Pages

Saturday, 30 April 2011

Yesterday was Arbor Day in America

Did you stay in yesterday morning and watch the wedding do you think they looked happy if a little amused by it all? Or perhaps for you it was an opportunity to get to the supermarket while it was quiet LOL.

In America yesterday it was Arbor day a national planting of trees.   The is something inspiring about a tree the timelessness they change with the seasons while remaining unchanging.   I like trees.

For this tag I have used Tando Wavy tag and the smaller of their Leaf Branch.   The tag has been coloured with Nick Bantock inks and then a Elusive Images tree stamped over the top.   The leaf Branch was placed on the tag and coloured to match the areas of the tag it would cover, the stamp was used on the tag when it was coloured.   Leaf Branch glued to tag.   Clarities flight of birds stamped top left but it is not clear in the picture.   The whole was then blasted with Glimmer Mist.


One of the nice things about Tando is that it comes in small packs easy to buy what you need without have stacks left over and those bits you might not use right away easy to store for when you do need them.   I used one of the tags from a pair and the smaller of the leaf branches.


Thursday, 28 April 2011

SCALLOPED BANNERS!

Helloooo, its Karen here today and I have been having a lot of fun creating banners for my niece & nephews new bedrooms!  I used the amazing single banner pieces that come in a pack of 5.  Each one comes in 2 pieces for decorating and they already have holes at the top for threading.  You can see the blanks ~HERE~. Here is Millie's, who is 3...


Here is a close up...


I painted the scalloped piece & dabbed chalk ink along the scallops to define them.  The upper piece was covered with paper and  painted grungy letters added.  Then a Prima flower popped on the bottom.  I threaded the whole thing with ribbon.  Although it doesn't show, its pretty glittery!!!  Then I couldn't leave little Max out could I?  Here is his...


Not so much glitter this time and buttons instead of flowers hehe!  Have to say that I do like the vobrant colours of this one!  So there you have 2 different takes on the banner!  Thank you so much for popping by today and do come back soon as we have something new nearly every day!!!! HUGS XXX

Wednesday, 27 April 2011

Hot stuff

We thought we'd go along with the weather this week and turn up the heat for some embossing on our pieces.

Carol used an arch for her first piece. The images have been stamped and embossed with clear and then the arch is coloured with Distress inks. The embossing resists the ink to reveal the images still showing the white of the board.

The Grungepaper butterfly at the top is coloured using Distress Stains and she's finished the piece off with a beaded pin and some steampunk cut outs.


Carol's second piece today cleverly uses a wavy twinche as a focal point on a card. The twinche was coloured with Distress Stains and then stamped and embossed with gold powder.

The twinchie is lined up over the same image stamped onto the base, making a fab textural contrast for the card.

Please pop over to {Carol's blog} if you'd like more details.


I chose an ATC to work with and also used emboss resist. The sentiment and flowers were embossed with white powder. I flooded each petal area with watercolour and then used a drop of reinker to colour the background before sponging over some sequin waste with a second shade of green. I also "stamped" a couple of leaves by pressing an inked-up skeleton leaf on there.

Full details of supplies {here} on my blog if you would like them.

The beauty of the white lined board for projects like these is that you get a really solid base that doesn't warp at all when you apply heat for the embossing and your colours go on true to form with no preparation needed - gotta love something that lets you stamp and go!

Thanks for joining us again this week!

Tuesday, 26 April 2011

Jig Saw Tags

Carol and Joanne have been doing a wonderful series of different techniques every Wednesday hope you will check back tomorrow to see what they have in store for us all next.

In the mean time here is a round canvas covered with TANDO Jigsaw tag set and all manner of other things.   The Clock Repair section of an old yellow pages has been cut out and used here stuck to one piece of Tando and onto the base canvas.  Another piece of Tando was run through the big shot with the T!M ledger folder and then coloured with layers of Distress inks.   Third piece was coloured with a light Distress Ink and then over stamped with a darker colour.   A strip of metal stamped with the same image and matched to the Tando piece.   The Tando has been stuck to the canvas with PVA glue and the dimension pastes used on the Canvas.

We have another long week-end coming and who knows the weather might not be so kind to us then, so when you have recovered from the wedding celebrations why not find out for yourself just how friendly Tando is.  There is a list of retailers here.

Saturday, 23 April 2011

Sandy's beautiful cards.....

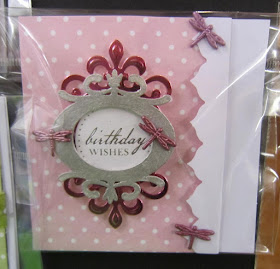
Our bookplates are so versatile and they are perfect for cards.  Just take a look at these fabulous cards that Sandy has made.  Take a look at the Craft Barn blog HERE for more information.


Friday, 22 April 2011

Another beautiful frame from Jean...

This time it is one of our round frames and this is gorgeous.  So many elements to look at.

You can find all the details on Jeans blog at Crafty Individuals HERE.


Thursday, 21 April 2011

I'd like to welcome our Guest Designer....

Kirsty Wiseman is a hugely talented designer and photographer and we're thrilled that she will be doing some projects with our chippie.

The first is this gorgeous layout using one of our flourishes, isn't it just adorable.  If you'd like to read more about this layout then do visit Kirsty's post on her blog HERE.


Wednesday, 20 April 2011

dry embossing

Hello!

It's my (Carol) turn to do the piece this week and this week we are exploring "Dry embossing".  There are so many different embossing folders out there, each one with its own appeal and all giving such fab results on paper and cardstock, so why not try it on Tando chippie....

Here are the results:-
Joanne has made:-

 this gorgeous domino necklace has been embossed using the cuttlebug Jamara folder along with acryllic paint and rub and buff..

and this gorgoeus notebook....

which was made out of a sheet of chipboard which was run thro' with a Tim Holtz Retro circles folder and the embossed sections hi-lighted with wax pastels, the piece was then gesso'd and rubbed back.  Embellished with aluminium tape, dymo labels and stamping create this stunning book.  Pop along to Joannes blog for a more details.

I have created this:-


The base is an atc blank which was run thro' the bug using the d'vine swirls folder....coloured using distress inks and hi-lighted using inka gold.  The tando domino in the centre was stamped with the text then embossed with the diamonds in the rough embossing folder then coloured with di's.  The gorgeous Tando dragonfly was painted using the neocolour 2 wax pastels and then blended before adding rock candy and pearls and beads.  Further info on my blog.

As you can see the embossing folders really create a good impression on the pieces and add depth and texture to your art work....giving it a try and see how you get on.

Don't forget that Joanne and I are here every Wednesday with different technqiues for you to try on your Tando chipboard.

TFL xx

Tuesday, 19 April 2011

The Croco Treatment.....

I've been playing again with some Tando Chippie and Viva Decor Croco,  I so love Viva Decor products, I have lots of them now and of course I have a tiny bit of Tando chippie too LOL.

The first is one of the Tando oval frames which I have covered firstly with Silver Croco.  Once it had dried I used the fabby Cosmic Shimmer Acrylic Drawing inks in four vintage colours and painted different parts of the croco.  The background is one of the new Impression Obsession Stamps in script which I then ran through an embossing folder to add some dots.


The birds (also Tando) were simply covered with patterned paper and the edges inked with distress inks.  A little dot of Viva Decor gloss gel gave the finishing touch to the eyes.  Gloss gel was also used on the stand.


The second piece has very similar techniques.  The chippie at the back again uses the Impression Obsession stamp and has been embossed as before.


This time I used 4 Tando wavy dominoes and a straight inchie for the Croco and Acrylic drawing ink treatment and then I finished off the piece with 2 Tando butterflies painted with Viva Decor metalic paint and the drawing ink to draw in the fine lines.  Oh...and gloss gel for the butterfly bodies.


Monday, 18 April 2011

Wavy bottom arch

When someone proposed a tag not in a traditional tag shape I knew just where to turn, my good and trusty stash of Tando Chippie. Frankly these day's I be in a right fix without it. This then is my non traditional shape tag.

Coloured the basic shape with distress inks, another essential, and stamped it. Stamped image coloured with Promarkers, butterfly both on vellum and on the chippie coloured with Dorso colours (its a kind of wax pastel but softer than the usual kind) the colour is spread and smoothed with Lavender oil. Another first for me on this Chippie the surface of which if not roughened or damaged in any way the colour is smoothly spread and settles on the surface like any other pigment, nice smell as well.


The arches come in pairs

Sunday, 17 April 2011

Using Tando Fluorish as a photo border

My very new lo was a bit naked and this fantastic  Flourish 3 Tando Creative chipboard was everything I needed to fix this. So it was inked with Ranger ink, heat embossed several times  with clear embossing powder and here it is- a perfect beauty for  my perfect daughter's photo


And as you all know- SWAK is just for Sealed with a kiss - I didn't know it and just asked as I got a stamp with this sentiment. I know it now enough even to use as my page title

Saturday, 16 April 2011

Bookplate on a box!!!

Hellooooo, these bookplates are really pretty and really versatile for all your projects!  Here I have used one of the small bookplates that come in a pack of 4, 2 each of 2 styles.  Don't be fooled into thinking that these are really small as they measure 7.5 cm each way, a really good size I think.  Here I have used one on the top of a 9cm x 9cm wooden box...


I kept it simple by just embossing the bookplate with silver.  I only did one coat as I quite liked the 'beaten' look it gave.  The box has ben sprayed with mica paints.


Looking at it now I can see that I should have gone round the edge of the word with ink but hey-ho, these things happen don't they? haha.  Oh and, yes, something precious is going in there!!!  Thank you for taking a look today and remember that there is something new posted most days so do come back!  HUGS XXX

Friday, 15 April 2011

Home Sweet Home

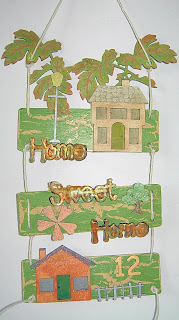
Wall Hangings and home decor hand made items are becoming very popular among paper crafters. Tando have lots of different sets that are perfect for including in your home make over and each one will be unique.

For this hanging 3 sets were used, at least in part plus the numbers from the Advent number set.    The Large Leaf Flourish came's as a single item, this one has been coloured with Promarkers in shades of green, yellow and orange.   The Home Sweet Home trio of plaques provided the three back plates which were painted with buff acrylic paint and allowed to dry, pva glue was then painted on and while wet green acrylic painted over it.   The different speeds of drying result in the cracks the thickness of the glue layer establishes the size of the.   The words also from the trio of plaques were dipped into UTEE (in a melt pot) a mixture of clear and cosmic shimmer orange.   Finally from that set 5 of the 6 little hearts were coloured with orange chalk and arranged in a flower shape.   The Short House set provided the street light the two houses the little bush and the fence.   These were coloured with Promarkers, Sakura pens and Chalk.   The houses were given a coat of Rock Candy Crackle paint and some Distressed Ink rubbed into the cracks.    Common or Garden string used to hang it all together.

These are the different packs and their entire contents, lots left over here for another project or two.


Thursday, 14 April 2011

Princess box with Tando fluorishes

I love to alter old and useless boxes and this heart shaped box was the one I altered lately
Those Tando Creative Fluorish 5 were just perfect addition to the glittery papers and stickers I used and I painted them with white paint and added some   white glitter
The 2 piece set was just perfect for 2 corners of the heart box, I wish I could add one  more swirl on third corner, but I just got one set, so I added flowers 
Hope you like the look of the box


Wednesday, 13 April 2011

Masquerade!

Hello, Joanne and Carol here again with the next of our technique pieces. We decided to play with masking this week.

Carol has used two sorts of masking on her fab piece and taken advantage of the fact that the white lined board means there's no prep to do if you want to use something like Distress inks straight on to the piece.


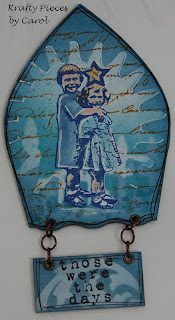
The girls were stamped and then masked with a hand cut mask. Some Tim Holtz masks have been laid over the top and then Carol has built up the effect with different shades of blue and some stamped text.

Carol used Distress inks to colour the girls and then stamped the sentiment on a domino shape that has also been masked and inked and then added it to the arch with with jump rings - doesn't that look fab?

Check out {Carol's blog} for more information.

I chose one of the journaling block shapes to play with.

I spray painted my piece black, then used some Tim Holtz masks (we didn't have a confab, honest - we just happened to both choose the big pointy cog!) and sequin waste and sponged silver acrylic paint on there. A stamped and heat embossed sentiment and a collection of random bits and pieces finish it off.

More details {here} on my personal blog if anyone would like them.

Thanks for joining us today, I hope you'll pop by again next Wednesday for the next in the series!

Saturday, 9 April 2011

Home Sweet Home Garland


I have decorated this Home Sweet Home Garland with My Mind's Eye papers, and coloured the words with a ProMarker.
The mouse stamp and the flowers are both from Tatty Button and have been coloured with ProMarkers, I have added some bling, some Rose chain lace and a couple of Prima blossoms.
I have attached it to part of a 12x12 chipboard sheet as it will be used for a demo at an upcoming show

Friday, 8 April 2011

Turning a new leaf

This chippie is tough it takes all the paints and treatments we throw at it and we are all still finding out just what it will do and how we can make the most of it!   Needing a bookmark for another swap this tall leaf seemed perfect.   Plain chippie coloured with Viva Inca Gold and then over stamped and embossed on both side.

Adding a chain and shrink charms punching a hole in the stem with a hole punch was like cutting butter.   How can it be so tough, strong and resilient and yet so each to punch holes in?


The leaves come in packs of four.

Wednesday, 6 April 2011

Colouring

We're back!! Joanne and I (Carol) have been having a play with various techniques to see how this FABBY Tando Chipboard stands up to our various styles.  Each Wednesday we will be posting another technique for you all to try and for you to see how the chipboard reacts.

This week we are starting off with Colouring.  There are lots of different mediums on the craft market at the moment, and each of them giving very different looks.

Joanne has used copics on this totally gorgeous hanging:-


and here's a close up


She has used a twinchie, an inchie and two domino Tando shapes along with twigs and wire to create this piece.  The images have been coloured in using copics....the board has taken the colour really well and kept the vibrancy of this medium.  See Joannes blog here for further details.

As my fellow crafters will know I love my watercolour pencils...so, initially I created this piece.


The blank is a journalling spot (another of my fav pieces) and a crafty individuals stamp was stamped and shaded using the watercolour pencils, hi-lights were added using glossy accents.

Not quite sure about that piece I then created this:-


The backplate is another journalling blank and the image by stampotique.  The colouring medium is neocolor 11 watersoluable wax crayons - the colour glided on with these and even with the water added the board didn't become saturated or drink the colour as so often happens.  For further details please see my blog.

Hope that you've enjoyed our first Wednesday piece - see you next week!

Inky hugz Carol and Joanne