Pages

Sunday, 30 November 2014

Christmas Baubles card

I'm finishing up Christmas week and I've made another card:


I painted 3 baubles from the ~{Small Bag of Baubles}~ with acrylic paint, blending to create shading. Once dry, I doodled the borders, added Glossy Accents and stuck some tinsel around the middle. Once this was dry I added some highlights using white pen.

They have been stuck to the card on top of a snowflake swirl stamp and a greeting stamp added. 

If you don't count the drying time (which I don't) it's a quick and simple card!

Kaz xxx

Saturday, 29 November 2014

Hanging Baubles

Hi everyone I hope everyone had a great Holiday with family and friends.  Now it's that special time of year again we all love Christmas and today I am sharing a card I made using the Tando Hanging Baubles stencil

I used various CTMH inks in the stencil and added a glitter vine and some bling to Christmas ball centers for added flair.  Below is the stencil I used to make this card.

Hanging Baubles Mask

I hope everyone enjoyed my post for today and Happy Holidays!!

Friday, 28 November 2014

Santa Please Stop Here...

...YES, please stop here Santa :-D  I ordered one of the personalised MDF *Santa Stop Here* signs as an early present.  Its brilliant as you can have up to 6 names on the stockings!!!!!  Its a lovely hanging to have!!!  I have only used 3 of the stockings but the other 3 are safely tucked away for when the family is added to!


The main part of the board has been painted and then over stamped with fir trees.  The houses have been covered in glittery patterned papers with the rooves covered in corrugated card.  I went round their edges with a red watercolour pencil to give them definition.


The stockings have also been covered with paper and drawn round with the red pencil.  All the lettering was painted red and glittered.


I glued some rough string around the main section and attached the stockings with a finer red string.  Then I rubbed some Treasure Gold around the whole thing to give a bit more sparkle.

There is a PDF of instructions available, just email Tando Creative.

Why not treat yourself to this, it could be one of your Christmas Treasures that come out year after year!  Take care, Karen x

Thursday, 27 November 2014

Christmas - A bit potty!

Hi there!

I have posted one of these pots for this months Tando Challenge also, so pop along there if you want to take part.  But I thought it fitting if I showed you more of them here, to fit in with the Christmas theme.

Shabby Chic your pots with some Tando chipboard!


They started life as plain wooden pots and with a little bit of Annie Sloan chalk paint and a Tando chipboard shape they ended up as nice little pots, ideal to pop a little plant in and give as a gift!

I used Tando Creative Reindeeer Large Running...


and a pack of 5 Snowflakes...


Caroline ♥

Wednesday, 26 November 2014

last chance for November Challenge

Its Carol with you today sharing with you one of my Christmas projects: this time I have used the mini printer tray with cover and come up with this:-


Tando products used:-


for more details pop on over to my blog…

also as its Wednesday don't forget a new project has gone live over on our challenge blog - 
its the last week of our November challenge - you still have time to join us…pop on over to the challenge blog and see what its all about!

Don't forget we have prizes!

Tuesday, 25 November 2014

Christmas Canvas with Dana


Hi Tando fans! Dana here today sharing another festive 3x3 canvas for our Christmas/Celebrate theme this week.


I layered a piece of Round Grid over my colored and stamped canvas. I love the dimension this layer of chipboard adds to my piece! (You can find all the Grid designs in the NEW RELEASES section of the Tando Retail Shop.) I framed my image with pieces of a Holly Flourish that I painted, stamped and glittered.

http://www.tando-creative.co.uk/catalog/holly-flourish-p-6.html
http://www.tando-creative.co.uk/catalog/grid-round-p-849.html


Thanks for stopping by today!

Monday, 24 November 2014

Celebrate Christmas with Irit

Hello my dear crafty friends!
Irit is here for the last November post and this time I am going to share my Christmas card made with Tando most gorgeous Stars oval.

I used vintage papers from FabScraps with some stars made with handmade stencil- just punched a few with a lot of sizes and inked them over the paper.
The oval was covered with paper and stamped sentiment and the stars were heat embossed with two kinds of powders: the lower layer was  simple gold powder and the upper one was this sparkle gold.


Friday, 21 November 2014

Decorated box!

This week I am bringing you a largish decorated Tando box!  The kit is actually the Tic Tac Toe Box but I have decorated it differently using different elements.


I made up the box before adding acrylic paints, using a different colour each side.  Lovely and bright eh?  On the top of the lid I used 2 sets of the FLOURISH 7 on the corners,  4 Twinchies (stamped) in the centre and then a Multi Loop Karen's Frame on top of those.


These are fantastic box to use to put that special gift in and they are incredibly easy to put together!  Here are the pieces that I used...

The main kit...I shall use the other pieces on another project!

The lovely corner flourishes...

The little frame...(pack of 4)

and of course the twinchies...
 
You can buy all these direct from Tando Creative *here*  Thank you for popping by today, take care, Karen xxx
 

Free For All with Kerri

Hello again Tando peeps.  Recently Tando got asked a question on their stencils that we didn't know the answer to, so what better way to find out then to experiment??  So that is what I did.  So the question:

One of you wonderful Tando followers wanted to know if stencil would hold up being used with UTEE (Ultra Thick Embossing Enamel).  Specifically the person wanted to lay a stencil on their work place, put a metal cookie cutter over part of the stencil and pour UTEE into the stencil.  The hope that was when cooled the cookie cutter shaped UTEE item would have the decoration of the stencil on the one side, but without ruining the stencil.

So I decided to try it out and see what happened, and I videoed the whole thing for you all to see so you don't have to take my word for it LOL.  

So drumroll.... IT WORKED!!!  Please watch the video below to see the results.


Here is the Tando stencil I used:  Distorted Hive Mask


I hope you all have some fun with this technique, it is definitely a lot of fun and could be a good way to make some fun Christmas ornaments this year!!

Happy Crafting!!

Thursday, 20 November 2014

Free for all for November with Irit


Hello my dear crafty friends and welcome to our Anything goes week!
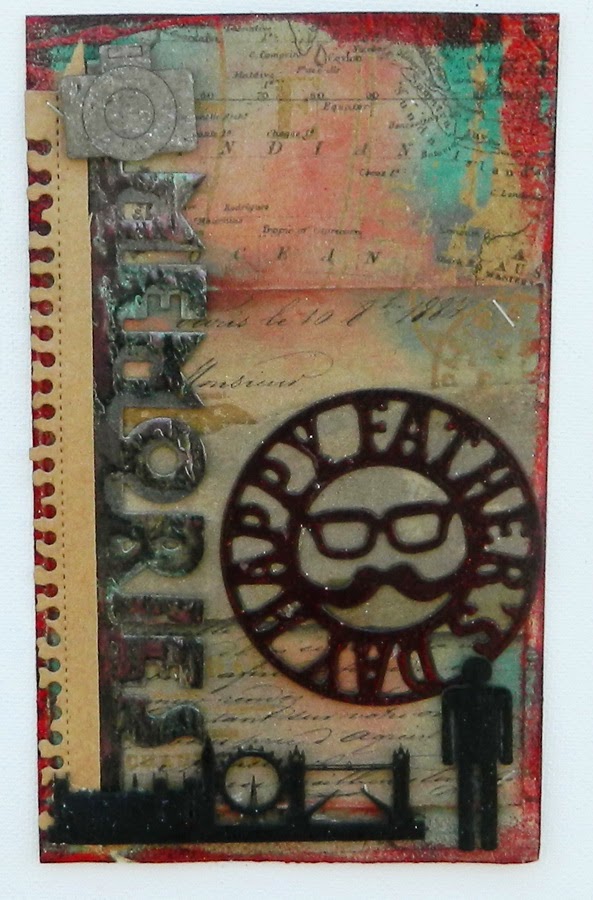
Irit is here again and this time with a card. Yes, just a card, but full of great Tando goodies such as a man shape, London skyline one and a small camera.
All together were added to this  masculine dark and heavy inked card and the just fit!
The lower shapes were heat embossed with black powder; the upper camera was just glittered a bit as I wanted to see the signs over the shape.
I hope you got some card making inspiration and see you soon again!

Tando products used here
London skyline

Camera

People


Wednesday, 19 November 2014

Free For All - Christmas Card

Its another Christmas card from me this week - I have to take any opportunity to make one at the moment!


This is a simple one, using the Joined Snowflakes mask.  I dabbed Weathered Wood Distress Ink through and it made a nice gentle background for the glittery snowflake.


You can find this lovely mask on the Tando Creative website, along with lots of other Christmassy masks and chipboard. Take a look!

Caroline ♥

Week 3 November challenge

We have had some great DT projects this month over on the Challenge blog - pop on over and see who is inspiring you today….don't forget for one lucky player we have prizes.

See you there.

Tuesday, 18 November 2014

Hanging Bauble Card

For this month's Anything Goes week I've made another simple Christmas card:


I used the ~{Hanging Baubles Mask}~ directly onto the card blank with inkpads, taking care to mask off the bits I didn't want inked each time.

I added a simple snowflake stamp to the middle of the 2 bigger baubles and then a bit of glitter glue. I finished it off with a greeting.

While I was looking through the deep, dark depths of my blog for another Christmas Tando make, I discovered that I made the exact, same card as this 3 years ago!! Even down to the same greeting stamp in exactly the same place!! Oh well, here it is again!!!

Kaz xxx

Monday, 17 November 2014

Free For All - Altered Matchbox


Hi Tando fans! Dana here today starting of our Free For All week with an altered matchbox. I was inspired to make this piece after seeing some gorgeous matchboxes created by Gio Zara, who has her own line of amazing stencils out with Tando.


I started with a piece of sheet music which I then distressed with ink and wrapped around a matchbox. I layered a piece of lace and a twine bow over the paper. I then covered circle waste from the Round Grid with gesso and glitter and glued them randomly around the box. I topped the box with an embellished Mini Book Plate to finish.

http://www.tando-creative.co.uk/catalog/mini-book-plates-p-303.html http://www.tando-creative.co.uk/catalog/grid-round-p-849.html

Thanks for stopping by today! You can pick up this chipboard, and everything else put out by Tando, in their new Retail Shop.

Sunday, 16 November 2014

H-Ho-Ho

Hi everyone Monica here I am sharing this cute Christmas house with the 3d Chipboard Bird House from Tando Creative I really love how this came out

3D Bird House

 Be careful you see Santa climbing around lol


 Santa is cruising by with his reindeers!!
I hope everyone enjoyed my post for today and this is a perfect piece for a table or mantle
Simply Monica

Saturday, 15 November 2014

Christmas Countdown

Helloooo!  To count down the days in December Tando have come up with this gorgeous *CHRISTMAS COUNTDOWN FRAME KIT* .  You get all that you need to make this, except the decorating materials!  Its free standing and is around 28cm tall to give you an idea of scale.  Currently its not on the Retail Site but will be there soon!  Keep checking and in the meantime look out at your local stockist!


I have used paint on all the pieces, adding some stamping to jazz up the frame.  The stockings have been glittered.  I added Crackle Accents to the frame for more dimension and a little fir cone that I found.


Here is how the kit arrives but don't be daunted it really is easy & quick to put together so plenty of time!


A perfect decoration in the build up to Christmas!  Take care, Karen x