Pages

Monday, 24 June 2019

Using spray paints/inks on a project - Brenda

Today we start a new theme and this week we are using sprays on a project. I hunted out some old bottle of colour sprays and used them alongside a DecoArt white mister spray and got some really quite nice results.


I used a media board painted with gesso and when dry scraped white modeling paste through a stencil.


These pieces I took from a bits box which were already painted - leftovers from previous projects.


I also grabbed these from another bits box of Tando leftovers to add to the design. As you can see these were not painted or sealed so I started by gluing these to the media board ...


.... and when dry I gave it all a coat of gesso.


Next I sprayed some water based sprays and DecoArt white mister over the surface, dried it and repeated again to give me my base  colours ...


.... and then dribbled some watery media acrylic paints, ....


.... sanded and inked the edges of the board and finished with some splatters of titanium white.


Because the sprays I used were water based they created some lovely mottled effects together when I spritzed them and when I repeated the layer. 


Keep a lookout for some other projects coming up from the team this week.

Thanks for stopping by.

hugs Brenda xxx


Supplies from Tando Creative
Media board, chipboards.
Andy Skinner stamps and stencils
DecoArt Media gesso, misters

Sunday, 23 June 2019

Wandering Heart Tag - Anything Goes by Jane

Hello!

This week the theme on the Tando Creative blog is 'Anything Goes' so I couldn't resist decorating another of the tags for my technique binder, although I am using mine for journaling tags.  I also wanted to use some of the fabulous steampunk parts that Di recently brought to HOCHANDA and mixed it up with some other bits and bobs from my Tando crafty stash...


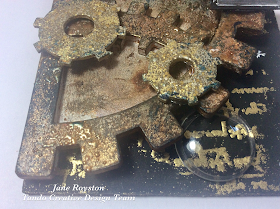
To start I got out lots of my greyboard pieces and decided which I would like to use.  I quickly chose the cog piece with the smaller cogs inside to be the main focal element before choosing some extra cogs from the minis and some wings and a heart. 
 
These pieces were primed with white gesso then I used pigment powders, acrylic paint and embossing powder to colour them until I was happy.  As I wanted the heart to stand out I used red paint then coated it with glossy accents, putting in a small gem whilst the glaze was still wet...


As the main elements were quite 'busy' I wanted the background of the tag to be reasonably plain, so I painted the tag with black gesso then used parts of the XL script stamp by Bee Crafty with some detail gold embossing powder...
 
 
When the tag had been put together I felt like it had a celestial look to it, so chose a sentiment from the Tim Holtz small talk stickers that went with the theme and added some white pen to the words and some little stars to the background,  I also added a few clear gems just to finish it off.
 
Here are the products I used:
 
 
Thank you for looking and happy crafting!
 
Jane xx


Saturday, 22 June 2019

Anything Goes week - Moroccan Sunshine


Morning everyone,

It's Anything goes week at Tando Creative, and my make for you today is one of the Giant Media Boards, which I squealed when I saw, as they are just a fab size for creating on, and something different.

The Media board was painted with a coat of lace chalk paint first.  Then I added a wash of Yellow Iron Oxide, followed by filling in the whiter spaces where the paint drained from, with a pale blue chalk paint wash.

The background was stamped with a texture stamp,  I used Archival Coffee Grounds ink for this.

I had a sheet of the lovely Moroccan style lattice, and thought this was perfect to add.  I painted it in the pale blue chalk, and then added 'rust' with quinacridone gold and Raw Umber, to look like an aged window grill.  To enhance the colour I used Andy Skinner's new Embossing Powder, Funky Cold Patina in small area's.


I stamped the beautiful Sun stamp from Stamperia twice, and cut out just the face to layer up.  I coloured this with my Prismacolour pencils, I felt like a change!  This was glued and then pinflair added to 3d the face.


The sentiment is a Mitform Casting, and I thought Journey was appropriate on my sunshine travel theme.


I punched holes at the top of the media board with a Cropodile, edged the whole board in Versafine Majestic Blue, and added wire and beads to finish.


Hope you like it, it seems fitting as we are going to get rather warm weather next week apparently!

Make sure you check out the rest of the team's fab makes this week, for more inspiration.

Best Wishes,

Nikki Killinger. xx

Products Used:

Tando Creative
Extra Large Media Board
Grid - Moroccan

DecoArt Media
Yellow Iron Oxide
Quinacridone Gold
Cobalt Teal Hue
Raw Umber
Americana Chalk Paint Lace
Pale Blue Chalk paint (mixed Cobalt Teal Hue with Lace).

Andy Skinner - Textures Rubber Stamp Set
Andy Skinner Embossing Powder - Funky Cold Patina (New).

Stamperia - Sun Stamp
Mitform Castings Journey word.
Versafine Coffee Ground Ink
Versafine Majestic Blue Ink
Prismacolour Pencils.


Thursday, 20 June 2019

Tando Creative 24 Play Days- Inspiration by Monika Maksym

Hi
Today I'm going to show you step by step how to create this tag.

Start with painting the tag with black acrylic or chalky paint.


Dry it using the heat tool.


Using brayer apply coat of white chalky paint. 


Repeat the step with yellow paint

Stamp your chosen images


Colour in using ink or paint


Cut out the images and stick them on the tag


Products used:


Thank you for looking

Monika

Wednesday, 19 June 2019

Anything Goes Father's Day Card

For the Anything Goes theme I'm showing the card I made for my dad for Father's Day using the new  Extra Thins we have released. Although these are aimed at art journalling, they are perfect for cards as they don't add any bulk to the card.


I've used Distress Oxides smooshed onto my glass mat and dabbed onto card for the base. I also used watered down {Payne's Grey Fluid Acrylic} splattered on the base.

I sprayed the {Extra Thins - Rectangles} with black ink and included the shapes from the cut outs.

I painted one of the hearts from the {Grab Bag of Hearts} with acrylic paint then mixed some {White Crackle Paste} with 2 drops of {Phthalo Turquoise} then added it to the heart. Once dry, I've used Black Soot Distress Ink to get deep into the cracks.

I've finished it off with a gem and a stamped and embossed greeting.

Tuesday, 18 June 2019

Play Day tag: Using texture sand paste

It was my turn last week to do a Play Day tag.  I had spent a day with Fiona Randall just beforehand and she had mentioned a technique using gel medium, paint and 2 pieces of paper so we experimented with a variety of other mediums to see what happened.

My tag uses Texture Sand Paste and I did a Facebook Live in Tando's Creative Zone showing everyone how to do it :)

Here is my finished tag.

Monday, 17 June 2019

Anything Goes with Brenda

It's an Anything Goes week here again at Tando Creative and I'm starting the week with this little stencil set. When Di designed and cut some new stencils for Andy Skinner she also cut two covers  for them so they could be kept together as a set. I did a simple background and made the covers fairly flat so they could sit in my drawer.


Process steps
1. Take tag and give it a random coat of white gesso.
2. Paint cerulean blue acrylic paint mixed with a little water over the whole tag and dab with some kitchen paper to remove some of it from the gesso. It will of course soak straight into any greyboard that is left exposed.
3. Use a small palette knife and scrape some white gesso lightly and randomly over the surface keeping the flat of the palette knife level with the tag. Dry.

 4. Seal with a coat of decou-page.
5.  Mix a little prussian blue hue 50:50 with glazing medium and paint over the tag and gently rub back with dry kitchen roll and a babywipe keeping the dark blue to the edges.


 6. Mix a little quinacridone gold with water, dribble on one place spritz with water and move around and dab some off with dry kitchen paper before drying. Repeat in another couple of random places.


7. Mix a little paynes grey with water and dribble around the edges, spritz with water and dry. I worked on about a 2 inch spread at a time.
8. Use the two different stencils - similar to American car number plates and with a palette knife spread black modeling paste through them and leave them to dry naturally.


9. For the inside covers, use a palette knife to spread a smooth coat of everlasting chalky finish paint over the greyboard, give them a watery wash all over of cerulean blue and dry. Mix a watery wash of prussian blue hue and dabble, spritz and dry around the edges. Heat dry and finish with some stamping and some colouring and a light quinacridone wash to tie it all together..
10. Seal both the insides and outsides of the overs with a coat of ultra matte varnish. 


These are great for altering and are useful to use to cover the stencils. You pick them out in an instant when they are with other stencils in a drawer.


I hope you'll be able to pop back during the week to see what projects some of my lovely teamies are showcasing.

Thanks for stopping by.

hugs Brenda xxx

Supplies 
Tando stencils and stencil covers. 
DecoArt media fluid acrylics - cerulean blue, prussian blue hue, quinacridone gold 
DecoArt mediums - white gesso, black modeling paste, ultra matte varnish, decou-page sealer

Wednesday, 12 June 2019

Nature Has It - Journal Tag by Jane

Hello!

This week on the Tando Creative blog the theme is 'Nature Has It' which means that we needed to include something natural within the project. 
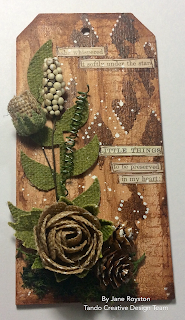
I decided to create a tag for my technique binder that I am using for journaling and make the whole project nature inspired...


I started by creating a wood effect background using weathered wood and crackle paint tinted with burnt sienna fluid acrylic.  Then I added some washes of burnt sienna and burnt umber.

To create extra interest in the background I stencilled with the Tando mini distressed diamond stencil and used a script stamp with archival ink.

My main feature was a group of flower elements from Little Birdie along with some real mini pine cones and moss.  The final element was some Tim Holtz clippings which I chose and put together as my journaling...


Here are the products I used:

* Tando Creative - Technique Binder and Tags
* Tando Mini Stencil - Distressed Diamond
* Decoart Mediums
* Decoart Fluid Acrylics

Thank you for looking and happy crafting!

Jane xx

Tuesday, 11 June 2019

Art Techniques Tag “24 Play Days” By Lisa Winnard


Art Techniques Tag “24 Play Days”
By Lisa Winnard for Tando Creative – June 2019

For the “24 Play Days” tag this week, I decided to concentrate on creating a mixed media piece rather than focusing on just one particular technique.
I have tried to include as many techniques and different types of products as I could to make this piece.


List of products...

Tando greyboard – tag, compass (small), Mini’s Arrows
Tando - hearts stencil
DecoArt Premium Acrylic Paint – Pyrrole Red, Cobalt Teal Hue, Texture Sand Paste, Crackle Paint
Rice paper
Sketchbook paper
Chequered stamp (Carabelle Studio)
Crochet flowers
Ribbon
Wool string
Gesso - black and white
PVA glue
Collall glue


STEP 1
Paint the Tando tag with a coat of white gesso and dry with a heat tool. Paint a coat of Cobalt Teal Hue with white gesso to create different shades and lines of colour. Dry.


STEP 2
Apply PVA glue to the tag. Place rice paper over the top and smooth down with a paintbrush and PVA glue. Tear or cut the excess.


STEP 3
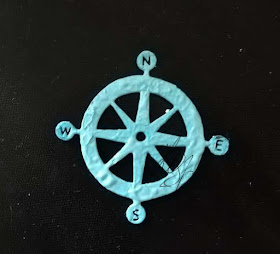
Paint the Tando compass with black gesso and dry with heat tool.


STEP 4
Mix DecoArt Cobalt Teal Hue with DecoArt Crackle Paint and paint the compass. Let it dry naturally. When dry add some black and white smudges of gesso to distress the compass. 


STEP 5
Take the arrows and apply DecoArt Texture Sand Paste. When dry, paint with black gesso.


STEP 6
Add DecoArt Premium Acrylic Pyrrole Red around the edges of the rice paper covered tag.


STEP 7
Stamp the chequered stamp around the outside of the tag. Stencil some hearts with the red paint.


STEP 8
Fussy cut an image/s from scrapbook paper.
I chose an Alice in Wonderland themed sheet of scrapbook paper which I cut several pieces from. The character, the checkerboard borders, the sentiment/words and the floral tag.


STEP 9
Start to arrange the scrapbook papers and the other elements on to the tag. Stick them to the tag. I used Collall glue for the majority of the elements but raised Alice using foam tape.


STEP 10
Colour some white crochet/fabric flowers red but not completely. (Initially I chose teal flowers which matched the blues in the pallet. But then changed my mind after singing “We’re painting the roses red, we’re painting the rose red”...)
Adhere these under/around Alice’s feet.


STEP 11
Chose a couple of different ribbons/yarn/string/wool for the tag hole. I chose some red ribbon with white hearts (to match the stencilling) and a length of teal blue wool yarn.


 Toodles for now...
Lisa