Pages

Wednesday 27 November 2019

'Mystical In The Stars' by Jane

Hello!

This week on the Tando Creative blog the theme is 'In The Stars' and I decided to go for an astrological feel to my project...


I decided to decorate the triple arch astral frame that was on the most recent HOCHANDA shows with Di and Fiona.  

After sticking my frame pieces together I dabbed texture sand paste over the arches using my finger and once it had dried painted the whole piece plus the decorative inserts with black gesso...


Next I used the Decoart interference paints in turquiose, violet and gold across all the pieces then once this had dried used gold gilding wax to add extra highlights to the texture...


Then I put the acrylic circles into place and attached the decorative pieces.  Finally I added some stars that I had cast in a mould using clear resin and purple glitter, and used a bit more gilding wax on top to tie the whole piece together...


Here are the products I used:


Thank you for looking and happy crafting!

Jane xx


Wednesday 20 November 2019

Anything Goes Week - Mini Book Case by Nikki K


Morning all,

It's Anything Goes week so I have decorated one of Tando's fantastic Mini Book shelves.  They are the perfect storage for your little book collection.

I started by painting all the pieces in Rouge Chalk paint.  Be careful to avoid the tabs if you can, it makes it easier to glue your pieces together afterwards.  I used a brayer to paint, it gives a nice smooth even finish with not too much paint.


I took a Chocolate Baroque Feather stamp and stamped the whole bookcase with tiny feathers.  This was followed by a coat of Crackle medium, but at this stage my crackle failed for some reason, so I went back in with a coat of Matte Varnish, which I actually preferred the look of anyway.  You can always cover up or change the look of something, if all else fails, paint it again!  We all make mistakes, and it's more fun experimenting.


I covered two Tando Mini feathers in modelling paste to make them look more realistic, and when dry painted in black gesso.  These were glued to the back of the bookcase top shelf.


I edged the bookcase in Iced Espresso Metallic Lustre to finish.

Now I need to make more mini books to fill it...

Best Wishes,

Nikki K
xxx


Wednesday 13 November 2019

Texture Paste Cog

Hi there, it’s Celia here with a look at texture pastes. They lend themselves very well to rust effects, and I find they're so useful to add interest to a project.
I decided to use four different pastes together, because why just use one! I used DecoArt Sand Paste on the cogs and stippled some Andy Skinner Lava Paste on the big MDF cog. This needs heat setting to make it puff up. If you stipple it on finely it creates a nice pitted rust effect.
For the base, I used a 6x6 greyboard sheet and stuck on some Tim Holtz Abandoned collage paper. I discovered that the big cog is the same size as the cut outs in Fiona’s new Layered Tags, so I cut one out to put behind the cog. I just sprayed this black.

I used a spatula to apply Andy Skinner's Strata Paste and DecoArt Crackle Paste randomly around the edges of the base board.

When this was dry I stippled on a mixture of DecoArt media fluid acrylics to roughly match the colours of the paper (Burnt Umber, Green Gold, Pthalo green yellow, Transparent Iron Oxide). I also stippled some rusty colours on the big cog. Then I dry brushed the texture pastes with Titan Buff to highlight. I also coated a couple of small cogs from the minis cogs tag with some Ferro.

Then I added a couple of washes to tie it all in together before assembling. I added some silver Gilding Paste to the cog to highlight the rusty texture. The combination of the different texture pastes produces all sorts off yummy crunchy goodness!


And here's the finished piece - 

Thanks for stopping by!

Celia x

Tuesday 12 November 2019

A Tag of Many Textures!

Hello!

I am on the Tando Creative blog today as part of 'Texture' week.  One of the many things I love about mixed media is the building and layering of different textures so I decided to decorate one of the technique tags using texture paste along with some grey board pieces and other materials...


First I added some texture paste through the distressed diamonds stencil from Tando Creative, but to add even more texture I tapped the paste with my palette knife to create extra peaks.  Once this was dry I painted the tag and the other grey board pieces with white gesso...


Next to create my colour I used some acrylic inks with water.  To help bring out the texture underneath I rubbed over gold gilding wax and then used black archival ink around the edges and across the texture too...


At this stage I felt that the tag needed some more interest so stamped the distressed diamond background from Bee Crafty using black archival ink...


Finally I built up my focal point using the grey board along with some cambric material, cotton thread and an acetate butterfly from Tim Holtz as well as some faux gems for the butterfly's body.  To create the finishing touch I adhered one of the Tim Holtz chat stickers at the bottom of the cambric...


Here are the products that I used:


I really enjoyed incorporating lots of different textures into my project.  Thank you for looking!

Happy crafting,

Jane xx

Sunday 10 November 2019

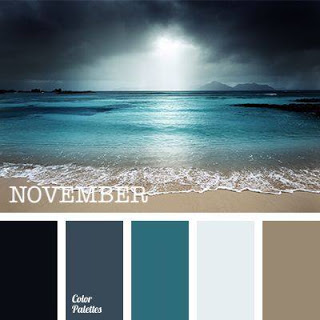
November colour week

Good Morning, Carol with you today bringing this week's theme to an end.

The colour way for November has been:-


Here is my ATC coin 11/12 and ATC (card) 11/12


For the card:-


I've used some harlequin extra thins along with a butterfly from the tag and a feather 

My coin is based along the same lines:-


This time I've used the extra thin circles and a smaller butterfly and feather.

TFL xx

Friday 8 November 2019

Thursday Twinchie Tutorial

This week's Thursday Tutorial uses the new Organic Twinchie set.


You can find step by step photos HERE

Wednesday 6 November 2019

Sea Heart

Hi There!

It’s Celia here today and November's colour theme is this gorgeous selection:

I selected my colours - PaperArtsy Midnight, Turquoise and Glacier Ice, and a mixture of an old paint dabber in Mushroom mixed with Yellow Iron Oxide. I chose the Flaming Heart, the Scribbles Heart Thins and a Mini's heart for my tag. I stuck them down and added a few patches of DecoArt Sand Paste before painting them first with PaperArtsy Glacier Ice.

I then stippled in the other colours with a hog hair brush, keeping the darker Midnight round the edge and working the lighter colours towards the centre. I added a bit of DecoArt Ferro for some sparkle and texture and dry brushed the thins with Glacier Ice to highlight.

For the Flaming Heart, I painted the base with Blue Lagoon and used a translucent embossing powder (Emerald Creek Fractured Ice). I used Cosmic Shimmer Lagoon Lilac Aurora on the small heart and Heat it up Aged Gold on the outer heart.
Then it was just a matter of gluing on the Flamed Heart and adding a ribbon coloured with spray inks.

I hope you like my tag! Thanks for stopping by,

Celia x

Tuesday 5 November 2019

Colour Theme ATC

The colour theme for this month is probably my fave of all year:


I took some of the inner pieces for the new {Twinchies - Organic} and stuck them onto an {Artist Trading Coin} then gave everything a coat of {White Gesso}.

I then blended various acrylic paints over the ATC until I was happy.
Once dry I stamped a text stamp onto the light turquoise (which you can't see on the photo).
I then dabbed white paint onto the raised bumps.
I dotted paint around the edges and then used gold watercolour paint onto the dots to make them sparkle.
It's finished off with one of my fave Stampotique stamps, a word and some doodles.

Saturday 2 November 2019

Spooky and Creepy

Hello Everyone and thank you for joining me (Carol) this Saturday.

I created these Artist trading coin and card for the colour week, but, due to personal reasons didn't get to publish them, so, they are having their outing today!


Both were painted with red acrylic paint and then using a stencil I created a background.  Ephemera was added to both pieces, along with a stamped spider….


TFL xx

Friday 1 November 2019

Spooky & Creepy by Nikki


Hi everyone,

It's Spooky and Creepy week here at Tando, and I've just got a tag to share with you that I made for Di's recent Hochanda shows, but it didn't get seen as I was poorly, so I thought I'd share with you now.

The tags were designed by my lovely teamie Fiona Randall, and brought to life by Tando.  This is just one way you could decorate yours if you were lucky to get them on Hochanda last week.


I started by putting modelling paste through a stencil, and then painting the whole tag black, front and back pieces.  They were then glued straight together, making sure I glued around the keyhole well so it was a sealed 'bezel'.

I used Pebeo Paint in Fantasy Prism, and carefully used a lolly stick to spoon paint all the way into the key shape.  When this dries it does mad things and creates fab patterns in the paint.

I painted a  spider in black, and a cobweb, and adhered to the tag.  Finally I dry brushed the whole thing with silver, to pick out the detail.


Hope you like it, don't forget to check out the rest of the team's Spooky and Creepy makes this week. x

Best Wishes,

Nikki K
xxx

Products Used:
Tando:
Spiders Grab Bag
Layered Tags
Haunted House stencil (bats)

DecoArt Media Line:
Metallic Silver
Black Gesso

Other:
Pebeo Fantasy Prisme paint.