Pages

Tuesday, 31 August 2021

September Colour Week

 Hello,

Carol with you today with my September (and August) tag…. The month's seem to be flying I can't believe that its September tomorrow.

So, the colour way for September is:-


such autumnal colours

and here is month 9's tag:-


so, August, saw the introduction of the very talented Fiona Randall's first stamp and stencil sets and I was lucky enough to be able to design some pieces for her… but, I also used them on my August tag, which, for many reasons never got published, so here it is…


Tando items used:-

Tags - found here

Fiona's stencil, moon rays - found here

Fiona's stencil, Moon phase - found here


TFL Carol xx

Wednesday, 25 August 2021

Product Focus - Box Storage - Jan Bradfield

 Hello lovely Tando-ites, 

As Fiona has said, our theme this week is product focus and with so many to choose from I think we'll be kept busy for a while 😂. Ive chosen the large new box and drawer to decorate. We all know that Tando greyboard is fantastic but you wont believe what i've put this poor box through. It was supposed to be ready for Di to take to the Craft Store show recently, but i was decanting, from a big bottle to a little bottle, glue... yep, I forgot to put the top back on and knocked it all over this and one other piece the day I was going to send it to Di!

I really took my time making this one as I wanted to really play with layering both the elements and the colours and I really urge you to do the same, making sure all the layers are dry before going to the next layer... and move everything out of your clumsy elbows way... just in case...

My inspiration was taken from something I'd seen years ago, by Natassa Blazaki I think, and I have far more cogs than I can ever use so this was a perfect opportunity to use some of them!

I assembled both the box and the drawer and started layering the cogs, some are card stock, some are chipboard, there are Tando greyboard ones and even some metal ones. The cardboard ones I glued together to make thicker and with one of the Tando greyboard ones I sprayed water and bent them round the edge of the box, then left them on the window sill to dry to continue the layering around the sides. I find it really hard to get good paint coverage if I layer everything up and then paint, so I painted each layer as I went. I used Chalky Paint in Relic for my base colour.

Next came the ugly stage... a light blue, a medium green and a deep purple (don't ask me how I came up with those three! I'd mixed the paint in to a little Textured Sand (to hide the spilt glue that I couldn't get off!).

...do not give up at the ugly stage, heres why... 

You need the lower (first) layers to give your piece depth, Whether its a card, canvas or a 3D piece. The lower layers give you a base to work on so it really doesn't matter that they are ugly. See the photo transforming from ugly - blue, purple, green to much nearer the end piece, in just one watery layer of quin gold…

I followed the quin gold wash with a paynes grey wash and finished with another quin gold wash, dabbing some undiluted to a few places. don't overthink these washes, let them do their job, it will look much more natural if you don't try and 'correct' it. if in doubt add a spritz of water to loosen any hard lines. I finished with my favourite waxes in Aged Brass and a tiny bit of Rusty Red. The central piece on top and front are resin pieces from my stash that have had a similar treatment to the box.

These storage boxes are so fabulous to work with. I used a lot of paint and water on this project and it didn't budge 💜

Have a look in your stashes...what do you have way to many off? Start layering, you can achieve a fabulous 3D project in no time 👍


I used:

Large Storage Box

Cogs Large and small

Decoart Fluid Acrylics in: Quin Gold, Paynes Grey

Decoart Chalky Finish in : Relic

Decoart Texture Sand

general paint from my stash: light blue, medium green and purple.


Monday, 23 August 2021

Product Focus- Tando Coasters- Fiona Randall


Morning All it's Product Focus this week on the Tando Blog. 

The DT will focus on the vast array of products available on the Tando website and hopefully give you some ideas and inspiration to try something new.

For my project I have focussed on the Tando Coasters. These are available in Square, Round, Octagonal, Hexagonal, and Square Clipped.

A great Item to decorate and functional too to either keep for yourself or give as a gift.

I have used both the Square and the Round to make two sets.

Round Set.


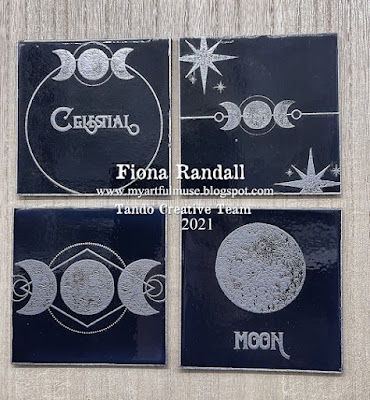
Square Set.


I started by giving the coasters a coat of DecoArt Chalky Finish in Rouge for the Round Coasters and Carbon for the Square Coasters.
Next up was some stamping with my new release stamp sets available from Chocolate Baroque which were launched on the Craft Store on 6th August.
For the Round Coasters I stamped with the Sacred Nature Stamp set with Versamark ink and heat embossed with Gold Embossing Powder.
 The edges were then inked with Black Archival Ink.
For the Square Coasters  I stamped with the Celestial Stamp Set with Versamark ink and heat embossed with silver embossing powder.
 The edges were then inked with a Brilliance ink in Platinum Planet.
The next step was to seal the coasters and for this step I used DecoArt Pouring Medium Top Coat. This gives a high gloss shine when dry and is non yellowing too. I applied the top coat by poring straight from the pot onto the coasters and tipped and tilted to spread out until the coaster was completely covered. The beauty of this top coat is that it is self levelling too. Easy Peasy. The coasters were then left to cure and dry overnight. 
The final step was to apply self adhesive cork to the back of the coasters to finish.
I am really pleased how these turned out and will be making more.
Thanks for stopping by today. 
Please check back to see what the other DT  Members post.
Stay Safe
Fiona xx

PRODUCTS USED.


OTHER PRODUCTS.

Ranger Archival Ink- Black.

Tsukineko Brilliance Ink Pad- Platinum Planet.


Tuesday, 17 August 2021

Anything Goes Week- Fiona Randall


Morning All it's Anything Goes this week on the Tando Blog.

I have decorated one of the Tando Binders with one of my New Stencils produced by Tando Creative that were Launched on the Craft Store on 6th August.


I love these Tando Binders and the bonus is they come with 12 Tando Tags too.
I started by giving the binder a coat inside and out with DecoArt Chalky Finish in Carbon. Once dry a coat of DecoArt Ultra Matte Varnish was applied to both inside and out of the binder to seal and protect. Next step was to cut a piece of 300 gsm cardstock to fit the front cover. I then applied DecoArt Media White Modelling Paste through my Moon Circle Stencil. Once the modelling paste was dry I then sprayed the cardstock with Distress Oxide Sprays in Black Soot and Peacock Feathers along with Lindy's Stamp Gang Sprays in Martian Magenta and Galactic Teal. I then spritzed with water to blend and dried with a heat tool. Once dry I replaced the stencil  lining up and coloured with a gold Posca Paint Pen. I then added spatters with the new Tim Holz Distress Mica Stains in Crooked Broomstick. The edges were then Inked with Black Soot Archival Ink. The Cardstock  Panel was then glued to the front cover of the binder using DecoArt Decoupage Glue Matte.
A nice little binder that is the perfect size to store my new stencil collection.
Thanks for taking the time to stop by and read.
Stay Safe
Fiona.

PRODUCTS USED.


DecoArt Decoupage glue- Matte.

OTHER PRODUCTS.

Tim Holtz Distress Oxide Spray- Black Soot and Peacock Feathers.

Ranger Tim Holtz Distress Archival Ink- Black Soot.

Lindy's Stamp Gang Starburst Sprays- Outer Space Set.

Posca Paint Pen- Gold.


Friday, 6 August 2021

Fiona's new Sacred stamps


Hi everyone it is a long time since I have done a post on here. My friend Fiona Randall is launching her new stamps and stencils and asked me to do some samples so here are mine using the stamp set. I used distress inks along with distress glaze. matt glaze mixed with rust to the edges. 

  
I used a Large matchbox from Tando Creative to show case the stamps as it has lovely little boards inside that you can decorate. I had put droplets of water on the distress inks prior to glazing it.

I stamped with black versa claire and clear embossed the image to make it pop.


I attached a knob and painted a board with chalk paint and allowed to dry prior to embossing with old Copper embossing powder.


I added some cogs and a corner piece to finish it.


The card above using the same stamp set i coloured some card with distress then stamped the image using the same stamp set. I added accents with triple embossing and pressing the stamps into the hot powder.

Tim holtz patterned paper was stamped then gold embossed triple embossed pieces were cut out and glued on. I applied Deco art antiquing cream in both white and patina. The odd gem randomly placed to finish it off. All these sit inside the Matchbox so you have storage!