Pages

Thursday, 31 March 2022

Art Box - It's Magic - by Kim


 For this project I used the deep ATC Art Box. Like any good magician I thought this box should be sawn in half. But this was easier to do before I stuck the pieces together, because I didn't want the cut to be boringly straight. See pictures.

Be very careful when using sharp tools to cut the greyboard.


Check to make sure the bits fit together before you start glueing, and that they match up neatly.

When dry I base coated the bottom half with texture paste and added some small Art Stones to give it some interest. When dry I painted it Forest Green then dry brushed Primary Yellow to highlight the Art Stones.

For the top half I used some of Julie's homemade background paper. I painted the inside of the box black.


At some point our magician will pull either a rabbit from a hat or a string of hankies from a sleeve, or in our case a bunch of flowers from an Art Box.

I used a die cutter to press a bunch of flowers from ordinary paper, reinforced with slivers of wooden coffee stirrers. I made enough so that they sprang apart when the lid was pulled off. The flowers were coloured with a selection of watercolour paints.

Squeeze the flower heads gently so they fit inside the lid, then secure the box with a red ribbon.


Abracadabra! Thanks for visiting!

Products:

Background or scrapbooking paper of your choice
Fancy ribbon
Die cut paper flowers

Wednesday, 30 March 2022

Trinket Box Books Trio & Shelf By Dee

Hi everyone I hope you are keeping well and safe. I have for you today this lovely 
Trinket box trio and shelf.


I used Tando creatives lovely new stencil it comes as a set of 4 Background and flourish Stencils.


I used Andy Skinners grungy floral rice papers along with his Vintage rice papers.


Photo of Inside the box .


Photo of the shelf.


One of the gift box's


Second gift box


Third box


shelf with all three gift box's.

Tando Creative Products


Tuesday, 29 March 2022

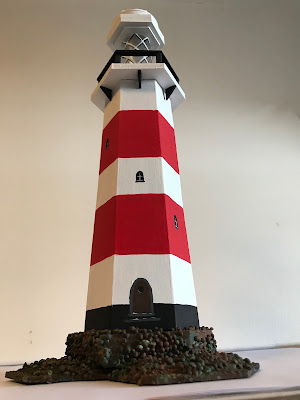
Hex Tech Tuesday - A Beacon of Hope - by Kim

 Let's make it difficult for ourselves! All the best lighthouses are tapered towards the top, so my challenge was to achieve that with the Hexagon kit.

We'll start with the tower. You'll need an empty cereal box, a hexagon with 3cm sides, and a hexagon with 4cm sides. My tower section is 20cm tall. Mark out the shape on the cardboard box (see diagram at the end - it's easier than trying to explain in words!).

Cut out the complete shape. I scored along the fold lines with an embossing tool and steel ruler, fold carefully and sharpen the folds with a bone folder.

I used a fast setting solvent glue for this bit. Starting next to the flap glue the larger hexagon in place with the first two sides - this will hold the hex better than trying to do just one side. Repeat with the smaller hex.

Allow the glue to set before you move on. Continue glueing just one side at a time until you come back to the flap. Glue the last side over the flap and hold until set. (Phew! that's the difficult bit done!)


I loosely stacked the shapes together to see what made an attractive shape before I started glueing.

Next was the platform with handrail.For this I glued three 4.5cm hexs together, topped with a 4cm hex. The hand rail is a 4cm frame. I found a bamboo stick from a plant pot label and cut six 1.5cm lengths for the uprights. Using solvent glue I arranged the uprights to support the handrail. When dry I glued this to the three larger hexs to form the platform. Arrange it so all the hexs are facing the same direction.


Later I found that the platform could do with being a little more stable so I cut some 1cmx1cm right angled triangles from greyboard sheets to help seat it on top of the tower.

The lantern is a plastic miniature rum bottle (hic!), cut off at the shoulder (be careful when using sharp tools!). This is glued top and bottom to two 2.5cm hexs.

The canopy was built using five 3cm, three rings left over from Industrial Elements, one 2.5cm hex, three smaller rings from Industrial Elements, two washers, two large nuts, two small nuts, all leftover from Industrial elements. You can use whatever you have to make an attractive canopy.

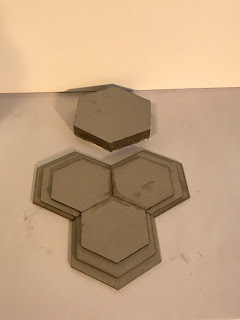
The central base  is made from three 5cm hexs and two 5cm frames. The base extensions are each of a 4.5cm, 4cm, and 3.5cm hex. These are arranged and glued as in the photograph to make a good stable base for the lighthouse.


Decoration:

The base was smeared with texture paste then large and small Art Stones were pressed in to the damp surface. This took more than 24 hours to set properly! When dry, with a stiff-ish brush, I dabbed a watery mix of Zinc all over to get in the nooks and crannies. Next came Burnt Umber dabbed randomly over the top, followed by Burnt Orange. Then to get the seaweedy slime look, some patches of Forest Green. The flat part of the base is Lamp Black.

The tower was gessoed first to cover as much of Kellogg's colours as possible (perhaps I should have used the plain side on the outside!) then at least two coats of Titanium White to get good coverage. I used True Red for the stripes, and Lamp Black for the damp proofing around the bottom. The door was added with Burnt Umber, outlined in Zinc. Zinc was used for the steps to the door. Windows are Lamp Black, Titanium White for the frames, Zinc for the window sills.


The platform is white with black handrails and supports and walking surface. I added a red band for fun. Underneath the supporting triangles are black.

The lantern has white plates top and bottom. I painted a white lattice pattern on the glass, with black shadows.

The canopy is white with one section in red and a red bit on the top.

This project used a whole set of hexs and leftovers from other kits. I measured the flat sides of my hexs. Use whatever you have to hand to make your lighthouse. Nobody with know what you have used once it has been painted! 

(Diagram for tower:
1 - set base line width A
2 - Mark vertical centre line 
3 - Set height B
4 - set top line width C
5 - Draw sides from ends of A and C
6 - Measure angle X (mark it on a spare piece of paper if you don't have a protractor)
To add sides:
7 - copy angle X as shown
8 - Draw top and bottom lines at that angle
9 - copy lengths A and C to new lines and draw fold line 

Repeat until you have six sides - then add a flap for glue (about 6mm))

Thank you for visiting - if you get stuck please ask and I'll help.

Supplies:

Hexagons for Hex Tech Tuesdays

DecoArt Americana Colours, various

Texture Paste

Art Stones (optional)

Odds, sods, and leftover bits

Friday, 25 March 2022

Rusty Art Block- Fiona Randall


Hello again. I'm back with another Art Block. 

( the Large shallow one) with a rusty theme.


I started by gluing the box together. 
I then gave it a coat of DecoArt chalky finish in Carbon to the back and all four sides. 
Then a coat of DecoArt Ultra Matte varnish to seal and protect.
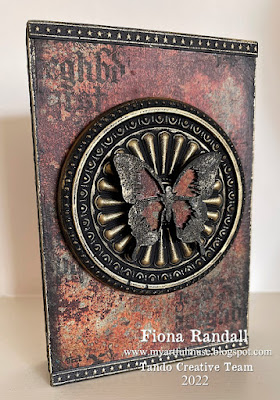
 The front of the Art block was given a coat of DecoArt Tinting base and also to  the base layer of a small Tando Layered Butterfly.


Next step was to use some Rusty themed Decopatch paper from DecoArt that I have had in my stash for ages.


Using DecoArt Decoupage glue matte I cut a piece of the paper to size and applied to the Art Block front Then inked the edges with black archival ink.
 I also did this for the butterfly base.


Next step was to give a cast resin mould and the top layer of the butterfly a coat of DecoArt Black Gesso. Once dry DecoArt Metallic Lustre in Burnished Brass was swiped over both pieces to bring out the detail and give an aged metal effect.


The top layer of the butterfly was the glued to the rusty base layer and the edges swiped with the metallic lustre.


Next step was some stamping using black archival ink with my favourite text stamp onto the Art Block front as shown.


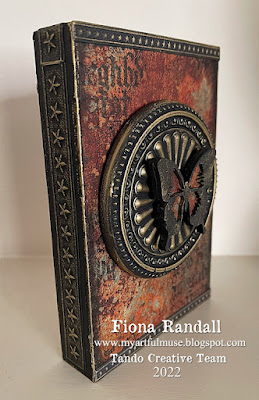
I then added the embellishments to the Art Box using off cuts of grey board to give depth and dimension.
To add a final touch to the piece I embossed some card stock strips. Gave them a coat of DecoArt Chalky finish in Carbon and swiped over with the metallic lustre to highlight the detail. These were then attached to the Art block font and sides..


Hope you enjoyed the step by step process of this project.
 These Art blocks have so many possibilities and I hope myself and the DT  will give you plenty of inspiration to make some for yourself.
Thanks for stopping by today.
Fiona.

Products Used.


Other Products.

Black Archival Ink.

Tim Holtz Stamps- Faded Type.

Tim Holtz Sizzix 3d impresslits Embossing Folder-  Star Trim


Thursday, 24 March 2022

Vintage Style Art Box by Bernadette


Good Morning Everyone, 

My love of the art boxes continues.  https://www.tando-creative.co.uk/set-of-4-art-blocks.html

For my last 2 art boxes I used texture paste and paint to cover them and then added embellishments - you can see previous blogs with my step-by-steps for those boxes.

For this box I decided to use some beautiful patterned papers from my stash.  


After putting the box together with PVA glue I measured each side and edge, cut the paper to size and covered all the sides with my chosen paper using glue.  


I then took a blending tool and blended vintage photo distress ink around all the edges.  I then used walnut stain distress crayon to darken the edges.


I used a script stamp and stamped with versamark randomly on the sides and edges then embossed with gold embossing powder.


I cut some elements from my patterned papers and chose some vintage photos to add to my box.  The clock is a Tando embellishment https://www.tando-creative.co.uk/MNTGSCLCKS.html and I inked it with versamark and embossed it with gold powder.


I then added my embellishments using glue and 3D foam pads 


 I hope you will give some of the ideas and techniques the design team are blogging a try and post your projects in the Facebook Tando Creative Zone group.


Bye for now

Bernadette xxx