Showing posts with label JBSQULRG. Show all posts

Wednesday, 25 May 2011

Waxing lyrical

Hello, thanks for joining us for the last of the technique pieces from me and Carol! We've been playing with metallic wax finishes this week.

Carol had fun with lots of different colours of Inka Gold (made by Viva Decor) and several Tando chipboard shapes combined into this fab piece.

The journaling block was embossed in the bug and then covered with graphite Inka Gold before orange Inka Gold was smeared across the piece.

The hearts from the little frame in the middle were removed and covered with lava red Inka Gold then covered with Glossy Accents. The image is from some Graphic 45 paper with the face hi-lighted using an acrylic fragment. The frame was coated with lava green and edged with graphite Inka Gold. The dragonfly was coated with orange and then edged with the lava green pastes before having some metal heads attached.

Do visit {Carol's blog} if you would like extra details.

Sorry to give you a Christmas project in May but ever since I first saw the bookplates, I've had the idea in my head that they'd make fun Christmas tree ornaments!

I covered my book plate with some Gold Leaf Rub n Buff (made by Amaco). I then hit the frame repeatedly with the fatter end of my embossing stylus to get the look of beaten metal. The sentiment is stamped onto an oval of cardstock trimmed to fit the back of the plate. I added a thin layer of glitter for extra festive sparkle and then finished with a stamped Santa and some pearls.

Full details of supplies are {here} on my blog if anyone would like them.

Thank you so much for joining us over the past couple of months - we hope you have enjoyed the projects!

Wednesday, 11 May 2011

Paint Job

Hello, welcome to another Wednesday with me and Carol. We've had the paints out this week (and probably both have the gunky fingers to prove it!).

Carol has made this fabulous piece with a beautiful weathered verdigris look to it.

She started by painting four wavy twinchies with Claudine Hellmuth Traditional Tan acrylic paint, then spritzed with Adirondack colour wash and Dylusions peridot ink spray. The pieces were then blotted dry, pieced together and stamped.

Carol used with watercolour pencils and Neocolour 11 watersoluble wax pastels to enhance the image, sanded back the edges of the pieces and finished with some gold acrylic paint.

Gorgeous, isn't it? Stop by {Carol's blog} for more details.


I went for texture with my paint by painting a heavy layer of gesso onto my journaling block and stamping into it with a background stamp. Once dry, I added a layer of crimson acrylic paint and when that was almost dry, dabbed gently with a baby wipe to highlight the texture.

I've added stamped images, punched stars and some gold Rub n Buff around the edges to finish.

Full supplies etc listed {here} on my blog if anyone would like them.

Thanks for stopping by today, hope to see you again soon!

Wednesday, 13 April 2011

Masquerade!

Hello, Joanne and Carol here again with the next of our technique pieces. We decided to play with masking this week.

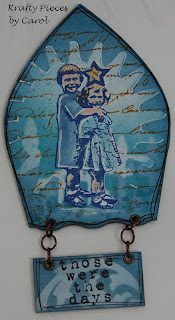
Carol has used two sorts of masking on her fab piece and taken advantage of the fact that the white lined board means there's no prep to do if you want to use something like Distress inks straight on to the piece.


The girls were stamped and then masked with a hand cut mask. Some Tim Holtz masks have been laid over the top and then Carol has built up the effect with different shades of blue and some stamped text.

Carol used Distress inks to colour the girls and then stamped the sentiment on a domino shape that has also been masked and inked and then added it to the arch with with jump rings - doesn't that look fab?

Check out {Carol's blog} for more information.

I chose one of the journaling block shapes to play with.

I spray painted my piece black, then used some Tim Holtz masks (we didn't have a confab, honest - we just happened to both choose the big pointy cog!) and sequin waste and sponged silver acrylic paint on there. A stamped and heat embossed sentiment and a collection of random bits and pieces finish it off.

More details {here} on my personal blog if anyone would like them.

Thanks for joining us today, I hope you'll pop by again next Wednesday for the next in the series!