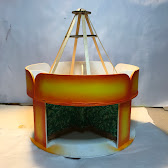
Fondly known to the design team as the spinny, roundy-round thing, I present my version of Tando Creative's Twirly Whirly Art Stand ...
Please note the curved round boards and circus top are not included in the kit - they are constructed from off-cuts and spare parts. See 'Bend it like ...' on tomorrow's blog for details of forming the curved surfaces.
Assembly of the greyboard kit is straightforward but note there are two large discs - one has a larger hole than the other - the larger holed one is the bottom, the smaller hole is atop the X section.
Also note the upright end pieces that slot into the large X have their tabs downwards and slot to the top (see picture).
My first job was to base coat the whole thing in white, to make sure the colours are bright and vibrant.
Next I painted a 'leafy glade' scene as a background. I used three greens, first a mid-green dabbed on all
over but leaving gaps. Next a darker green dabbed on but mainly in the lower half, finally a lighter green, mainly to the upper half. There is no skill needed for this, it is just dabs of colour to give the impression of leaves. I added some brown lines to suggest branches, and brown 'ground' for it to stand on.
Next I worked on the round boards and side panels. I started with a base coat of Primary Yellow, then using a dry brush technique added a boarder of Tangerine, and a slightly narrower boarder of Calico Red. This gave me the basic fairground look I needed.
Using Primary Blue, Festive Green, and Calico Red I added the brush stroke design to the round boards and side panels. I added dotty scrolls in Venetian Gold to complete the design. To make sure the scrolls were all the same I sketched out a suitable size and shape on stiff card, and using a pokey tool pierced the design. I used this as a reversible template to mark the shape in pencil.
Last I added the large white dots - reminiscent of the bright lights found on fairground rides.
To make the circus top I used a cog wheel left over from Tando's Industrial Elements kit and six wooden coffee stirrers. I glued these with all purpose glue as in the picture to make a cone shape. I glued a large washer, also from the Industrial Elements kit, inside the cone for strength. I left this overnight to make sure it was dry.
I measured the height, to get the size for the circle needed for the 'canvas' cover. It just fitted an A3 sheet of paper. I estimated how much of the circle I would need and painted on the red and yellow stripes. I wrapped the paper carefully around the legs of the cone, using PVA to glue it to each one as I went round.
Rather than horses, I thought butterflies would be more magical, so I used a set of Tando Butterfly Minis.
While they were still in their original frame I base coated them in white, and then with Primary Yellow, Calico Red, Primary Blue, and Festive Green I dry brushed random areas over the board, ensuring each butterfly had some of each colour. A little gold edging to finish them before gluing them on poles made with jewellery wire to hang in the carousel.
 |
| A Magic Roundabout |
I added flags on cocktail sticks, just for fun.
See the carousel in action on my Instagram page
Products:
Tando Creative Twirly Whirly Art Stand Kit
Tando Creative Mixed Media boards (for the round boards, see tomorrow's post)
DecoArt Americana Colours - White, Primary Blue, Primary Yellow, Calico Red, Festive Green, Burnt Umber, Leaf Green, Foliage Green, Forest Green, Yellow Ochre
Spare parts from Offcuts and Industrial Elements
Coffee stirrers


No comments:
Post a Comment