Saturday, 21 December 2019

Winter Scene


Morning all I have a festive scene for you today using Tando's Winter Scene Kit.


I was drawn to this kit because of the Mini Houses. I went with a Vintage theme using Reds, Creams and Gold with a touch of white. The box frame had a crackle effect applied with DecoArt Chalky finish paints. Each of the individual houses had a distressed  or crackle treatment applied, some stamping added and DecoArt Snowtex added to the roofs. To enhance the holly and snowflakes added to the box frame top, I die cut some winter greenery from white and craft cardstock and spattered with gold paint to some of them to give added detail.. To finish I added a small  vintage robin.
 
Here's a close up of the detail.
 
 
Thanks for stopping by today.
Fiona.x
 
Products used.
 
Tando Winter Scene Kit.


DecoArt- Snowtex.
 
Andy Skinner Stampendous stamp set-Toxic


Wednesday, 18 December 2019

Christmas Baubles


Hi there! Celia here with a quick Christmas crafty idea. I’ve decorated some of the large baubles. They also come in mini! 😍
I first primed them with Tinting Base so that my colours would be nice and bright. Then I applied some Crackle Paste through some stencils. (Distressed sequins and some Dylusions)

Then I painted them in some bright jewel colours (Cobalt Teal hue, Quin magenta, Quin violet, yellow green light, Pthalo blue, Vermilion - all DecoArt fluid acrylics), then used a crackle stamp with toning Archival ink colours for a bit more interest.

I added some interference paints for a bit of sparkle and used some thin gold twine for the loops. Finally some Treasure Gold on the edges and the crackle paste areas. I did this through the stencils to avoid getting gold everywhere.


Thanks for stopping time and have a crafty Christmas!

Celia x

Monday, 16 December 2019

'Winter Flowers' Card by Jane

Hello!

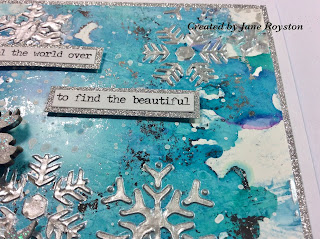
Today on the Tando Creative blog I am sharing a card I have made with a wintery feel...


I started with an alcohol ink background that I had already created with some bits of silver foiling added on top.  Then I used the Tando 4" snowflakes stencil with silver texture paste...


I picked a couple of leaves from the Tando Minis and a flower from the Tando grab bag and coloured them with a silver paint pen before adding some sparkly glitter glue to the elements.  The flower was then finished off using a sparkler from my stash...


To add even more winter to the background I splashed on some watered down white gesso before sticking on my greyboard pieces.  Then I found some text from the Tim Holtz small talk stickers which I matted onto silver glitter card...


Here are the products I used:

* Tando Creative 4" stencil - Snowflakes
* Tando Creative Minis Leaves 1 and 2
* Tando Creative Flowers with Stems Grab Bag

Thank you for looking and happy crafting!

Jane xx

Friday, 13 December 2019

Christmas Printer Tray

Hi there! Celia here,

For our Christmas Crafting theme, I have made a Christmas mini printer tray.
I started by looking through my stash for some mini Christmas embellishments. I picked a few from the Tando minis and made some with some old Christmas stamps I had.

I decorated the greyboard with embossing powder
and coloured in the stamped images with Promarkers. I varnished them with Triple Thick to make them a bit more substantial.

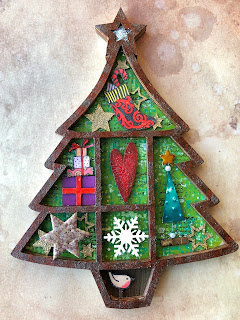
I primed the back of the printer tray with green chalk paint, then added Decoart green gold. Then I mono printed some other greens with textured wallpaper (a Seth Apter technique) and stamped some Christmas script with black Archival. I painted the star in gold and the tub in raw umber.

I stuck the three top parts together with mat medium, putting a heavy book on top for a while to get good adhesion. I primed it with gesso so that the finish would be nice and bright.

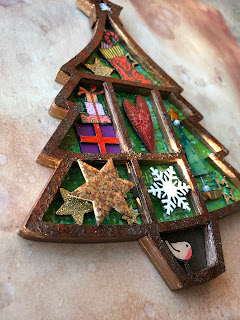
Then I painted it in a bronze paint. This looked a bit too pretty for my liking, so I rusted it instead, stippling on some media fluid acrylics in burnt umber, transparent iron oxide & quinacridone gold. Much better!
For the sparkly star, I filled it with triple thick and sprinkled glitter on top. Do this in two layers, as it shrinks a bit as it dries.
I stuck the tree together and stuck all the little decorations inside. Some of them I bumped up with sticky pads to give a bit of height.


Have a happy Christmas, and thanks for stopping by!

Celia x

Wednesday, 11 December 2019

SnowFlakes


In the Run up to the Festive Season myself and the DT will be showcasing all our Christmas themed projects using fabulous Tando products. To kick things off here is my project featuring Tando Snowflakes and Holly.
 
 
I started with a piece of Tando MDF. Stencilling was added to all four corners using DecoArt Media Modelling Paste using the Tando Long Flourish Stencil( my favourite). DecoArt Media Texture Sand paste with added grit was then applied randomly around the edges. and a coat of DecoArt Chalky Finish in Relic applied. Next step was to paint all elements used with DecoArt Chalky Finish in Relic and layered up onto the board Using off cuts of grey board to give depth and dimension. More of the grit/texture sand paste mix was added in various places. Tiny glass beads were then applied to the holly leaves, letters and clock. Next step plenty of dry brushing to bring out and highlight all the lovely texture. Final step was to add touches of DecoArt Metallic Lustre in Turquoise to finish.
 
 
Thanks for stopping by. Do pop back for more Festive Inspiration from the Team.
Fiona xx
 
 
Products Used.


DecoArt.


Monday, 9 December 2019

Hochanda Monday Mini Books

Hi, I hope you are all enjoying the shows today with the new products :-D

Here are two of the new mini books that have featured...


I hope that you will join us in the new 366 Challenge on Facebook, Karen x

Sunday, 8 December 2019

December Colour Theme - by Nikki


Morning all,

December's Colour Theme contains the most beautiful Jewel colours!

I hope you've managed to catch my teammates pieces this week using these colours.  I thought I'd share a make with you today too.


I used one of Tando's Gothic Arch kits, to create this steampunk flower piece.

The background was crackled, and then sponged with some of the colours of the theme.


I stamped the beautiful flowers twice, and used watercolour pens to colour them in. 


I layered the flowers up and added a sentiment to finish.

Thanks for stopping by this week.

Best Wishes,

Nikki
xx

Products Used:

Tando Creative Gothic Arch Layered Frame kit
Chocolate Baroque Steampunk Flowers

Friday, 6 December 2019

Colour Theme Mini Book

Hi there, Celia here with November’s colour theme. These are my absolute favourite colours so it was a lot of fun making this little book. It’s my first Tando mini book and I’m now hooked!

I first chose my colours - I seem to have rather a lot of purple and turquoise so matching up the colours was easy!

I started off by gessoing the cover in white, just to get nice vibrant colours. Then I did a base coat of Cobolt Teal and stencilled the other colours randomly all over. I chose stencils with small designs to go with the tinyness of the book. I was going for a sort of colourful yet grungy look.

I used embossing powder on the book plate and made a little label with my alphabet stamps.

For the pages, I tore up some watercolour paper (15cm x 8cm) to get a nice rustic feel and folded them in half. I made 5 signatures and sewed them individually together.
Then I cut a piece of calico to  bind them together. I measured the spine (1.5 cm) and put glue thickly in a strip in the middle of the calico, then pushed the folded signatures into it. I had them held together with a clip and they stayed upright like that till they were dry.

Then I glued the fabric either side of the living hinge inside the cover, avoiding putting glue on the hinge.
I made a quick splashy paper to put on the inside.

There are some other methods of bookbinding on the blog and the website too. You can also get a mini book 'innis' set, which I forgot to order. It has some templates for the pages and so you can make concertina pages too.

I hope you like my colourful little book!

Celia x

Thursday, 5 December 2019

Tando Tuts on Thursday. ATC Concertina Book by Fiona Randall

 
Over on Tando's Facebook Group- Tando Creative Zone you will find the step by step tutorial to create  this ATC Concertina Book.
ENJOY!
 
 
Here's the link to download the step by step tutorial.
Have Fun
Fiona x


Wednesday, 4 December 2019

Colour Theme ATCoin

This month's colour theme is this gorgeous set:


I've given the {Artist Trading Coin} a coat of {White Gesso} then added {White Crackle Paste} that I'd mixed with some acrylic paint to, across parts of it.

Once dry, I blended acrylic paint over the base and added ink to show up the cracks. Then added some paint dabs and doodles.

I've painted some {Mini Snowflakes} white and added glitter glue onto them.

Here's the collection I've made this year:

Monday, 2 December 2019

December colour theme

Hello everyone, and welcome to the last colour theme week of 2019!

Carol with you today sharing my last two artist trading coin and card:-


The colour theme for this week is:-


and here are my two:-


Both have been painted using acrylic paint and so have all of my mini Christmas elements.

Do pop back during the week for some more colour projects.

TFL xx


Sunday, 1 December 2019

Reach for the Stars Tag


This week on the Tando Creative blog the theme is 'In The Stars' .
 
 
For my project I decided to decorate a Tando Long Tag with a moon and stars theme.
I used DecoArt Chalky Finish in Legacy mixed with a little Carbon Chalky finish to give a dark midnight blue colour. I applied this to the textured background of the tag the two circles from the Tando Grab bag of circles and the moon and  stars which I had cast from molds. I then swiped DecoArt Metallic Lustre in Burnished brass across the raised areas of the tag to highlight the texture as well as the moon and stars also. I then stencilled onto the larger of the circles with DecoArt Extreme Sheene in Burnished brass and attached the moon to the small circle and then edged both of the circles with the metallic lustre. A piece of brass chicken wire from my stash was then attached to the tag. Some twigs from the garden were given a swipe of metallic lustre before attaching on top of the chicken wire . Then the circles and stars layered on top. A splattering of DecoArt Media Fluid Acrylic in Titanium white was then applied. Word strips were then typed up on my vintage typewriter and attached to the tag base to finish.
                                                   
                                                         Here's a close up of the detail.
 
 
List of products used.


Thanks for taking the time to stop by and read
Hugs Fiona x


Wednesday, 27 November 2019

'Mystical In The Stars' by Jane

Hello!

This week on the Tando Creative blog the theme is 'In The Stars' and I decided to go for an astrological feel to my project...


I decided to decorate the triple arch astral frame that was on the most recent HOCHANDA shows with Di and Fiona.  

After sticking my frame pieces together I dabbed texture sand paste over the arches using my finger and once it had dried painted the whole piece plus the decorative inserts with black gesso...


Next I used the Decoart interference paints in turquiose, violet and gold across all the pieces then once this had dried used gold gilding wax to add extra highlights to the texture...


Then I put the acrylic circles into place and attached the decorative pieces.  Finally I added some stars that I had cast in a mould using clear resin and purple glitter, and used a bit more gilding wax on top to tie the whole piece together...


Here are the products I used:


Thank you for looking and happy crafting!

Jane xx