Sunday, 8 May 2022

School Days Collection

Today I bring you a cute little project I have been pottering about with for a few weeks. Sticking to my promise of using up all my old vintage Scrapbook papers i stumbled across some cute little children at school papers and just knew i had to use them. And what better why to highlight the good old Days of school with a Tando printers tray and two large cubbey's.


Materials Used

Selection of vintage school themed papers & Ephemera

Black Gesso or Paint


Collection of Alpha stickers, all random

PVA Wood Glue

Tando Greyboard

Tando cubbey's.

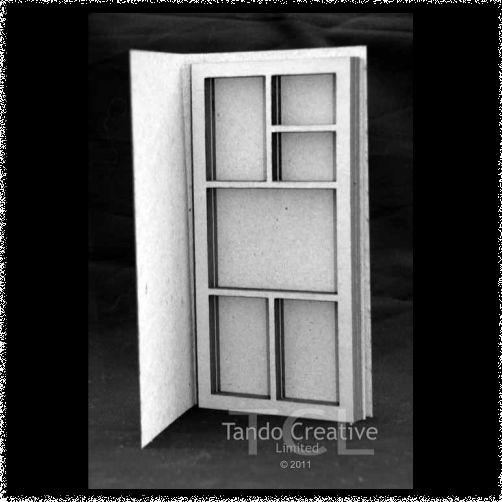
Tando Printers Trays: rectangle


Instructions

I knew roughly my plan which was to have my cubbey's stacked on top of each other and have my printers tray next to it so I arranged then on my piece of greyboard, moving about until I was happy with the arrangement. I had to sacrifice the front cover of the printers tray sadly. Once finally happy, I cut the greyboard to size and gave everything a couple of coats of black gesso. At the same time I did a Tando Display Stand just in case. 


The greyboard back piece measured 8" x 8" in the end. I covered it in a piece of burgundy cardstock just slightly smaller. I then added a matt of green spotted patterned paper with sanded edged to that and set aside for later.

I glued my two cubbey's together, I secured with extra tape all over too. This will be hid with patterned paper. I cut strips of patterned papers and decorated both the inside and out side of my cubbey's. I sanded all the edges for a vintage worn look. I wasn't bothered about gaps or joins in my wallpapering inside as i knew the ephemera would hide it. The printers tray was a wee bit trickier. I placed a sheet of patterned paper on top and left it too dry over night. I then carefully used a craft knife to cut out the small holes. i sanded the edges down to give the aged vintage feel again. I added backgrounds to the cubbey's too. At this stage i glued both the cubbey's and printers tray the greyboard back piece and left over night to dry. I have said it before. I am a convert to the PVA wood glue that Di has on the web site, super strong and the applicators, where have you been all my life, lol


Next i just took a square at a time and began to just build up a little scene, adding layers of paper ephemera and 3D objects, moving stuff around until i was happy. This took awhile. I was like a kid with a new dolls house. 

First the Cubbey's


Then the smaller printer tray squares


The top of the display looked a little bare so i decorated it with some alpha stickers which i made little stands for 


I hope you like the little display of school days fun. I had so much fun tinkering about for days on end, it was like i was back at school again. Would love to see your creations if you have ago 

Sarah xx


Tuesday, 3 May 2022


                                                        One Little Hexi - Bernadette


I made this size 10 greyboard tag https://www.tando-creative.co.uk/TAGS180X100.html with one little hexi frame https://www.tando-creative.co.uk/HXGNS2022.html I had left from another project.  I like to use up everything I get in any of my kits, so I added other bits and pieces to make this.


I started off by rubbing distress oxide pads onto my media mat - the colours I used were antique linen, bundled sage and frayed burlap.  I kept dipping my piece of ivory coloured card in, drying and repeating until I had the effect I wanted.  


I then drew around the card using the greyboard tag for the outline and cut it to shape using scissors. I glued the card to the tag using PVA glue.


I took a floral stamp and randomly stamped on parts of the tag using vintage photo distress ink. 


Using a floral stencil I added some texture using crackle paste and let it dry.


Once the crackle paste had dried, I used a stencil brush to add some definition to the crackled areas with vintage photo distress ink.


I painted my little hexi frame using a metallic brown paint and had a rummage around in my stash for some paper dolls, die cuts, ephemera and paper flowers.  To make the little bee tag, I die cut a tag then then die cut the middle using a rectangle die.  I inked it with vintage photo distress ink splattered a bit of water to remove some of the ink then added some stamping.  I cut a piece of acetate, stamped the bee using black Stazon then glued the acetate to the back of the tag.  (I added some thread to the tag but you will see on the finished photo I decided to take that off).


To put the tag together, I first glued some pieces of honeycomb which I had die cut from brown card.


I had a play around with the bits and pieces I had decided I was putting on my tag before sticking anything down.  Once I have pretty much decided where I want everything to go, I usually take a photo with my phone, take everything off the tag then glue each piece using the photo to make sure each piece is in the place I wanted to go.

I enjoy working with lots of substrates but love tags especially.  They are small enough to complete in one crafting session and robust enough to take lots of additional layers.  Would love to see anything you create in the Facebook Tando Creative Zone if I've inspired you to have a play.


Bye for now!

Bernadette xxx


Friday, 29 April 2022

24 Boxes of Advent - Follow a star - by Kim

Here is the next in my series of 24 Boxes of Advent.
 
Follow a star ... but which one? There are trillions to choose from!

I couldn't get them all on this box, so you'll have to use your imagination. My inspiration was the wonderful photographs taken from the Hubble Space Telescope.

Once I'd glued the box together I base coated the whole thing, inside and out, with Lamp Black.

Because my nebula is small I used an old and worn out brush for the stippling. All colours are stippled on so they blend easily.

The centre of the nebula is Cadmium Yellow. Make the colour more dense at the centre. Next up, and mainly towards the left of the picture, is Tangerine. Start by covering some of the yellow so the colours blend and gradually change from one to the next. Scarlet is next, stippled on as before. Then Calico Red. The red doesn't cover too well, which is good for the blending process, the density can tail off as you stretch in to outer space. You will probably need more than one coat for the denser areas.


To the right I used Primary Blue with tiny dabs of white blended in roughly. As the blue area gets farther from the centre it becomes less dense and eventually fades in to space.

At the centre of the nebula I added some tiny white 'splits' in the yellow layer showing the white heat of the core.

Next, the rest of the universe. I diluted a couple of drops of Titanium White with water to make it a milky consistency, then with an old tooth brush, spattered the stars over the surface. Try out your technique on scrap paper before you aim at your project - it could be messy!

Choose a couple of larger stars to have extra sparkle. With a fine point like a dip pen or cocktail stick paint in six or eight starburst lines. Make them taper away from the centre. Worth practising on a spare surface for this, too.

Once all is dry, mix some diluted black and add shadowy clouds in a couple of areas.

As this is my fourth Advent box I cut a number 4 from spare greyboard, painted it black, then added first Tangerine, then white highlights only to the edges that face the glowing nebula.

Thank you for journeying around the universe with me.


 Products:

Thursday, 28 April 2022

Tando 6 inch Ring Binder - by Zoë Sanderson

 Today I'm sharing the steps and stages in transforming a bare Tando Kit to something both useful and to my mind attractive.


For me the start looking at the basic kit and thinking about what to use with it is the beginning of a journey that might go in any direction!  Having a good look at the kit and getting a feel for it is important in getting a feel for the direction to go in.  Once the ideas start to take shape you can start to stamp and colour.


Of course I had to experiment this time the first stage was to stamp and emboss the cover.  For the embossing both black and clear powders were used.  The result is a worn looking image, that was further aged and distressed with a blending of different coffee coloured inks.


The light must have changed for this picture because the camera settings were not changed nor were colours/light edited later.   Hay Ho at this point a gold ink pad had been run over the edges and hinges of the cover.  An application of Viva Maya gold had been brushed over the two stamped images.


The last element of the aged distressed process was a rough application of clear crackle glaze.  I spread this with a pallet knife leaving it in different thickness over the board.  As the glaze dries the cracks appear being bigger and more obvious on the thicker parts.

Time to start dressing the cover up.


From a bag of assorted Tando shapes four pieces had been selected for embellishments.  To get a good cream finish they were painted with Viva Ceramic effect.  This medium is a thicker finish which can be applied to any surface including glass, plastic and metal.   I'd also got some more stamps out used on card coloured and fussy cut.  

When fussy cutting you need to keep as close to the outside line as you can even cutting into it, unless you have embossed the image a cut into embossing will possibly lead it to start flaking off.   The art of cutting is also to move the card in the open scissors rather than opening and closing the blades while moving them along the card.


A variety of stamps from different manufacturers were used with Archival coffee coloured ink to stamp little sentiments, then the gold ink pad dragged round the edges.


The inside was painted with black gesso and then some very old printed paper cut down to fit over.  Gel Medium used to attach the papers both below and above it for a good secure hold.


Prior to working on the inside a slit was cut in the hinge on each side and ribbon threaded through.   A fussy cut stamped image attached to the right front  making a bridge there ribbon was passed under to meet up with the piece on the other side and tie the cover closed.

I'm really pleased with this it is wonderfully inky, messy and textured and was great fun to do.

Products used

Tando 150gram Offcuts these are great to have to hand and are useful for all sorts of projects.

Tando Ring Binder for 148x82mm stencils

DecoArt Clear Crackle Glaze

Stamps, ribbon and other mediums from my personal stash.

Tuesday, 26 April 2022

Hexagon Tags


Today i bring you two beautiful tags made using lovely vintage botanical scrapbook papers and Tando Hexagons.


When i made my "fly free" original hex canvas earlier this year, i covered my desk in brown paper as i was using lots of distress oxide sprays. Once my project was finished i realised i had a lovely background paper.


I took a Tando tag and sketched around it before gluing to a piece of Grey board. I randomly stamped on some text in black and highlighted some of the Hexagon's on the background,


I used a Tando stencil and textured paste and added pattern to the tag. 


Once dry, i cut out some hexagons from paper and began layering them up on the tags


I fussy cut some flowers and foliage from my scrapbook paper and added it to the tags. I cover some Tando Hexagons with more vintage paper and added them to the tags with foam pads


To finish i added doodling, tiny hexagons, word stickers and ribbon


And there you go. Simple tags, made from waste that just look beautiful i am sure you will agree,

Thanks

Sarah