Monday 30 July 2018

August colour week

Hello everyone, Carol with you today to kick start Augusts' colour theme week.

The colours for August are:-


strong, vibrant colours this month.

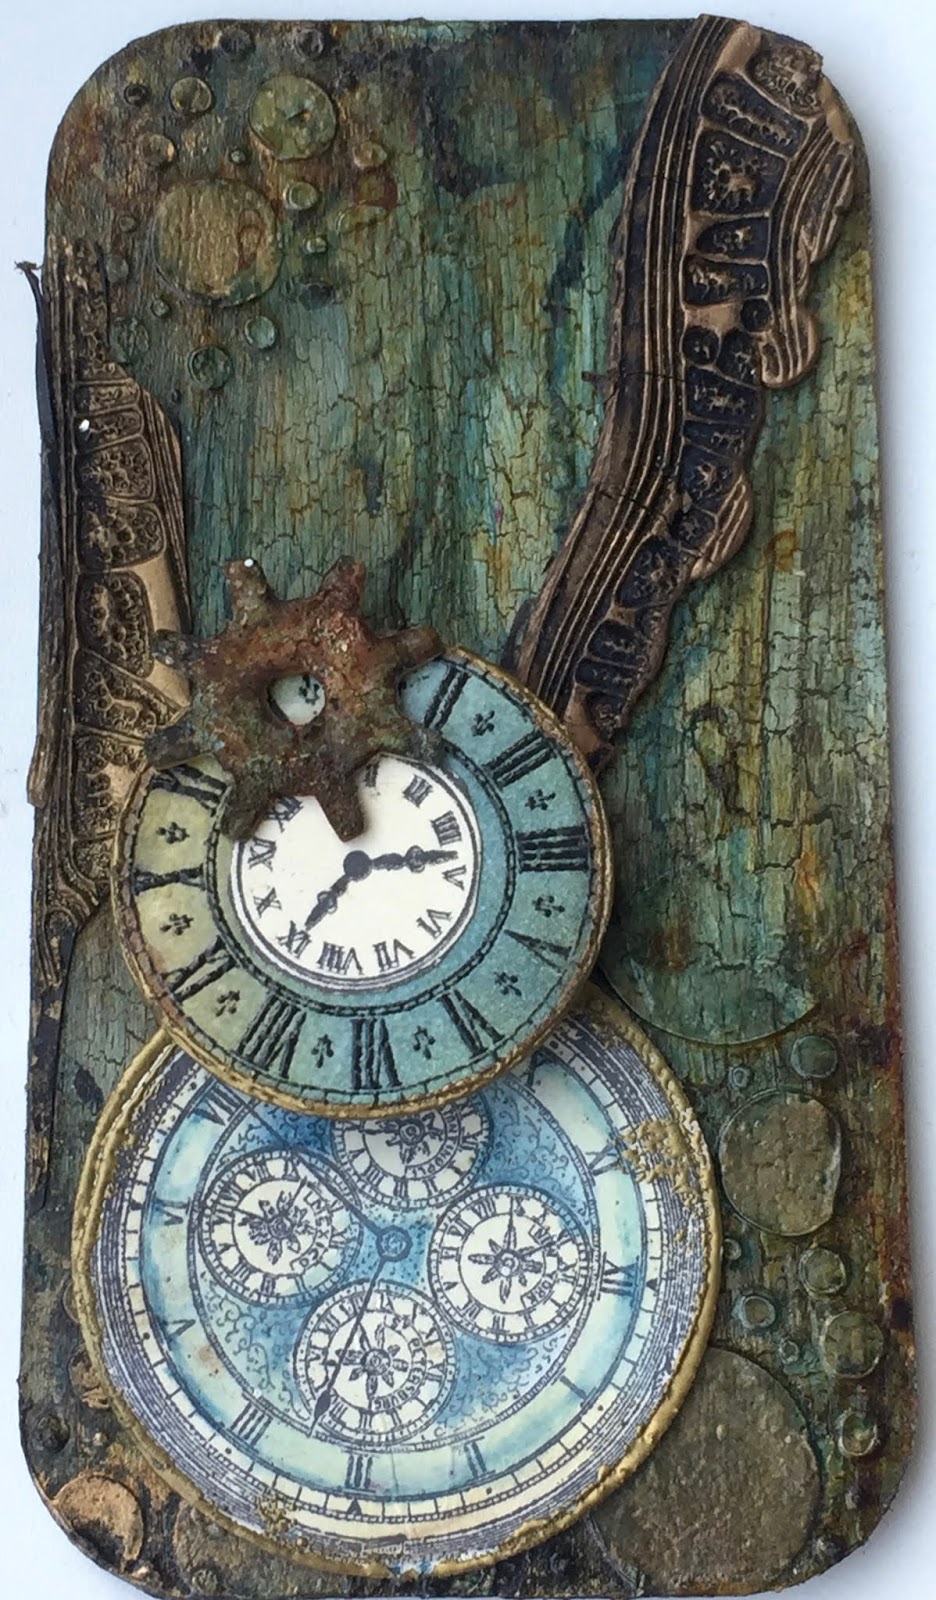
So, in line with previous months here is Mixed media board number 8


Paint was added to the media board (74mm x 138mm) and then white paint was stencilled over.  Using a very thin layer of paint I created the base for my stamped text, I created a "text box" using a black aquarelle pencil.

Taking inspiration from a day out butterfly watching, I painted a butterfly white and added black definition (nothing like the marbled whites we saw!!) and attached this to the bottom.

Definition was added to the edges using my aquarelle pencil.

Thank you for visiting today, do pop back during the week for more colour projects.

xx

Sunday 29 July 2018

Layers with Lisa

Hello lovelies, Lisa here with today's post and this weeks theme is 'layers'.


I haven't chosen a specific Tando kit for this theme but instead, I had a rummage through my Tando box and picked out some "left-overs". (If, like me, you have had a few bits & pieces from Tando in the past, you will notice there are always poppie-outie-bits in a kit, which you could throw away or extra pieces of a grab bag you may not have used.... I tend to keep these in a separate box. In my "left-overs" box I have all sorts of shapes in many different sizes and these are the bits I used for this project.)

So, I used one of the innie arches from the Arabian Style Layered Arch Frame, Grab Bag of Circles, Butterfly Grab Bag and a birdcage.


I first Applied DecoArt Texture Sand Paste through the Tando Brick Stencil to the arch and left to dry. 


I added a couple of circles gluing a smaller circle under a bigger one to lift it from the background. 


I added the birdcage, then the butterflies.


I then used DecoArt Premium Acrylics to paint it. When it had dried, I dry-brushed  DecoArt Tinting Base over the top to tone the colours down.


Thanks for popping by today.
Toodles for now, 
Lisa x 


Arabian style Layered Arch Frame   Grab bag of Circles    Stencil: BRICK    Media: Texture Sand Paste

Thursday 26 July 2018

Layers Week- With Media Boards and Tags from Fiona Randall

 
Morning all it's layers week and I decided to use a media Board a Tag and of course Grey board sheets for my layered composition.


I started by cutting a sheet of grey board to the size I required. Next I gave the grey board, Media Board and Tag a coat of DecoArt Media Fluid Acrylics in Burnt Umber. Once dry I applied DecoArt Vintage Effect Wash in Patina with a sponge in downward strokes to create a distressed look. All pieces were then stencilled with  a white Colour Box mixed media ink pad and set aside to dry. Next up I coated a heart from the Hearts Mega Pack with two oats of DecoArt Media Fluid Acrylic in Cardmium Red Hue. Once dry I stamped the Eye from Andy Skinners Curiosity stamp set with Black Archival Ink. Once dry I gave the heart a coat of DecoArt Triple Thick Gloss Glaze to finish
I then stamped around the edge of the Grey Board base with a stamp from Andy Skinners Industrial rubber stamp set. All pieces were then layered with off cuts of grey board to give them dimension and depth onto the grey board base. To finish a quote was added.
 
Here's a close up of the detail.


Thanks for stopping by
Hugs Fiona.


DecoArt Media Fluid Acrylics- Burnt Umber and Cardium Red Hue.
 
DecoArt Vintage Effect Wash- Patina.
 
 
DecoArt Triple Thick Gloss Glaze.


Tuesday 24 July 2018

Layers Week - Diamonds Media Board

Hello!

It is layers week this week on the Tando Creative blog and I decided to use one of my media boards as a base for lots of greyboard embellishments.  This is one of the really good points of grey board as it is not to heavy so can be layered up...


I started with a first layer of stencilling onto the board.  Sand texture paste was added through the distress diamonds mini stencil.  Once this had dried I combined green gold paint with tinting base and then used some gilding wax across the top.  A script stamp was added using archival ink...


For the next layer I cut a piece of diamond grid and then used versamark and shabby blue embossing powder to create a topping.  I made sure to keep all the diamond shapes that came out of the grid and painted 3 of them with cobalt blue paint then added stamping and gilding wax to match the first layer.  Next I used the same colours and wax with one of the mini frames...


The final layer was one of the butterflies from the butterfly grab bag.  This time I mixed tinting base with the quinacridone violet paint.  More stamping was added then for an extra layer I used liquid glass and added some pearl embellishments before adhering a sticker quote.

Here are the products used:

* Media Board
* Diamond Grid
* Mini Frames
* Butterfly Grab Bag
* Distress Diamond Mini Stencil
* Decoart - Sand Texture Paste; Fluid Acrylic Paints; Tinting Base; Liquid Glass

Thank you for looking, there will be lots more layered projects across the week from other members of the design team.  Happy crafting :)

Jane xx

Monday 23 July 2018

Layers week with the mini book storage kit

Hi again, it's Brenda here following up on my post from Saturday where I showed you how I put one of the mini books together. In fact you can see it on the top shelf of the storage unit below.


This project was one I did for the DecoArt Media blog and thought I would show you here as the paint is all laid down in lots of layers with stamping over the top.


If you would like to see the full tutorial you can see it on the DecoArt blog HERE and I am also transferring it to my own blog where I keep a record of all my makes. There are lots of photos and a full explanation of the steps to take to create this shabby look right from the base layer .....


...... to the finished effects.


Thanks for taking a look, I hope you have enjoyed your visit.


hugs Brenda xxx


Sunday 22 July 2018

Anything Goes - Box with fabric

Hellooooooooo!  I am rounding up this 'anything goes' week with a *BOX* decorated with brightly coloured fabric!  The box itself is around 8x8inches square and about 2inches deep.....a really handy size for all sorts of things!  Its a great box for stash storage as well as for putting a gift in.  I have made up a few of these over the years now and this time I have added some internal storage!


The box kit comes with a grid for the top, some tic-tac-toe pieces and 10 rounded squares.  I have disgarded the play pieces and used the squares which I covered in fabric and put into the grid on the top of the box.  I added fabric to the sides of the lid with some daisy braid.


I also added fabric inside the lid and the bottom.  For the box insert I used 3 *SMALL CUBBBEYS* which were glued together and then wrapped in fabric with fabric in the bottoms.


I didn't glue them down in the box so that I can move them around.


Not sure what I will use the box for, probably beads!!!

Thank you for taking a look.  Please leave a comment as we love to hear from you , take care, Karen xxx


Saturday 21 July 2018

Vintage mini book.

My little booklet was made using the panels from the Mini Book Pack.


The cover is canvas, cut in one piece and the panels stuck onto it.
The pages are folded and stamped black paper stuck into a concertina spine (there are some great tutorials for these on YouTube). 


The inside covers are panels made using distress inks and the same Tech Trauma Andy Skinner stamps used on the pages.


Make a hole in the spine and attach some elastic ......


..... and this will slip over the booklet to secure it shut.


Thanks for popping in.If you make a return visit on Monday I'll have the mini book storage kit on display and you'll be able to see how I decorated it and put it together.

Have a great weekend.

hugs Brenda xx

Friday 20 July 2018

Anything Goes Week - Layered Mini Book by Hannah Oxberry

Hi all, Hannah here! For "Anything Goes" Week I wanted to share a mini book project created for a Make & Take workshop at June's Ministry of Mixology.


I adore these mini books from Tando, they are perfect for quick makes, allowing you to explore a range of techniques to create something truly unique.


As with most of my projects; layers are key. Here I have used chalky finish paints for the initial base layers, rubbing back areas to expose the colours underneath, Decoupage papers add another dimension while crackles and washes add a grungy element.


The back cover is decorated in the same way as the front, embellishments like the faux pearls add a highlight to the cover while the gold along the edges frames the piece.


I have included my initials as a design element along with a textured heart highlighted in gold. To finish I have tied the book with jute string.

I hope you have enjoyed this project, until next time!


List of products used;

Mini Book
Mini Hearts


Thursday 19 July 2018

Anything Goes - Heart Mini Book

Hello!

This week is Anything Goes week on the Tando Creative blog so as I am loving all things journals and books at the moment I decided to decorate one of the gorgeous mini books with a flexible spine...


I started by using white gesso to prepare the surface of the book then added layers of fluid acrylic with a brayer (hansa yellow light, pyrole orange and pyrole red).  Using the same orange I added some stencilling using the Tando mini flourish stencil...


To create extra detail in the background I used a cross stamp and the text from Andy Skinner's Steampunk set with archival ink.

The Tando heart was painted with white gesso and then I used a palette knife to apply crackle paste.  Once this had dried it was painted with pyrole red and then black antiquing cream added.  When dry I rubbed this back and in some areas rubbed some of the paint off too to create an aged and distressed look.  Gilding wax was then added as well and some black archival ink around the edges to make the heart stand out.  Some of the same text stamp was also added to help tie the heart in with the background...


Wings from a butterfly stamp were cut out and lightly coloured with sparkle pen before liquid glass was used over the top and once dry these were added behind the heart and all of it adhered to the book cover.  I used a couple more little Tando hearts with the same paint and black ink to add next to the heart.  The sentiment was added using some stickers and then pages added to the book using a piece of elastic as the binding...


Here are the products used:

* Mini Book Pack 2
* Grab Bag of Hearts
* Tando Mini Flourish Stencil
* Decoart Mediums - White Gesso; Crackle Paste; Liquid Glass; Antiquing Cream
* Decoart Fluid Acrylics
* Andy Skinner - Steampunk Stamp Set

I am really looking forward to decorating the other books to make a whole set now!

Thank you for looking and happy crafting,

Jane xx

Clock Work Media Board

Hi everyone Dee here with my make for the week. I have used a Tando Media board and the circles grab bag for my project, along with Deco art paints and varnishes & Stampendous embossing powders.

I painted the media board with Prussian blue media acrylic applied weather wood in area's once dry I used deco art media crackle paint. I gave it watery washes Prussian blue then yellow Iron oxide followed by quinacridone gold.
 A coat of media gloss varnish was applied I coloured a card with distress inks in marigold and china blue then stamped the clock onto it. I also stamped a smaller clock onto cream cardayd cut out I then glued them onto a Tando circle from the grab bag.
I tripple embossed using a chocolate baroque stamp and glued to the card.
I hope you enjoyed my piece.
Cheers Dee x


Grab bag of Circles