Showing posts with label clock. Show all posts

Monday, 21 March 2022

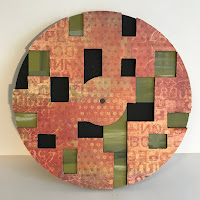
Faux Printers Block Clock - by Kim

 I took my time (!) with this one as it needs thinking through. First I had to think through the colours scheme. There are three layers to consider. I started by choosing the top layer and worked the colours from that. I worked from a 12x12 Basicgrey scrapbooking paper, 'Infatuation' from their Fusion range.

Read Tando's instructions - they are included in the pack and will help. Don't try to rush this project.

First I marked the back of each of the greyboard sheets with the pieces to be removed later (each sheet is different) according to the instructions.

As the top sheet will have the patterned paper glued on, I removed the marked sections then laid the sheet, face down, on the glued paper. When dry I trimmed the paper and removed the outer ring.

The middle sheet was painted, I used Moss Green from the patterned paper as my lead, with a little white, grey, and black for interest. The marked sections


remained in place until the paint was dry.

On the MDF back sheet I painted black only the areas that would be visible, but you could paint the whole surface black if you wanted to. I glued the layers together making sure that all the sections lined up. I painted the exposed edge of the clock with black to keep it neat.

Next the numbers. There are a lot. Tando's instructions suggest they are left in the sheet to paint them. This is good advice. As I wanted to paint the sides of some of the numbers I had to remove them - but it was a fiddle. The big 12, 3, 6, 9 are grey with white sides.


The numbers on the patterned paper are grey, those on the green middle sheet are white, and those on the black areas are gold. I stuck them on with reference to the instructions.

Mount the clock works, the hands, and a battery (battery not in the kit) - and ... tick tock.

Products:

Tando Printer Block Clock

DecoArt Colours, various

Patterned paper of your choice


Monday, 17 September 2018

Texture Week with Brenda

Welcome to a new week on the Tando Creative Blog and this week we have the theme of TEXTURE.
A few months ago I had one of the Tando Steampunk clocks published in the Craft Stamper magazine so I thought I would share some photos of it with you as it is full of crackle texture and I have added the process steps at the bottom of this post.
This is my clock shabby style.


Here are the steps for you to follow.

I used DecoArt media acrylics and mediums available in the shop.

1. Take the front frame and prepare it by scraping over some modeling paste with a palette knife and adding some sand texture paste in random places. Push the clock numbers into the surface and let it dry.

2. Give the textures and numbers a thin layer of white gesso before adding random patches of white crackle paste around the whole frame. Try to keep the patches almost joining up so it has continuity.

3. Mix washes of the colours used on the background. Use a paint brush to add small amounts to the frame drying between each wash. When dry paint over white antiquing cream and let dry again before buffing it all with a soft cloth.

4. Take the background piece and cut yourself a circular piece of card for the clock face and paint them both with a coat of white gesso to seal the substrate.

5. Mix a watery wash of Cobalt Turquoise mixed with Titanium White on a craft mat and dip the backgrounds into it and heat dry. Keep the clock face lighter than the background.

6. Repeat the dip and dry method with washes of blue/green light, green gold and prussian blue. If after you have finished it still isn't dark enough go through the four colour washes again.

7. Stamp the diagram and text stamps randomly on the background and patterns on the clock face using watering can and coffee archival inks mixed on the same stamp.

8. Using Titanium White and a stencil add some random patterns over the background and heat dry. This adds greater depth and interest to your background.

9. Splatter some watery Prussian Blue and Raw Umber over the background and cobalt mixed with titanium white over the clock face.

To finish the project:
Paint the clock numbers with pewter paint. If you intend to display your clock give everything a coat of varnish before you stick the panels together. I used Soft Touch from DecoArt. Use sandpaper to distress some of the edges and rub in some ground espresso distress ink. Take your chosen embellishments, use the pewter paint and gesso to alter some of them and adhere to the project.
Thanks for stopping by.

hugs Brenda xxx

Friday, 16 February 2018

Anything Goes Week - Time Flies

Morning everyone,

Today I've got a tag/hanging for you that I was playing with backgrounds for a while on, and loved this bright but grungy style.  I also like putting colours together that don't initially 'go', but always end up working.


The background was some red, orange and pink paint, just randomly applied to the tag.  To pull it together I used a Media Mister in Violet, and spritzed the tag all over.  I then spattered black, and then white paint on the tag, drying in between stages so they didn't mix.  A honeycomb heart stencil was used with black modelling paste to give texture, and some number's stencilled to one side.  The sentiment is a printable.


The heart in the centre was stencilled with the treadplate stencil, then given the same red and pink paint treatment as the background.  On top of this, white antiquing cream was added and rubbed back when dry.  I also spattered with black and white paint.


Cogs were added, using a very very simple rust technique, it's just two colours, Burnt Umber and Pyrrole Orange, stabbed loosely with a paintbrush and nice and wet, and then heat dried until the paint bubbles slightly.  This gives great texture and is very quick to do.


The clock in the centre was a metal embellishment with separate hands.  I first gave it the rust treatment without heat, and then used Crackle Glaze all over once glued together.  The crackle glaze helps to hold it as well.  I used White Antiquing cream again in the cracks of the glaze, and wiped back when dry.  I wanted a matt effect on this and the cogs, so used Ultra Matte Varnish to seal.


Don't forget to check out the rest of the teams design's this week :)

Thanks for stopping by.

Nikki K.
xxx

Products Used:
Tando Creative Tags, Cogs, Hearts & Mini Stencil - Criss Cross.
Andy Skinner stencil - Industrial Elements
DecoArt Media: Pyrrole Orange, Pyrrole Red, Primary Magenta, Titanium White, Carbon Black, Burnt Umber.  White Antiquing CreamBlack Modelling PasteMedia Mister-Violet.
Mixed Up Magazine Printables.
Rusty Wire.


Friday, 27 June 2014

Transportation: Journey to our dreams


Hello my dear crafty friends and welcome to our Transportation week!
 This is my Journey Mixed Media canvas that shows some transports- if anyone still use  hot air balloon and an old steam train...
But then those Tando pieces are so great for any Mixed Media crafts!  The clock shows the time that is gone and  London skykine  piece is just delicious! 


See you in a few days with more TANDO inspiration!

Tuesday, 13 May 2014

Swirls week with Irit

Hello my dear crafty friends! Irit is here with my Swirls creation.
This time I decided to make a Mixed Media flat canvas and to use our new released Long Flourish mask  as a main point of my background.


The mask was added with texture paste and then heat embossed with a lot of embossing powder and misted all over it. You can see it clearly on this lower photo here.


Then I added two Tando most loved (by me) chipboards- the clock and the Flourish #7; both chipboards were covered with a mix of red and black embossing powders and  the clock became the frame for the embellishment cluster.
I hope I inspired you to make your own Mixed Media boards or pages and as you can see Tando masks are just the best for this kind of projects.
And here are the products used here


See you again soon!

Monday, 13 January 2014

Fan and games with Tando

Hello my dear crafty friends! Irit is here with my altered Mixed Media game project.
I actually used an old, partly with missing pieces puzzle and made this art board over it.
I used Tando delicious  stencils and a big Clock chipboard and made this " Timeless" piece for my new craft room.
As you can see I use the chipboard clock as a mask too, with misting around it.

A close look at the clock shape and the molding paste letters from the stencil I used.


See you nest week with more Tando inspiration!

Sunday, 5 May 2013

Clock-Tag

Hi, Caro is here. Today I have a clock tag for you ... I have used the great Clock Mask and 2 arrows of the Arrows Grab Bag.


Saturday, 6 April 2013

Time for everything: proverb week


Hello, my dear Tando friends! Irit is here again and this is our Proverb week.


This week here on Tando I want to showcase you my best and my most awful year: 2011.And this distress look is so perfect  for my " distressed mood" and the Bible stamped quote here is so much fit for this page. This is a time for everything in our life and mostly to be born and to die.
My very first grandson Omer was born on 1/1/11 and then, almost a year after, my beloved Dad past away. This scrapbooking page is all about it: one year, time they spent together.
I used Tando Clock mask with embossing ink and black embossing powder and Tando clock arms to make this one year clock behind my photos. I also used Tando chipboard letters Time on this page and you need to read my journaling to understand all my feelings on this page.
Hope the next years will be better!
See you next time on Tando blog with more cheerful inspiration!

Thursday, 5 July 2012

New releases!

Hellooo!  We launched some new releases at the Craft Barn Extravaganza last weekend which will be on general release now.  They were 3 clocks with mechanisms and all very different.  Some of the other designers at show decorated some and I am sure that pics will follow.  These are the ones that I decorated...

The Tall Clock...


The Round Clock...

The 'Cuckoo' Clock...

All these clocks are sturdy & incredibly versatile.  They would make fantastic presents, especially if you personalised them.  Thank you for looking, Karen x