Showing posts with label Andy Skinner. Show all posts

Friday, 23 October 2020

3D Week - by Nikki Killinger

 Hi all,

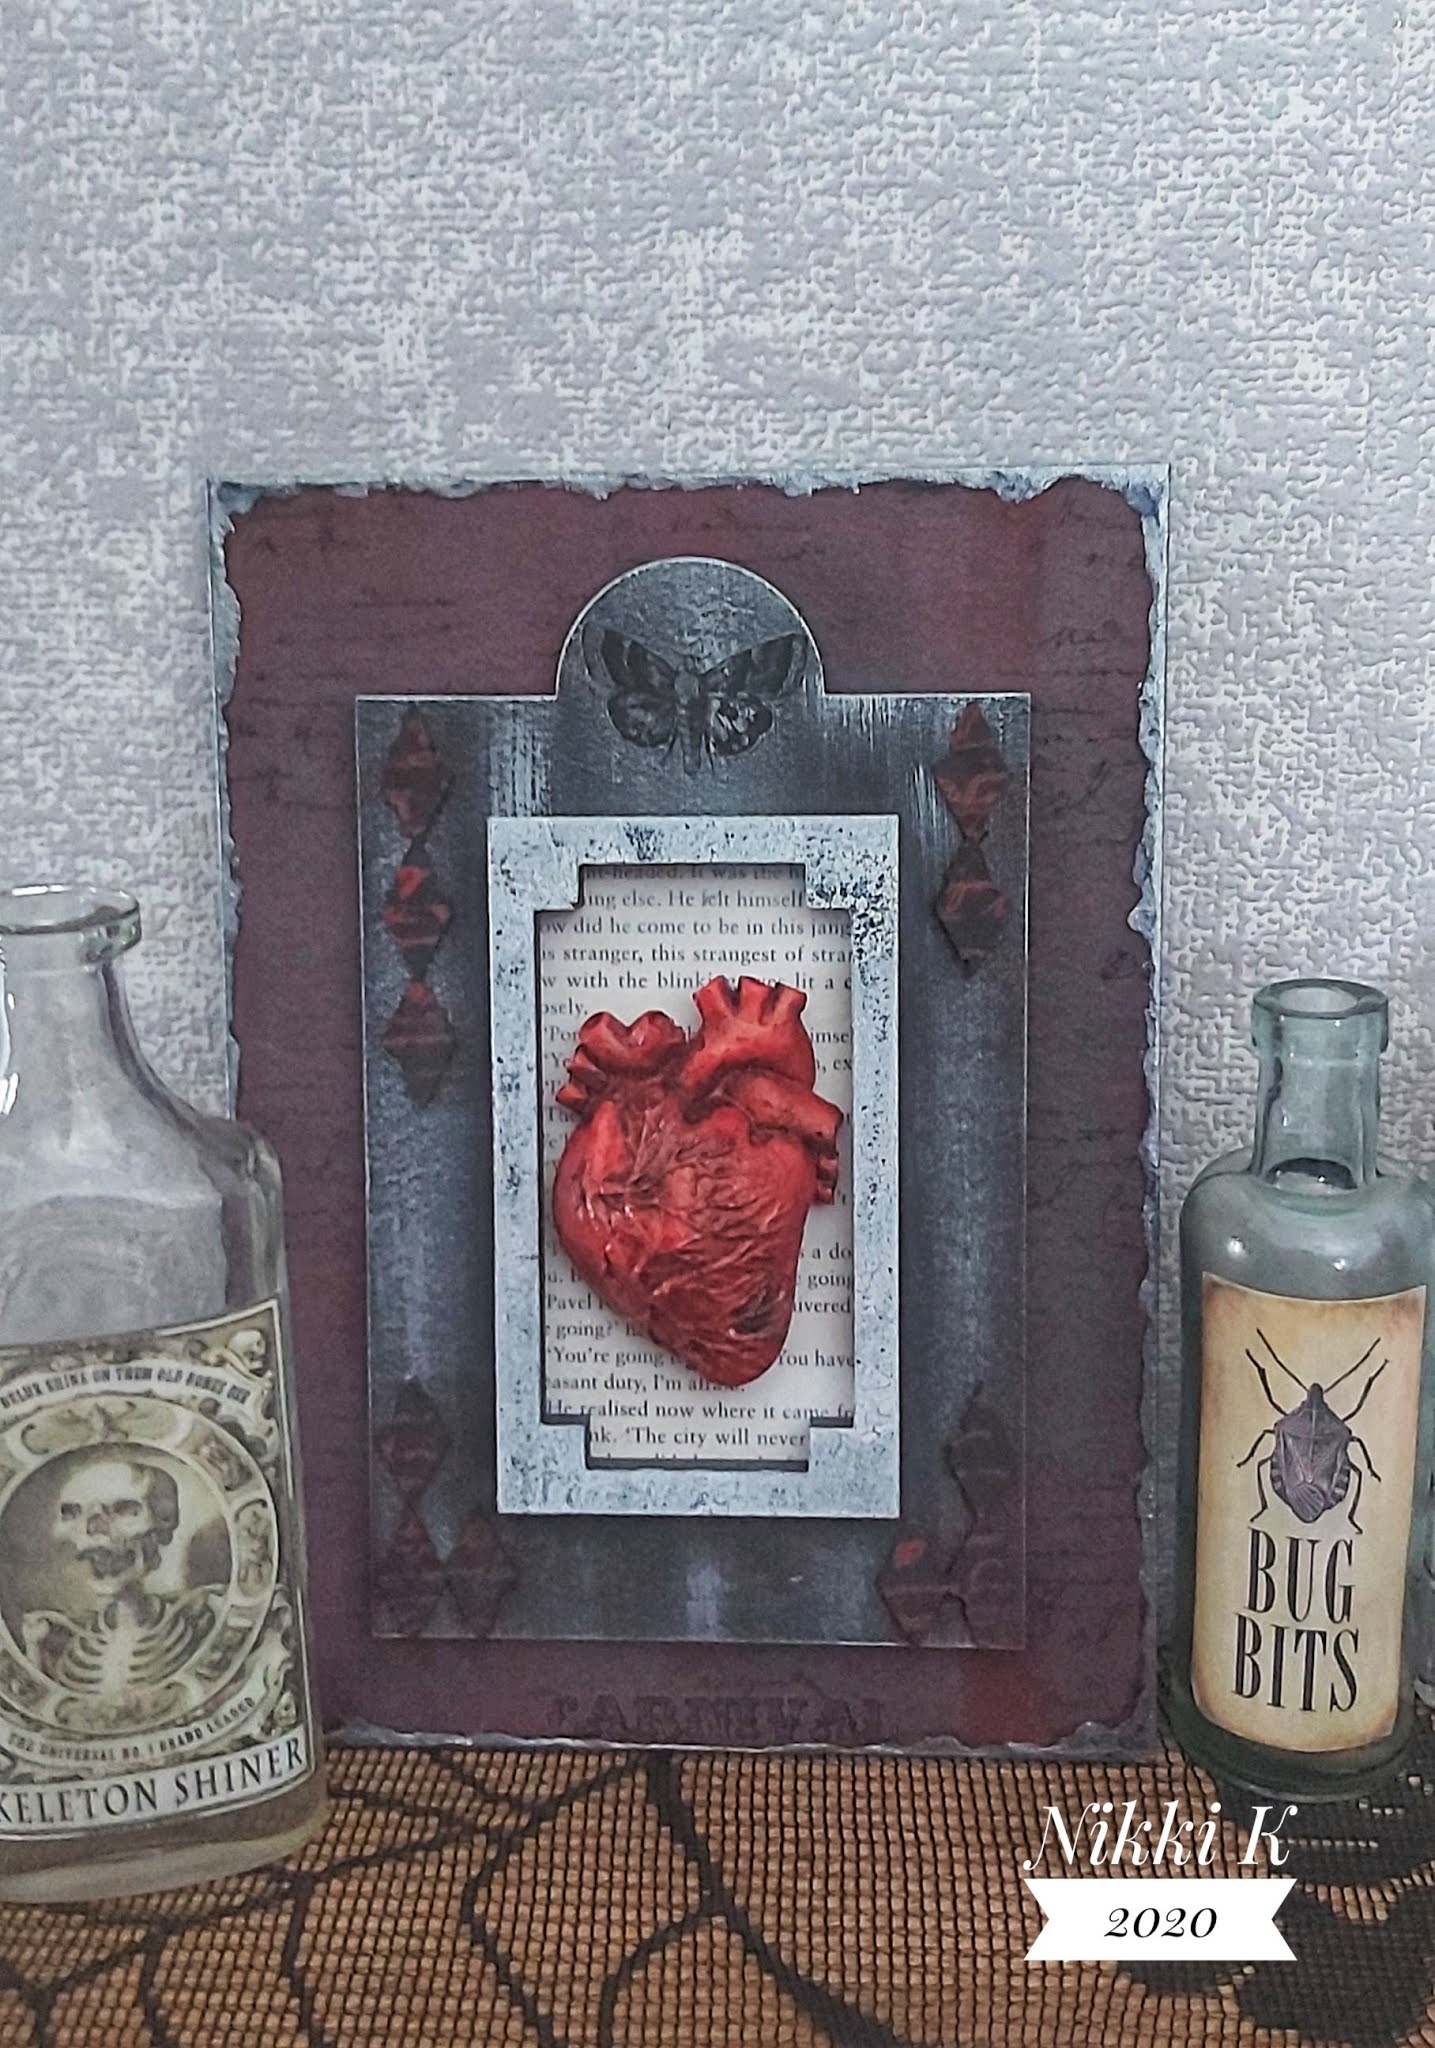
It's my turn for this weeks 3D theme and I'm sharing a different take on Di's 'Butterfly Frame' workshop.

I painted the backboard in midnight chalk paint, and then applied crackle glaze with a sponge.  The top coat was chalkboard grey.  This left a fine crackle.  I highlighted it with red paint just by dry brushing, and stamped a text stamp over the top.  

The next layer is the arched frame, and was painted in midnight, and then dry brushed in silver.  

The top frame was also painted in midnight, and crackle glaze applied.  Over this I sponged warm white, which gives a distressed crackled look.

I whitewashed the text page, and adhered the painted plaster heart to the centre of the frame.  

Some transfers were added on the frame, and the diamonds were painted black and stamped in red text.

Hope you like it.  

You can still purchase the workshop here, and it will have instructions for Di's lovely Butterfly Frame.  I just thought I would show you a darker take on it. x

Have fun crafting,

Best Wishes,

Nikki

x


Wednesday, 20 May 2020

Anything Goes Week - Binder Step by Step


Morning all,

I have a Step by Step on Di's Binder from Hochanda last week for you today,  the way I have decorated the outside of mine.

Make sure you lay the kit out, and work out which hinges fit which side to line up with their corresponding stitching holes, and your book covers are the right way up.  Continue to work on them as you have laid them out so you don't do any stamping/stencilling etc upside down. (if you choose stamps that need to be the right way). I'm talking from experience on a previous project here :)

Step 1.
Using Di's long tag Numbers stencil, put Structure Paste through onto the book covers in random areas.  Then take Crackle Paint, and using a palette knife, add random patches all over the two covers, and then more on all the hinges to cover (not the bendy spine).

Step 2.
Paint the whole book in white Tinting Base, paint or gesso, your preference, it won't make much difference to the finish.

Step 3.
Dry Brush everything, using Carbon Black paint.  This brings all the little crackle to life, and highlights the numbers.

Step 4:
Stencil using Quinacridone gold, through the coffee stains stencil, in random areas all over. 


Assemble the book, using pegs or clips if needed to hold the hinges in place while drying, I did one side of the book then turned to do the back.  Once all glued, you can stitch through the holes, giving extra strength and character to the binder.  Use Ribbon or Elastic, or you could stitch a button to the back latch and use as a hook from the front.  (I haven't stitched mine yet).


You can still purchase your binders, and get Di's online workshop with this link.   It's well worth it, and Di's folder is beautiful and easy to follow.  (I did the workshop myself :)

Best Wishes,

Nikki K
xxx

Products:
Di's Binder & Workshop Kit
Long Stencil - Numbers
Long Stencil - Rings

DecoArt Media Crackle Paint
DecoArt Media Tinting Base
DecoArt Media Carbon Black
DecoArt Media Quinacridone Gold

Andy Skinner Creative Expressions Structure Paste
Andy Skinner Creative Expressions Quick Grab Glue


Friday, 8 May 2020

May Colour Theme - with Nikki


Morning everyone,

I made something for the colour theme week, I don't usually do these as I struggle sticking to 'rules'.. lol.  But these colours were so good together I couldn't resist.

I started with a media board that I had already put some modelling paste on, with the Clock stencil, and painted in magenta and turquoise, for a different project.  But something told me it would work well, so I stuck with it.

To disguise the turquoise (as it wasn't in the theme), I added pale grey/blue chalk paint and yellow iron oxide to areas just really roughly with the paintbrush.  A bit like the theme above!

Once I had finished messy painting, I added transfers to certain areas in keeping with the time theme, and stamped in a dark burgundy in random places.

I painted a Tando ATC coin in the grey, then stamped in yellow chalk paint with a distressed wallpaper stamp.  These pics are taken in the evening so the colours are more vibrant when seen on the finished piece.


This picture shows the background detail and layers on the media board background.


I took a plaster crown from my stash, and painted in a mulberry pink chalk paint, then finger painted over the relief bits with purple.  On top of this I highlighted in gold.  This was glued to the ATC to finish, and a final transfer number added for detail.


I absolutely love how busy and vibrant this is, and that depending on where you start with a piece of art you never know where it is going to end up.

Best Wishes,

Nikki K.
xxx

Products Used:

Tando Creative:
Media Board
ATC Coin
Clock face Stencil

Andy Skinner/Creative Expressions:
Enigma stamp.
Mixed Media Transfers
Distressed Wallpaper Stamp
Andy Skinner Structure Paste
Artist Pigment Yellow Iron Oxide Paint
Artist Pigment Paynes Grey
Quick Grab Glue

DecoArt Media:
Primary Magenta
Quinacridone Violet
Tinting Base
Cobalt Turquoise Hue (under layer).
Metallic Gold
Dioxazine Purple


Thursday, 9 April 2020

Crackle week - 'Safe' by Nikki


Morning everyone,

It's my turn this week to do a crackle piece, and I made this tag.

I took a Tando tag and painted in random colours, red, yellow and orange all over, then spritzed with white mister to knock the colours back.  On top of this I put a layer of Crackle glaze.


I stencilled in modelling paste on the heart with the grid stencil, and painted the heart red.  I used the Chalk Crackle medium next, and then a layer of chalk paint to bring out the crackle.


The book plate was simply embossed with mixed media embossing powder, and the word 'safe' taken from the dictionary and framed.  I used Heavy Gel medium to glue all my pieces together, and give the word a protective coating inside the plate.


I went back to the tag once the crackle was dry, and used green patina antiquing cream to age it and show the crackle, and then used mixed media transfers to add detail.  Sometimes I like a colour change!


Hope you like it and have a go yourself. xx

Best Wishes, stay safe.

Nikki.
xxx

Products Used:

Tando Creative:
Tags
Bookplates
Heart

Andy Skinner:
Chalk Paint
Mixed Media Transfers
Mixed Media Embossing Powder - Funky Cold Patina

DecoArt Media:
Heavy Gel Medium
Crackle Glaze
Pyrrole Red Media Line
Primary Yellow Media Line
Vermillion Media Line
White Shimmer Mister
Green Patina Antiquing Cream
Americana Chalk Crackle Medium

Thursday, 8 August 2019

Technique Tag Thursday - Collage Stamping - with Nikki Killinger

Hi all,

Sorry I couldn't do a live tonight, but hope you enjoy this easy technique tutorial.

You will need:

Your Tag.
Scissors
Paper or Post it Notes
Flat Paintbrush.
3 paints that blend together, i.e: red, orange, yellow.  Blue, Green, Yellow.  Pink, lilac, purple...
Stamps of your choice, I would make these smallish stamps that can be cut out easily.
A varnish, or crackle glaze to finish.

Step 1.
First give your tag a base layer of White Gesso, Tinting Base or White Paint.
Then paint your tag, going across it, in a strip of the first (palest) colour.  While still wet, introduce the second (medium) colour, and then the third (darkest).  This gives you a 'sunset' or ombre/graduated finish.


Step 2.  Take a focal stamp, and position where you would like it.  Stamp onto your background, then onto a piece of paper and cut out.  Cover your image with the paper 'mask'.  A tip here, using Post It Notes is good for this technique, put the main part of your stamped image to the part where the sticky is (on the back), and then your mask will stick to your tag and be removable but easier to keep in position.


Step 3.  Stamp another image (or two or 3), around your original image on the tag, depending on what fits without overlapping.  Stamp these on to paper and cut out.


Step 4.  Place the paper over your images, and continue stamping.  Repeat the paper process if needed, until the whole tag is masked and stamped to your liking.


Step 5.  Remove the paper to reveal your Tag!  If you have any 'gaps' where the paper hasn't masked properly, you can take a fineliner and just 'fill in' where you think the lines should be.  You can also fill any spaces that are too empty with some doodles if you feel brave.


Complete your tag with a layer of Triple Thick Glaze, a Varnish, or Crackle Glaze for effect.  I used Crackle Glaze.


This is a simple technique that gets forgotten, but can give amazing results.  It's how I made the Ministry Team's Jacket's, and works brilliantly on fabric bags and Canvas too. 


Have fun and make up your own scenes!

Best Wishes,

Nikki
xxx


Saturday, 13 July 2019

Same but Different - Layering Stencils by Nikki K


Morning all,

This week we have shown a few different ways to use the Layering Stencils, I created a folder with mini binder inside for Di's Hochanda shows a month or two ago, and thought I would share it with you now.


I painted the folder white first, then layers of  colour were added, with background stamping and crackle.

The Flourish stencil comes in 3 layers, and the middle bit for a mask if needed as well.  I used modelling paste for each layer, which builds your design in different area's to make it more 3d. 


The Leaves Layered stencil works similarly, and I did the little binder with this.  It even has the veins of the leaves standing out more. 


I painted the binder in teal, and added Metallic Lustre with my finger to age it.


Love how the mini binder fits in the larger folder pocket, a really handy folder and art case.

Best Wishes,

Nikki K
xxx

Products Used:
Concertina Binder
Layering Stencil - Flourish
Layering Stencil - Vine

DecoArt Media Line:
Raw Sienna
Tinting Base
Cobalt Teal Hue
Metallic Lustre - Iced Coffee
Chalk - Lace
Metallic Silver
Quinacridone Gold
Paynes Grey

Other product:
Background Stamp - Andy Skinner Textures.
Turquoise Ink.


Saturday, 22 June 2019

Anything Goes week - Moroccan Sunshine


Morning everyone,

It's Anything goes week at Tando Creative, and my make for you today is one of the Giant Media Boards, which I squealed when I saw, as they are just a fab size for creating on, and something different.

The Media board was painted with a coat of lace chalk paint first.  Then I added a wash of Yellow Iron Oxide, followed by filling in the whiter spaces where the paint drained from, with a pale blue chalk paint wash.

The background was stamped with a texture stamp,  I used Archival Coffee Grounds ink for this.

I had a sheet of the lovely Moroccan style lattice, and thought this was perfect to add.  I painted it in the pale blue chalk, and then added 'rust' with quinacridone gold and Raw Umber, to look like an aged window grill.  To enhance the colour I used Andy Skinner's new Embossing Powder, Funky Cold Patina in small area's.


I stamped the beautiful Sun stamp from Stamperia twice, and cut out just the face to layer up.  I coloured this with my Prismacolour pencils, I felt like a change!  This was glued and then pinflair added to 3d the face.


The sentiment is a Mitform Casting, and I thought Journey was appropriate on my sunshine travel theme.


I punched holes at the top of the media board with a Cropodile, edged the whole board in Versafine Majestic Blue, and added wire and beads to finish.


Hope you like it, it seems fitting as we are going to get rather warm weather next week apparently!

Make sure you check out the rest of the team's fab makes this week, for more inspiration.

Best Wishes,

Nikki Killinger. xx

Products Used:

Tando Creative
Extra Large Media Board
Grid - Moroccan

DecoArt Media
Yellow Iron Oxide
Quinacridone Gold
Cobalt Teal Hue
Raw Umber
Americana Chalk Paint Lace
Pale Blue Chalk paint (mixed Cobalt Teal Hue with Lace).

Andy Skinner - Textures Rubber Stamp Set
Andy Skinner Embossing Powder - Funky Cold Patina (New).

Stamperia - Sun Stamp
Mitform Castings Journey word.
Versafine Coffee Ground Ink
Versafine Majestic Blue Ink
Prismacolour Pencils.


Sunday, 12 May 2019

Crackle week- Mechanical Heart Tag by Monika


Good mornig, it's last day of Tando Crackle Week and I wanted to share my inspiration for You. 


 I have started with punching three holes in my tag, then painting it with Decoart Media Fluid Acrylic paint in Iron Oxide. I have also applied a coat of the same paint on my heart embellishment.

I have tinted Decoart Crackle Paste with Paynes Grey Media Fluid acrylic paint and scraped it randomly all over my tag making sure the layer is nice and thin.


 Once paste was dry and tiny crackles appeared I have stamped my tag with Andy Skinner Tech Trauma stamps and black Archival Ink.

Also, I have added my favourite 'dirty washes' of  Decoart fluids in Quinacridone Gold and Paynes Grey.


I hope you like my inspiration
See you next time
Monika x


PRODUCTS USED:

Friday, 19 April 2019

Anything Goes week - Brenda

We have another anything Goes week for you where we share something that we have been working on for Di or for ourselves. Today I have a small media board I made for one of Di's Hochanda shows where she introduced a number of new stencils from Andy Skinner.
I love going over to west coast America and have been lucky enough to drive quite a large part of Route 66 so this brought back great memories. I also thought by using the design on a media board means it could be used for a journal cover.


The Route 66 badge was stencilled onto a piece of leftover painty paper using  cerulean blue, phthalo blue and paynes grey media fluid acrylics.


The quote was stenciled using black modeling paste.


The background was created using a cracked distressed technique I have used before. The blues were chosen to get a retro look.


Hope you have been enjoying AG week.

Have a great weekend.

hugs Brenda xxx

Monday, 1 April 2019

Gasolene Alley Tag - Brenda

I love using a colour palette for inspiration and this time I had a new stencil as well as this tag was for one of Di's Hochanda shows.
Thestencil is a new one from Andy Skinner.


So here's how my muse took me.


Process Steps
1. Cover tag with DecoArt decou-page paper - I used text from Victorian Romance. Adhere with matte medium and seal the surface of the paper with it. When dry sand back the edges to get rid of any rough edges.


2. Paint a layer of  gesso, black and white mixed together to create a light grey  over the tag and wipe back to reveal some of the text.


3. Stamp some designs over the thicker gesso areas using watering can archival ink and scrape some white gesso over the tag with a palette knife and add a very small edging with it too using the side of the palette knife.


4.  When dry daub, spritz and dribble some paint through. I used quinacridone violet mixed with titanium white and also cerulean blue mixed with paynes grey and titanium white to get two more colours from the photo palette.


5. Blend some black geso through the stencil on the tag to look like an advert.


6. Use a stabilo pencil and wet brush around the edge of the tag to add a 'frame' it.
7. Stamp and cut out a vintage car and the fuel vendor to add as embellishments.


8. Give it a coat of matte varnish.


There are quite a few new stencils in the range from Andy and they are available in the shop.

Thanks for stopping by.

hugs Brenda xxx


Supplies
Tando size 8 tag.
Tando - Andy Skinner new 15 cm stencil - Gasoline
DecoArt media fluid acrylics - quinacridone violet, titanium white, cerulean blue, paynes grey
DecoArt Mediums - black gesso, white gesso, matte medium, ultra matte varnish
Stamps - Tim Holtz Travel Ways, Documented, Vintage Auto