Saturday 28 September 2019

Chocolate Baroque with Lisa

Hi lovelies, today's blog post is showcasing a great combination of two amazing British companies - Tando Creative and Chocolate Baroque. A match made in heaven!!!


Here is the Tando tag I created using a Chocolate Baroque stamp. 


First, I painted a Tando tag with yellow and blue DecoArt Premium Acrylic paints. Then painted over it with white Gesso. When it was dry, I rubbed over the tag with a damp baby wipe to distress the surface of the tag.
I then stamped directly on to the tag using Chocolate Baroque's 'movie strip collage' A5 Rubber Stamp. I coloured in the stamped flower using my lovely new Koh-I-Noor watercolour pencils. I then painted a section of the Tando Extra Thins - Wire and added it to the tags. I finished with adding some rusty orange thread to the tag hole. 


I hope you enjoyed reading about the wonderful collaboration of Tando and Chocolate Baroque products.
Be sure to check out all the products available on the website's using the links at the top of this post.

Toodles for now,


Here are the products I used...

Movie Strip Collage individual unmounted rubber stamp  - A6   Extra Thins: Wire

Friday 27 September 2019

Silver icons Chocolate Baroque Week by Dee

Hi everyone I hope you are okay its Dee here with a very silver theme. I love this stamp set from Chocolate Baroque. It reminds me of old gothic churches, and grave yards etc. This tag was created withe The Gothic Fragments Stamp set from Chocolate Baroque. 


I triple embossed directly onto the tag after I had painted the base with deco art media acrylic paints.


I triple embossed the fragments onto black card tore it and stuck it to the side of the tag. I triple embossed onto a Tando circle and used a circle stamp in the set.


Quinacridone gold was used for the rust effect along with antiquing cream in Patina, white and black.
I used Ferro paste through a stencil and around the edges.
Cheers Dee x


Thursday 26 September 2019

Chocolate Baroque Week- Fiona Randall

 
Morning everyone Fiona Here with a Tag for Chocolate Baroque week here on Tando Creative.
 
Chocolate Baroque is a small independent art and craft company, based in the historic market town of Barnard Castle in County Durham in the North-East of England and is owned and run by Lesley and David Wharton. Lesley and David produce an extensive range of natural rubber art stamps. The rubber stamps are made in house, by David, to our very exacting quality standards.
 
So using Chocolate Baroque's fabulous stamps and Tando Creative substrates are a match made in heaven. So here is the tag that I created.
 
 
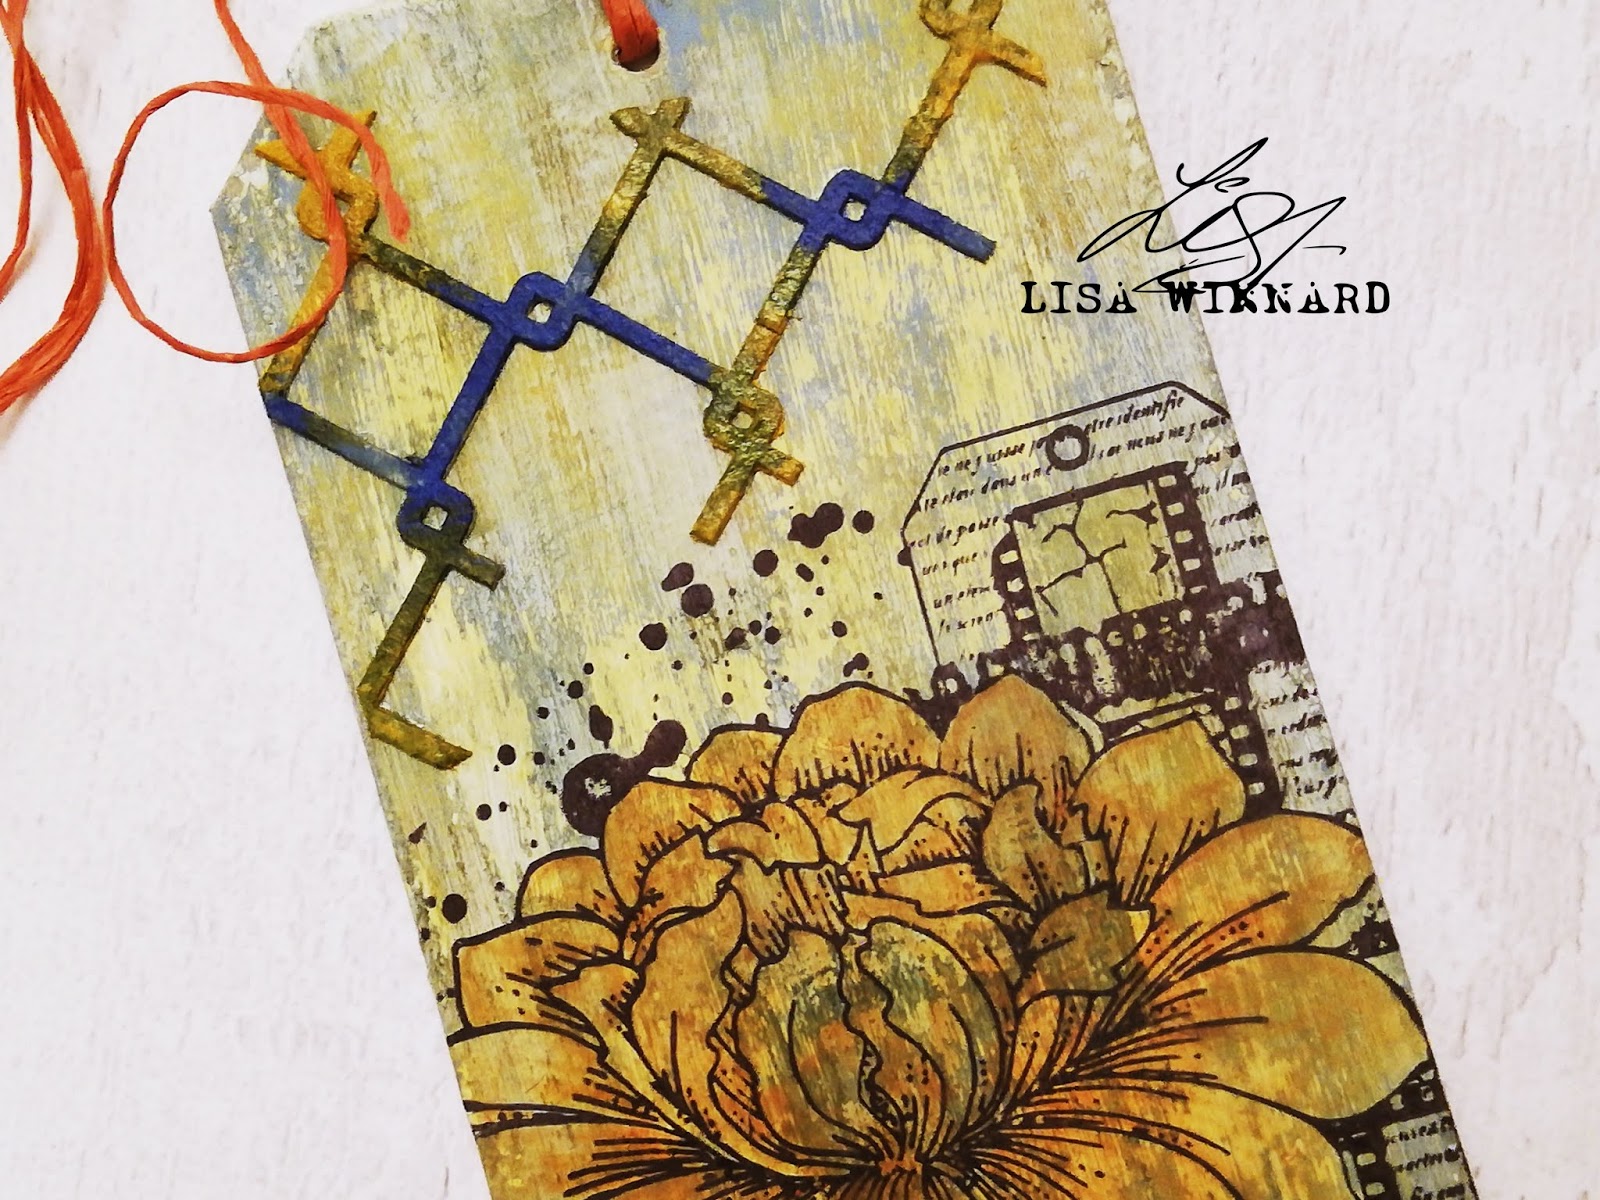
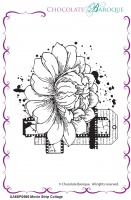
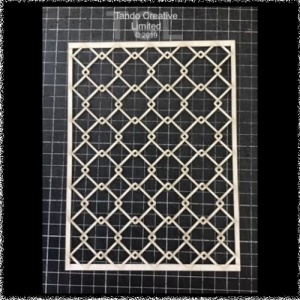
I used a Tando  size 9 Tag ( 160x90mm) as my substrate base. I then embossed a piece of 300gsm cardstock with a woodgrain Embossing Folder. I then applied Distress Ink Sprays  and Distress oxides to colour and age the cardstock. This was then cut to shape and glued to the tag base and the edges inked with walnut Stain Distress Ink. I used the same coloured ink sprays to make a small cardstock panel and then stamped using the border stamp from Chocolate Baroque's Texture Fragments Rubber Stamp Sheet with Potting Soil Archival Ink. I then applied Distress ink to Some Tando Harlequin Extra Thins and then stamped with the text stamp from Chocolate Baroque's Butterfly Poppy Collage Rubber Stamp Sheet in Potting Soil Archival Ink. I then Stamped the Large Butterfly also from The Butterfly Poppy Collage Stamp sheet and applied watered down distress ink using a brush to colour. The cardstock panel was then mounted onto a piece of Tando Grey Board cut to size and the edges Inked with Walnut Stain Distress Ink.. All elements were then mounted onto the tag, some burlap string was pulled apart and added also and to finish sentiment strips added.
 
 
Here's a close up view of the detail.
 
 
I hope you have enjoyed the process of how this all came together. I do hope you will stop by Chocolate Baroque and peruse all the wonderful stamps Lesley and David has to offer.
Do check back to see what the other Design Team Members have in store for you this week.
Fiona x
 
Products Used.


Other Supplies.
 
Ranger Distress Ink Sprays- Frayed Burlap, Vintage Photo, Walnut Stain.
Ranger Distress Oxide- Wheathered Wood
Ringer Distress Ink- Walnut Stain
Ranger Archival Ink Pad- Potting Soil and Black
Tim Holtz 3d Embossing Folder- Lumber
Burlap String


Monday 23 September 2019

Hochanda Monday Whimsy Birds

For this week's Hochy Monday I'm showing a couple of cards from way back in 2017:


I painted the {Whimsical Bird 1} with acrylic paints and added lots of doodles. I used painted text pages and drew around the clouds from the old garden stencil then cut them out and used a computer generated greeting.


Again I used acrylic paints in layers with lots of blending for the {Whimsical Bird 2} and added paint dots and lots of doodles.


I cut a circle from scrap paper and used spray inks through the centre and added splats and a computer generated greeting.

Friday 20 September 2019

Anything goes By Dee


Hi everyone Dee here with a tag for anything goes week here on Tando creative.


I started with rubbing my tag back with my ringers after i had sprayed it with water
the tags are so sturdy they roll back the layers.


I used the papers i made the other day with deli wrap and matted them to the tag i then highlighted the layer that had been rolled back by painting them with raw umber i inserted the broken clay clock 
which i had coloured with water colour / bister or infusions that kind of thing gives a lovely natural finish as you can still tell its clay.


around the clock i used crackle accents and a glass dome was stuck to the base along with some screws. I hope you have enjoyed my piece. I will be back soon don't forget to let me know that you have stopped by.

Cheers Dee


Thursday 19 September 2019

Danger Dial Tag by Hannah Oxberry

This week is "Anything Goes" week at Tando Towers - so I thought I would have a little play with some of the Steampunk Parts.


I wanted to try and create a tag that looked like it could have been part of a operation panel for some sort of highly sensitive equipment. 

I created a layered effect with paint using the colour combination of yellow, grey and black typically seen on warning signs. The tag base I gave a weathered effect using washes, crackles and some splatters too.


The dial I layered up and gave it the rusty treatment, being sure to paint in red the top section of the dial to give the impression the needle is ticking over in to a critical zone.

Industrial style stamps add to the overall theme while red and green buttons have been created using a glossy finish.

I hope you have enjoyed this project!


List of products used;


Tuesday 17 September 2019

Anything Goes Week- Fiona Randall

 
Morning all it's anything goes week here on the Tando Blog.
 
For my project I decided to just go for it and throw everything painty and and Inky at it.


I started by creating a master board on 300gsm cardstock using DecoArt  American Premium Acrylic Paints in Primary Magenta, Primary Yellow, Green Gold and Cobalt Turquoise Hue. I applied with my fingers blending the colours all over the cardstock. I used the same colours to stamp and stencil over the top. Next up Stamping all over with a stamp and Black Versafine ink. To finish my master Board Spatters of white using a Posca Paint Pen.
 
I then cut a piece of my master Board Cardstock and applied to a Tando Long Tag. ( the leftover masterboard can be saved for another project) I then applied the same colours of paint to decorate the Tando Heart and Word Strip. Posca Paint Pens in Black and White were used to add the dots on the Heart. I then stamped the Butterfly and painted with watered down Green Gold and Cobalt Teal Hue paints and then fussy cut.. All embellishments were then added to the tag and to finish the tag was edged with black Ink.
 
Here's a close up shot of all the detail.
 
 
Thanks for stopping by today. Do check back to see what the other design team members have in store for you this week
Fiona x
 
Products used.


Other Supplies
 
Paper Artsy Stamps- Tracey Scott A5 Set no 26
 
Impression Obsession Stamps- Seth Apter- Planetarium
 
Carabelle Studio Art Printing Stamp- noAP60007
 
Ranger Archival Ink- Black
 
Versafine Ink- Onyx
 
Posca Paint Pens- Black and White


Monday 16 September 2019

Hochanda Mondays - Jane Royston

Hello!

Today on the Tando Creative blog I am sharing a couple of the projects that have been previously created for the HOCHANDA shows and I thought I would start with some rusty ones...


Large Tando hearts decorated with a selection of the cogs and butterflies.


Stencil board covers using the stencils that go in between.

The rust is created using sand texture paste from Decoart and then coloured using the Decoart Media fluid acrylics.

Thank you for looking and happy crafting!

Jane xx

Saturday 14 September 2019

Resist by Dee


Hi everyone Dee here with my resist post, I went with an old favourite of a gesso resist for my piece
I used a Carabello stamp 


I covered my Tando tag with a manilla tag which i stamped onto using gesso that i applied to the stamp using cut and dry foam. I heated this with a heat gun until dry.


I used distress ink to colour the tag I used antique linen, Weatherwood, Vintage photo & walnut stain 
i applied the ink using cut and dry foam.


I tripple embossed some Silver/Pewter embossing powder and stamped with a Chocolate Baroque stamp. A circle from the Tando grab bag was covered with a Finnabair stamp and wax was applied.
Finally three small butterfly images were coloured with rusty hinge and cut out, glitter stickles were used on the body of the Butterfly's.

Cheers folks x


Grab bag of Circles

Grab Bags


Thursday 12 September 2019

Tando Creative Zone Thursday Tutorial- Fiona Randall


Hello all welcome to another Thursday Tutorial. Over in The Tando Creative Zone on Facebook you will find the step by step tutorial to create this large media board.
 
 
I got Inky with Paper Artsy Infusions and fabulous stamps from Pink Ink Designs and of course Tando's fabulous substrates.
So if you want to  give this a go head on over to the  Tando Creative Zone  on Facebook for the full step by step.
Have Fun
Fiona xx


Tuesday 10 September 2019

Resist Butterfly Card by Jane

Hello!

I thought that I would do something a bit different this week with my project on the Tando Creative blog and make a card! 

As it is resist week I decided to use clear embossing powder for my resist on both card and a Tando whiteboard piece...


I started by using a versamark ink pad through the arrows stencil onto a piece of stamping card.  It was then coated with clear embossing powder and heated until it turned glossy. 

Once it had cooled I used distress inks with a blending brush (broken china and faded jeans) then wiped the ink off of the embossing...


I used the same technique through the dots stencil onto one of the whiteboard butterflies from Tando and then used wild honey and mustard seed inks on top.  I also added a little bit of black around the edges for extra definition.

To finish the card I added a strip of white vellum, some black gems and a sentiment...


To create this card I used:

* Tando Creative Stencil - Arrows
* Tando Creative Stencil - Dots
* Tando Creative - Butterfly Grab Bag

Thank you for looking and happy crafting!

Jane xx

Monday 9 September 2019

Hochanda Mondays- Fiona Randall

 
Morning all it's my turn to showcase a piece that I created that has been seen on Hochanda using Tando Products.
 
Today I'm Showcasing Birgit Koopsen's Fabulous Portable Art Case which will be showcasing again on Hochanda  With Di and Tando Creative this coming coming Friday September 13th.
 
 
I ran this as a workshop in April earlier this year and it was very popular. Everyone absolutely loved their Art Case.


Here is a side view of the Art Case open to store your paper and pens when travelling. It comprises of 2 inner compartments to take A6 paper sheets and pens/pencils.
Fold over the front cover to reveal a clipboard clip on the inside
 A great project to make and so useful for keeping supplies all in one place and compact for your travels.
Don't forget to catch Di on Hochanda on Friday September 13th to see this on the show as well as other variations created the Tando Design Team.
 
I hope you have enjoyed this re visit. Thanks for stopping by
Fiona.
 
Get yours Here


Friday 6 September 2019

Neil Walker Book Cover


Hi there!

Today I've made a video to show how I decorated one of the Tando book covers. It's Neil Walker's Mechanical book cover kit. He has a whole range of covers available. If you look on his blog neelz expressionz he has some more ideas on how to decorate the covers. 

Here's the link to the video 


If you search the Tando blog for book binding or mini books, there are some other methods of binding the journal. Here is a simple method from Karen (mini book). I stuck my calico inside instead of outside, and then simply painted the inside covers and the calico. 

Thanks for watching!

Celia  x

Thursday 5 September 2019

September colour theme

Hello, Carol with you today.

This month I have created an ATC (card) and ATC (coin) for my coloured themed project.


September's colours are:-


and here is my coin:-


and card:-


Both have been painted using acrylic paint and then distressed! this didn't turn out as I had envisaged - I just can't get any type of crackle product to crackle! and my favourite crackle stamp looked too flat … so, its a bit of a disaster which was wiped back with a baby wipe, which, in the end I didn't think was too bad for my background.

Did you see the Hochanda show when Di showcased those wonderful tag elements, found here?, well, these birds (which I adore) are from one of those tags… I do love the fun element of these as there are no set rules with them…

TFL today xx

Tuesday 3 September 2019

Colour Theme ATCoin

This is the colour theme for this month:


I thought I'd have a go at something different for me. I've still used an {ATC coin}, but just layered it up with lots of bits and pieces.
I've used a bit of bandage type stuff then the grid from the {Grid Round}, various metal embellishments, a key from the {Mini Keys} and a {Cog}.
It looks a total mess to start with.


I gave it a few coats of very thick gesso until it was completely white and then used watercolours to colour various parts. I built up the layers gradually.