Showing posts with label Hearts. Show all posts

Thursday, 14 February 2019

Love & Hearts Theme Week - with Nikki K.


Morning everyone,

Today I'm sharing a tag made for the 'Love & Heart's' theme week.  I thought I'd go with the 'secret admirer' slant,  because if I have any, they are definitely secret!!

I put some modelling paste through a stencil, onto the Tando tag.  This was then given a coat of grey paint that I mixed with Tinting Base and Carbon Black paint.  I covered that in White Antiquing Cream, and rubbed back to give depth to the background.  Some red and black stamping in paint finished this off.


The Tando heart was painted in Red, and stamped.  Over this I put a layer of Crackle Glaze.


A book plate, numbers, bolts and nuts were painted in rust colours, and a sentiment stamped for the book plate.

I added rusty wire to the top of the tag, and shaped the top like a little rustic heart.  I didn't glue the heart down, so it moves as you move the tag, which is quite nice.


Hope you like it and can join the rest of the team this week for more inspiration.

Best Wishes,

Nikki K.
xxx


Products Used:


Tag
Heart
Bookplate & Bolts (Industrial Elements Kit)
Numbers
Andy Skinner Tech Trauma Stamp Set
Andy Skinner Word Up Stamp Set

Crackle Glaze
Antiquing Cream
Tinting Base
Carbon Black
Pyrrole Red
Quinacridone Gold
Raw Umber

Wednesday, 13 February 2019

Love and Hearts- Fiona.

 
Morning all Fiona Here with a Love and Hearts themed Artist Trading Block.


I die cut the block with Tando Grey Board and assembled. Embossed wood grain watercolour cardstock was given a wash of media fluid acrylic then the grain texture highlighted with a distress crayon and then cut to size and attached to all four sides and top of the cube. Tando Grey board Hearts and the Faceted Heart die once assembled were then Given the Rusty treatment with DecoArt Media Fluid Acrylics in Paynes Grey and Quinacrodone Gold Then edged with a black Archival Ink Pad. The Hearts were then attached to sturdy Florists wire of Varying lengths before being inseted into the block. Hemp Twine was then wound around the wires and finished with a bow with ends frayed for a rustic feel. The base was created by using two Tando Grey Board circles attached to a piece of cardboard tubing cut to size to create a bobbin. This was then painted with DecoArt Media Fluid Acrylic in Raw Umber and Hemp Twine wound around the bobbin before gluing to the cube. To finish Scrabble Tiles were edged in Potting Soil Archival Ink and then attached in place on the block.
 
Close Up Detail.
 
 
Thanks for stopping by
Hugs Fiona.
 
Supplies.


DecoArt Media Fluid Acrylics,
 Paynes Grey, Quinacrodone Gold, Cobalt Blue Hue, Titanium White, Raw Umber
 
From my Own Stash.
 
Ranger Archival Ink Pad- Black, Potting Soil.
 
Tim Holtz 3d Embossing Folder- wood Grain
Tim Holtz Sizzix Faceted Heart Die.
 
Hemp Twine, Scrabble Tile, Floristry Wire.
 
Eileen Hull Sizzix Die- Artist Trading Blocks.


Thursday, 15 November 2018

Spray Ink/Paint week- Rusty Heart Tag Fiona Randall


Morning all  the Team are playing with Spray Inks/ and or Paints. Here's my contribution a Rusty Grungy Paint Sprayed Tag.


I started by priming all my greyboard pieces with DecoArt Media Tinting Base. I then Used DecoArt Media Fluid Acrylics in Prussian Blue Hue  And Raw Umber mixed with a little Carbon black to make a darker brown in a couple of mini mister bottles to make my spray paints. These were then misted onto the tag base and dried between layers until I got the effect that I was after. Next up DecoArt Media Modelling paste was applied through a woodgrain stencil to the greyboard circle and Heart and once dry spritzed and sprayed with the Raw Umber Carbon black mix. Again drying between layers to achieve depth.  I then applied DecoArt Media Fluid Acrylic in Raw Umber to the large Washer from Andy Skinners Industrial Elements set. When dry it was bound with Rusty Wire. Stamping was then added to the tag base using France Papillion's London New York Stamp set from Illusionary Artists .Potting soil Archival Ink applied to the edges and  finished with a swipe of  DecoArt Metallic Lustre in Burnished Brass. Splatters of DecoArt Media Fluid Acrylic in Titanium white applied to finish the Tag Base. On the Greyboard circle and Heart DecoAt Media Antiquing Cream in Patina was applied to my craft mat and water added to make a wash. The circle and heart were then dipped into  it to create spotting and splatters. All pieces were then assembled onto the tag base and a sentiment added to finish.
 
 
Close up detail.
 
 
Thanks for stopping by today
Fiona.
 
PODUCTS USED.


Saturday, 10 June 2017

Black Modelling Paste by Nikki

Morning everyone,


My turn to share a make with you today, and our theme was to use Black Modelling Paste.

I decided to do one of my favourite Tando pieces, a little heart shelf.  It lends itself to so many ways of decorating, and is very easy to put together, and very sturdy when glued, as it's made from mdf.

I assembled and painted the shelf with tinting base, and then a coat of Vermillion.


As I was on holiday, and had taken limited supplies, I had to improvise to get my top coat colour.  I wanted a crackle effect, but realised I'd forgotten the weathered wood, and chose to use chalk crackle instead.  I coated the orange with the crackle medium and left to dry.

For the top coat, I'd only taken one colour of chalk paint, so decided to mix some fluid acrylic into the colour I had, to make a turquoise.  I picked a bit of everything at this point!  Just be careful not to add more than 10-15% fluid acrylic, otherwise the crackle reaction may be affected. (This is not a problem if you were just mixing a paint colour).


When painting the top coat, do even strokes, and try not to go over a patch you've just done, as it crackles almost immediately, it's brilliant to watch!


The black modelling paste was then used through a stencil.  You can use black modelling paste exactly the same way as white or clear, and can paint over it if you wish.  But sometimes it's nice to use it as a feature, and it also makes certain colours pop when put over it, or acts as a contrast to metallic lustres etc.  It's a firm favourite of mine.


Once stencilled and dry, I added Copper Kettle Metallic Lustre on my finger, to the raised area's of the modelling paste, to highlight the skull and bring the colours together.  I also ran my finger around the edge of the shelf, to tie in.


Thank you for joining me today, don't forget to check out the rest of the week's projects by my lovely colleagues, and let us know what you think.

Best Wishes,

Nikki K. xxx

Products Used:
Tando Creative - Heart Detail Shelf.
DecoArt - Chalk Crackle, 2oz Chalk paint Yesteryear, Fluid Acrylics: Vermillion, Cerulean Blue, Cobalt Turquoise Hue, Cobalt Blue Hue, Green Gold. Tinting Base, Black Modelling Paste, Metallic Lustre in Copper Kettle. Decopage Glue.

Saturday, 22 April 2017

Anything Goes week by Nikki

Morning everyone,

Nikki here today.  I wanted to share a make with you for my 'anything goes' theme this week, that I made for a make and take recently for Tando Creative and the Ministry of Mixology retreat.


These are the Tando 'Cubbeys', and are great fun to assemble in any way you wish.  Each one makes up a box, either with a solid back or a cut out, that you can add acrylic or acetate or leave empty, and put lights behind if you wish. You can stack them however you want too, or put certain sizes together if you prefer.  And you can add more at any time.

I painted and stamped mine before assembling them, using DecoArt media cobalt teal hue mixed with tinting base to get a pale aqua colour.  Each box was then stamped in a slightly darker shade of the blue, as background stamping.

I kept to two tones of the blue, and pyrrole red for the stamping, and changed the stamps around in each box.  The acrylic shapes are stamped in carbon black, and then painted from behind in layers, starting with the one you want to see from the front first.


The skull box was stamped and his teeth painted white, then I added Stampendous Frantage embossing powder in Aged Scarlet for his nose, keeping to the red theme.

I left the centre of the main acrylic piece clear, so you could just see the writing in the heart, and it looks lovely with lights behind of an evening.


Thanks for stopping by for the 'Anything Goes' week.

Best Wishes,

Nikki K.

Products Used:
Tando Creative - Cubbeys, Acrylic pieces for Cubbeys, mini hearts, cogs small.
DecoArt Media Fluid Acrylics - Cobalt Teal Hue, Pyrrole Red, Titanium White, Metallic Gold, Carbon Black.  Media Tinting Base.
Stampendous - Andy Skinner stamps - Skulldoggery, Toxic, Handle with Care, Steampunk, Curiosity.
Frantage embossing powder - Aged Scarlet
Nathalie Kalback Marks stamp.


Monday, 6 March 2017

Technique Week - Cracks & Crevices

Morning everyone,

Nikki here today with my take on this weeks theme, 'Cracks & Crevices'.

I absolutely love these components from Tando Creative, I used a media board, and hearts and wings, and the fab mini skulls to make this darker than dark piece.


I used DecoArt chalk paints and crackle to create the deep cracks on the Media board, and then gave a very dark wash of colour around the edges.  I stamped onto the heart with Andy's crackle stamp in paint.  Once dry I painted over the top of the stamping in black, this gave a textured cracked effect.


The Tando mini skull was given a rust treatment (Andy skinner technique), and the wings painted black and stamped.


I adhered strips of torn paper from an old book, and edged the tag in carbon black, and some stencilling, and edging with a posca pen finishes it all off.


You can find all of the products used over at the Tando Creative Store, and don't forget to join us on facebook in Tando's Creative Zone, we'd love to see your own makes, and you can keep up with all the new products and workshop news!

Bye for now,

Nikki K.
xxx

Products used:
Tando Media Boards
Tando Mini Skulls
Tando Wings
Tando Grab bag of Hearts

DecoArt Media:
Fluid Acrylics: Carbon Black, Raw Umber, pyrrole orange, diarylide yellow, paynes grey, quinacridone gold.
Americana Chalk paint - Restore & Lace
Americana Crackle Medium

Andy Skinner stencil - Made to Measure.


Thursday, 2 April 2015

April Colours - a card...

Hi there!

Its the beginning of April and time for another colour theme!

Its my best friend's birthday this month and I made here this card to tie in with the colours:


I used the Tando Hearts Background Mask to lightly emboss the clouds with hearts.


Hearts Background mask

Anything goes with this colour scheme so wny not give it a go!  Join in with any of this month's themes via the link at the top of the page to be in with a chance of winning a prize this month!


Caroline ♥

Friday, 2 August 2013

Hearts and Swirls


I went all out on hearts for this page, all the paper ones are hand cut from a template I made!  Tando has loads of lovely heart shaped product and one of my favourites is the heart mask.  I used some chalk ink and a sponge, and sponged the top 4 rows blue, then the middle green and the bottom yellow so you get a mix of colours through the mask.  I then layered up all my hand cut hearts.  I also used a heart button, covered in gesso and then sprayed with yellow cosmic shimmer mist just in the corner to give another two tone effect.


Katherine

Thursday, 25 July 2013

Winged heart

Hi, Caro is here. Winged things is our theme this week and I'd like to show you my card with a winged heart which I took from the set Valentine Symbols. The winged heart is embossed with various embossing powders and embellished with a little rhinestone.


Sunday, 17 February 2013

Yellow, Red, Orange - a little Canvas

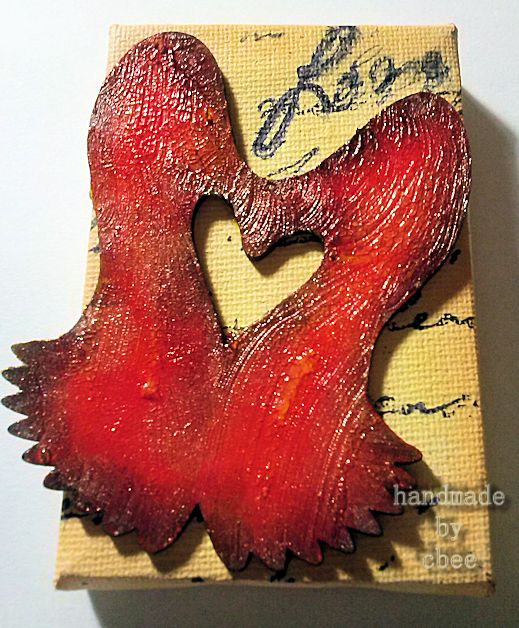
Hi, Caro's here. I have a little canvas for you in the colors red, yellow and orange. I have colored the background with Distress Inks and stamped onto. The chipboard of the Wings and Heart Set was colored with Distress Stains, dried and crackle paint rock candy put onto.


Thursday, 7 February 2013

With Love

Hi, Caro is here. As you know this week we want to show you projects with embossing.

I have chosen to create with the With Love Heart Stand - isn't it fabulous? First I have covered everything with Gesso, then sponged with Distress Ink and the letters are embossed with UTEE.


Saturday, 21 July 2012

Bling it Up!

Hi, it's Gez here delighted to be sharing my first creation with you for Tando. This weeks focus is all about the Bling!

I have decorated a couple of 3"x6" chipboard sheets and run them through a Bind-It-All machine to make them into notepad covers.. I don't know about you but I love blog hopping and finding new ideas and then never remember when or where I saw them so I thought this book would be handy to keep at the side of the computer!


I have also used some of the mini hearts and decorated them in Cosmic Shimmer Twinkles


Here are the products I used.. 


also,


Thank you for looking and leaving a comment if you get the chance,
Happy creating, Gez