Showing posts with label grey board. Show all posts

Tuesday, 24 May 2022

Hex Tech Tuesday - Haunted Windmill by Kim

I think I got a bit carried away this time! 

The basis for this construction is the Hexagons set from Tando Creative, and I’ve gone for the derelict, haunted look.


The main building

I used the same cereal box method of construction as I did for the lighthouse (Beacon of Hope), but this time I used the largest hex with sides of 5cm for the bottom. Make sure you use the one with a frame because you will remove the centre later, so that you can put a battery light inside.


For the top I used the centre from the smallest hex, about 2.5cm. The windmill is shorter than the lighthouse.


As an alternative method you could cut six separate side panels - and make sure you include an extra flap on one side of each one, so you have something to glue the next one to.


Once the glue has set I used a very sharp X-acto craft knife to cut windows and a door. I also cut a random shaped hole for added decay. I add exposed laths to this hole from the inside with broken ends. These are wooden coffee stirrers split in half lengthways with snapped off ends.


I used thin strips of waste greyboard for the door frame, windowsills and lintels.


I used solvent glue for the above because it grabs and dries quickly.


Once all the glue has set I painted black gesso all over, then plastered the outside with DecoArt Texture Sand in a rough manner to give that old ‘cob wall’ look. 


The cowl

The base of the cowl is a hex with 3cm sides. To get the shape for the cowl I trimmed the top from a Tando Creative Gothic Arch Layered Frame kit.

I cut a section off the hex to get a straight front. The cowl insert is angled backwards slightly so that the sails don’t hit the building. This insert is supported with a ‘wedge’ of leftover greyboard.


Using more cereal box I used scissors to cut the roof section. These parts are glued together using as many fingers as you can muster to hold them until set.


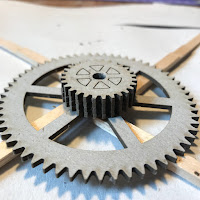
The bit at the back (that turns the mill to face in to the wind) is made from greyboard offcuts and a small cog wheel from the Industrial Elements greyboard set. 


On the front I glued 4 greyboard washers to space the arms away from the cowl. I drilled a hole in the centre for a piece of bamboo chopstick as a spindle.


The Base

I used 2 x 4cm hexes wrapped with more cereal box. I then cut a large piece of cereal box in a hex shape with 7cm sides for the floor.


To add the handrail I first had to cut a 3cm and 4cm hex frames to make support around the edges, then glued a 1.5cm strip around the outside. When I realised my first idea wasn’t going to work I cut away all but the corners then glued in some bamboo sticks (from an aroma diffuser) as they are more handrail-like.


Arms and Sails

I used a large cog wheel from Industrial Elements and a few wooden coffee stirrers for the arms. At the back I glued on 4 small cog wheels to ensure the arms could turn without hitting anything else.


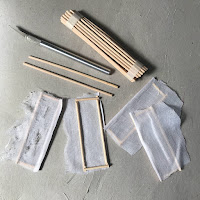
After trying all sorts of things to get the sails looking just right I went with bamboo diffuser sticks glued in to an oblong shape, with muslin glued on to the frame thus formed. I cut and slashed the muslin with scissors and a craft knife to get the frayed and torn effect.


They were glued into place on the arms - but not until they had been painted and dried.


Painting


Once the Texture Sand on the main building was dry I used DecoArt Media Fluid Acrylic in Grey Value 6 as a wash to colour the whole area - no need to get even coverage, then Grey Value 3 as a wash to add stained areas, followed by patches of Paynes Grey as a wash. Weathered stains of mould and decay were added with Burnt Umber and Green Gold Fluid Acrylics. Windows and door frames were painted with watery Burnt Umber. The broken laths were stained with Burnt Umber then shadows of Paynes Grey where they go behind the outer ‘cob’.


The cowl was base coated with DecoArt Americana Lamp Black. Americana Burnt Umber was stroked over the top of the small gear structure to give an aged wooden look. The cowl roof was stained with streaks of Media Quinacridone Gold to give a rusty tin look. Detail of nails and joins were added with a dip pen and Media Paynes Grey.


The base was base coated in Lamp Black, then Americana Burnt Umber, then Americana Espresso was stroked over to give the impression of wood. The bamboo handrails were stained with Burnt Umber. To continue the decayed look Media Green Gold was dry brushed on to look like moss and mould. A few touches of Media Paynes grey to give the rotten look to some of that wood.


The arms were base coated in Lamp Black, then Americana Burnt Umber stroked over the top. Details were added with dip pen and Media Paynes Grey to give the look of old timbers held together with bolts.


The sails were stained with washes of: Media Grey Value 6, Burnt Umber, and Paynes grey.


To finish, the centre section was removed from the base of the mill (if not already done) and a small battery powered lamp was placed on the base and covered with the mill - instant spooky!


Thanks for dropping by - take care walking home in the dark … especially if your path takes you past the old windmill!


DO NOT - DO NOT PUT A NAKED FLAME TEA LIGHT OR ANY OTHER NAKED FLAME INSIDE THE MILL - IT WILL BURN!


Products:

Tando Creative Hexagon Set

Random greyboard offcuts and an empty cereal box

Coffee stirrers and bamboo sticks

Tando Creative Industrial Elements - cog wheels

DecoArt Texture Sand Paste

DecoArt Americana colours

DecoArt Media Fluid Acrylics colours

Tando Creative Gothic Arch Layered Frame

Friday, 11 June 2021

Butterfly Week- Fiona Randall


Morning all,

 The theme on the blog this week is 'BUTTERFLIES'

You know that I have a passion for this subject matter so this was a no brainer for me.


I used one of the Tando Size 8 Tags and a Piece of Tando Grey Board cut to size to mount the Tag onto to create a panel. A piece of watercolour cardstock was cut to fit the tag and glued into place.
The tag was stamped with the leaves and embossed in gold embossing powder. This was then Water coloured with Lindy's Magicals and Distress Spray Stains and finally a few splatters added with gold paint. 
The flowers were stamped and gold embossed onto vellum and fussy cut. The Butterfly was stamped and given the same water colour treatment as the leaves on the tag.
The flowers and the butterfly were then added to the tag with off cuts of Grey Board to give depth and dimension. Finally a simple sentiment was added as shown.
The panel was given a coat of DecoArt Chalky Finish and the edged by swiping gold wax.
The Tag was then mounted onto the panel with off cuts of grey board to give depth to finish.
I love how this has turned out and the soft dreamy effect I was going for I think I achieved.

Thanks for stopping by today
Stay Safe
Fiona xx

PRODUCTS USED.


Deco Art Chalky Finish- Honour.

DecoArt Media Fluid Acrylic- Metallic Gold

OTHER PRODUCTS

Watercolour Cardstock

Vellum Sheets

Stampendous Gold Embossing Powder

Versamark Embossing Ink Pad

Lindy's Flat Magicals Set- Summer Meadow

Distress Spray Stain- Pumice Stone

Finnabair Wax- Aged Brass

Stampendous Stamps- Jumbo Butterflies

Paper Artsy Stamps by Tracy Scott- set TS058

All and Create Stamp set by Tracey Evans- Butterfly Meadows


Tuesday, 22 December 2020

Christmas Week 3- Fiona Randall


Morning All I'm back with my project for week 3 of Christmas.

Before I go any further I would just like to wish you all a very Merry Christmas

and lets hope 2021 is going to be better for all of us.


for my project i used the Layered Frame Arch to create my Christmas theme.
 Lots of painty layers, crackle and distressing. Embossing, Inking and Die Cutting.
I am quite pleased with my christmas makes and won't be a stranger to it in the future.
Do stop by the rest of the week to see what the creative team has in store for you.
See you all in the New Year
Merry Christmas Everyone
Stay Safe
Fiona xx

PRODUCTS USED


OTHER SUPPLIES

Tim Holtz 3d Embossing Folder- Lumber

Distress Spray Stain- Walnut Stain, Frayed Burlap, Gathered Twigs

Distress Inks Pads, Rustic Wilderness, Forest Moss, Aged Mahogany, Candied Apple.

Distress Archival Ink- Ground Espresso

Tim Holtz Thinlet Dies- Holiday Greens

Poinsettia Dies- Sizzix

Kraft Cardstock


Tuesday, 15 December 2020

Christmas Week 2- Fiona Randall


Morning all I'm back with my second Christmas Project for week 2 of Christmas.


I decided to creat a Christmas Sleigh from scratch from Tando Grey Board Sheets.
For the sleigh Blades I cut two strips of Grey Board, rounded the corners on one end then sprayed with water and curved the grey board around a paint bottle.
As the grey board dries it hold the shape of the curve- Neat eh. One dry these were given a coat of media fluid Acrylic in Raw Umber.
Onto the top of the sleigh next. 
A piece of Tando grey board was cut and the top given a rounded shape.
A distressed finish was then added with DecoArt Chalk Paints, then scored with a pokey tool to create the look of wood panels. 
Vintage Music paper was then applied to a small Tando Tag size 1 and the edges inked.  A paper Snowflake was the die cut from Christmas Scrapbook paper from my stash.
 A small Tando Mini Snowflake was given a coat of chalky finish paint and the edges inked and then the snowflake assembled.
This was then attached to the tag along with some stringed silver bells.
 Everything was then assembled to complete the sleigh using off cuts of grey board to give depth and dimension.
Isn't it amazing what you can construct from a sheet of grey board and your imagination.

Thanks for stopping by today
Stay Safe
Fiona xx

PRODUCTS USED.


OTHER SUPPLIES

Tim Holtz Snowflake Rosette Die

Christmas Scrapbook paper

Distress Archival Ink Pad- Ground Espresso

String

Mini Silver Bells

Vintage Music Paper.


Thursday, 8 October 2020

Nature Week -Fiona Randall

 
Morning All Fiona here with this weeks theme Nature. I decided to create a Nature themed Mini Book. I have been participating in The Tando Mini Book Club which is a monthly subscription online book club. Where you can learn how to create the inner pages to fit into the Tando range of mini books by way of regular Facebook Lives and videos in a private group on Facebook .

 
These inner pages of the mini book were created following one of the tutorials Di Oliver has shown in the club so far.  The pages have been Inked Stamped and collaged using a Nature theme.

 
A little book full of creatures of Nature from Bugs to Butterflies.

 
What's not to like. I love it. So if you would like to create something like this and a whole lot more of different inserts and pages for Mini Books. Hop on over to the Tando Site and sign up......

Do stop by the rest of the week to see what the creative team have in store for you.
Thanks for stopping by today, Stay Safe
Fiona xx


TANDO PRODUCTS USED.


Other Products.

Ranger Distress Ink Spray Stain- Gathered Twigs.

Ranger Distress Ink- Vintage Photo

Ranger Distress Embossing Glaze- Vintage Photo

Ranger Archival Ink- Black Soot

Tim Holtz- Entemology Stamps

Tim Holtz Baroque Stamps

Collage Elements- My own Designs from My stash.


Tando Mini Book Club Monthly SubscriptionMini Book Club SubscriptionTando Mini Book Club SubscriptionTando Mini Book Club SubscriptionMini Book ClubMini Book ClubMini Book ClubMini Book Club

Wednesday, 26 August 2020

Texture Week- Fiona Randall


Morning all Fiona here with this weeks theme-Texture.


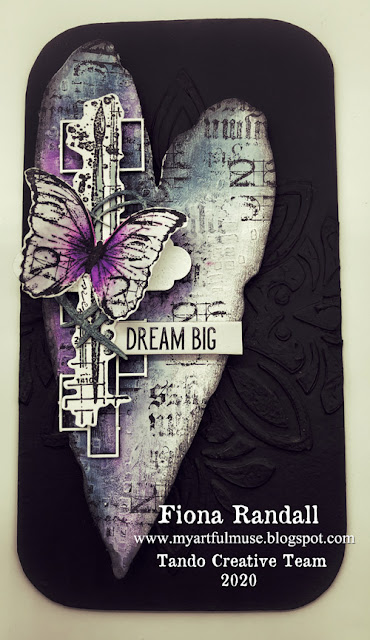
I have used one of the Tando Large Media Boards in Conjuction with the large Tando Distressed Heart for my project. Lots of stencilling with modelling paste ,stamping and painty washes to create my texture and to finish of course a Butterfly.
Do stop by the rest of the week
 to see what the other DT Members have in store for you.
Stay Safe
Fiona xx
 
Products Used.


Other Supplies
 
Tim Holtz Tissue paper- Floral.
 
Tim Holtz Stamps- Distressed Text
 
Black Archival Ink Pad.
 
Butterfly Stamp- Finnabair.