Showing posts with label cogs. Show all posts

Wednesday, 27 July 2022

Book binder cover A6 - Steampunk by Kim

 When you have a book full of secret stuff, it needs to be secure!

This steampunk style cover is tough enough to keep prying eyes off your personal pages. It has lots of heavy iron work - and a time lock!

I collected the required parts, left over from another Tando Creative set, Industrial Elements - 1 large cog, 3 small cogs, door plate with keyhole (trim the round top off), 6 small hexagon bolt heads, 4 rivets, 2 empty frames from waste greyboard, and 2 large hexagon nuts and washers for the back cover.

I arranged the pieces on the cover, and when I was happy I cut the large cog to fit to the edge. I cut a small cog so that it looks like there are two appearing from the locking mechanism.

I searched through my collection of old watch parts (like everyone has in a kitchen drawer!) and found one just the right size.

First, I glued the rivets in the corner of the front cover. Next I stacked the two empty frames and the door plate, and glued them together, adding the six small hexagon bolt heads.


I used strong solvent glue to attached the watch works to a piece of waste greyboard - but didn't glue it to the door plate yet.

Next everything, including the cogs gets a coat of DecoArt Americana Zinc (grey). Once dry all the outward facing surfaces get a wash of DecoArt Media Paynes Grey - keep the brush strokes in a vertical, up and down, direction to help with the weathered illusion. Then we reach for DecoArt Media Quinacridone Gold and add washy patches, some thicker than others. Last, I added DecoArt Media Green Gold to add streaky stains from strategic places - like the bolts, and maybe where edges might have been damaged.

When I was happy with the painted look I glued the watch works to the inside of the door plate, with the works exposed.


Once all was dry I glued everything together as previously arranged.

The back cover had two large bolts holding the hinges in place, these have the same paint treatment as the front. Two hinge plates (more greyboard offcuts) are glued on the outside of the hessian strip to complete the set. The bookbinding spine is glued inside.

I used a little DecoArt Metallic Lustre, Champagne Ice, to highlight the cogs and bolt heads.

Steampunk never goes out of fashion! Thanks for visiting.

Products:

Tando Creative Bookbinding covers (This one is A6)

Leftovers from Tando Creative Industrial Elements

DecoArt Colours; Americana, Media, Metallic Lustre

Hessian strip.

Friday, 7 January 2022

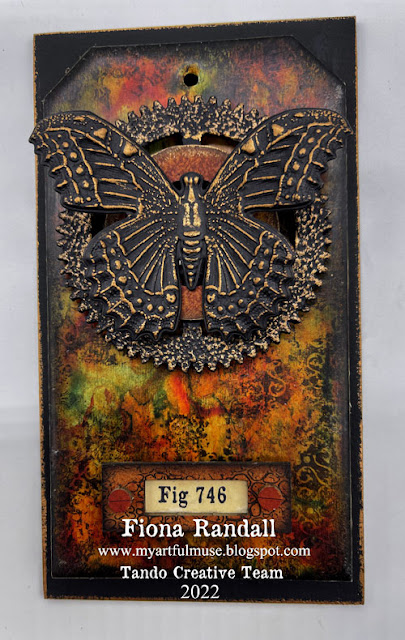
Rusty Butterfly Tag Plaque


Morning all Fiona Here with my first post of the New Year.

I am in my comfort zone for this project with a rusty grungy Tag topped with a metallic effect embossed Butterfly and a cog thrown in for good measure


Layers of DecoArt Media Fluid Acrylic paint were dripped and drabbed onto a Tando size 7 Tag and heat dried between layers until I got the look I was after.I then added some stamping using an Andy Skinner Vintage Background stamp for some extra interest using black Archival Ink. The Tag edges were then inked using black Archival Ink to draw everything into the background.
Texture sand paste was then applied to a cog from The Industrial Elements set. Once dry this was given a coat of DecoArt Media Fluid Acrylic in paynes Grey then swiped with Burnished Brass metallic Lustre once dry. A small washer from the industrial elements kit was given a rusty treatment along with some resist stamping. The same rusty treatment was applied to the bookplate and screw heads and black stamping added. I then embossed and die cut the butterfly using a Tim Holtz 3d Impresslit embossing folder from black 300gsm cardstock. This was then swiped with the Burnished Brass Metallic Lustre to highlight the raised areas. All elements were then layered up onto the tag using offcuts of grey board to give depth and dimension. The tag was then layered onto a piece of Tando Grey Board cut to size to which was painted using DecoArt Chalky Finish in Carbon and two coats of DecoArt Ultra Matte Varnish to seal. Thedges were then swiped with the same Metallic Lustre. A small piece of cardstock was cut to size to fit the bookplate and stamped before attaching and gluing to the base of the tag as shown. Two mini screw heads were then applied to finish.

Thanks for taking the time to stop by and read.
Fiona xx

PRODUCTS USED.


Wednesday, 21 October 2020

3D Week- Fiona Randall

 
Morning all Fiona here with this weeks theme 3D.
 I have used one of the Tando Ring Binders as my base substrate but I cut the flap off to make a book binder. Icoated the whole binder inside and out with DecoArt Chalky Finish in Carbon Black. I embossed a piece of 300gsm Black Cradstock with a 3d embossing folder. Cut to size to fit the front cover and glued into place. I then gave the whole binder a coat of DecoArt Media Ultra Matte Varnish inside and Out. I then constructed my centre piece using Various Tando elements and layered them up until I was happy. Then gave it a Rusty Patina effect and finished with some white splatters and Metallic Lustre. This was then mounted onto the front cover of the binder to finish.
Thanks for stopping by today.
Stay Safe
Fiona xx
 
Products Used.


Sunday, 19 January 2020

Spray Inks/Paints Week- Fiona Randall

Morning all Fiona here with my contribution to this weeks theme which is spray Inks/ Paints.


I've gone for the paint approach but sprayed it. This is achieved by mixing the colour of paint with water in a mini mister bottle and voila you have spray paint.
 
I started by base coating a piece of Tando Chipboard with DecoArt Media Titan Buff. I then applied Paste through a stencil and allowed to dry. Next Up I sprayed with DecoArt Media Fluid Acrylic in Dioxazine Purple. Varying the strength of mixes to get different tones of the same colour drying between each application. Further spraying was added with DecoArt Media Fluid Acrylic in Carbon Black and DecoArt Extreme Sheen in Vintage Brass but in short sharp bursts to create a spatter effect. A  Large and Small Tando Distressed heart were given a coat of DecoArt Media Fluid Acrylic in Quinacrodone Violet mixed with a little Carbon Black. Both were the spattered with the Vintage Brass Spray Mix and then edged with the neat paint of the same colour. Cogs from my Craftalong Kit Cogs Sheet and a Tando Embelishment were then given a coat of the vintage brass paint also. A set of wings from a Finnabair mould were given a coat of watered down DecoArt Media Fluid Acrylic in Dark Grey Value 3 and then swiped with DecoArt Metallic Lustre in Burnished Brass to highlight the raised Areas. All pieces were then layered with off cuts of grey board to give depth and dimension on the Chipboard  base. Finally the sentiment was added to the small Heart to finish.
 
 
Here's a Close Up of the Detail.


Thanks for stopping by
Fiona.
 
Products used.
 
Tando Products.


Wednesday, 13 November 2019

Texture Paste Cog

Hi there, it’s Celia here with a look at texture pastes. They lend themselves very well to rust effects, and I find they're so useful to add interest to a project.
I decided to use four different pastes together, because why just use one! I used DecoArt Sand Paste on the cogs and stippled some Andy Skinner Lava Paste on the big MDF cog. This needs heat setting to make it puff up. If you stipple it on finely it creates a nice pitted rust effect.
For the base, I used a 6x6 greyboard sheet and stuck on some Tim Holtz Abandoned collage paper. I discovered that the big cog is the same size as the cut outs in Fiona’s new Layered Tags, so I cut one out to put behind the cog. I just sprayed this black.

I used a spatula to apply Andy Skinner's Strata Paste and DecoArt Crackle Paste randomly around the edges of the base board.

When this was dry I stippled on a mixture of DecoArt media fluid acrylics to roughly match the colours of the paper (Burnt Umber, Green Gold, Pthalo green yellow, Transparent Iron Oxide). I also stippled some rusty colours on the big cog. Then I dry brushed the texture pastes with Titan Buff to highlight. I also coated a couple of small cogs from the minis cogs tag with some Ferro.

Then I added a couple of washes to tie it all in together before assembling. I added some silver Gilding Paste to the cog to highlight the rusty texture. The combination of the different texture pastes produces all sorts off yummy crunchy goodness!


And here's the finished piece - 

Thanks for stopping by!

Celia x

Monday, 15 April 2019

Anything goes- Industrial Tag by Monika

Hi!
It's 'Anything goes' week so I thought I would share this project with you today. Eveything I like combined on one tag.


I have started with applying Decoart Modeling Paste through stencil.

Next I have covered entire tag with Chalky Finish paint in Relic. Using clear wax candle I have rubbed the areas I wanted to show through.  For added interest I have also added Weathered Wood medium randomly.


Then a coat of Chalky Finish paint in Yesteryear was painted on. Once dry I have rubbed off the areas coverd with wax to reveal underneath paint.

Nuts, washers and cog were painted with Media Fluid Acrylics in Paynes Grey and Quinacridone Gold and then added on the tag.


I have also applied rusty washes and stamped randomly my favourite Andy Skinner's industrial stamps.

Last step was to coat the whole tag with Ultra-Matte Varnish to finish it off.


I hope you like my inspiration
See you next time
Monika


PRODUCTS USED:


Tuesday, 19 February 2019

Techniques Journal - by Nikki Killinger


Morning everyone,

We are gearing up for 24 weeks of playing in our Journals/Technique Binders, starting Thursday 28th February at 19.00 GMT.  These will be in the form of step by step articles, Facebook lives, or video, and we hope you can join us in the Tando Creative Zone each week to see them. 

I created the cover of my journal by putting modelling paste through a cogs stencil on the back, and then painting the whole journal in black Gesso.  Some paper from Stamperia was added to the front, in a random edged manner, and further stencilling was added to 'ground' the paper & design. 


I painted washes of Prussian Blue Hue, Quinacridone Gold and touches of Raw Umber over the paper, cogs and words.

   
I decided to use mine as a techniques binder, and painted the words in Pthalo Green Blue, highlighted in Metallic Lustre, and glazed with Triple Thick Glaze.


The whole of the rest of the binder was also highlighted with Metallic Lustre, picking out all the modelling paste detail. 


For my Facebook Live on 14th March, I will be showing a couple of  'faux' techniques similar to those below.


Don't forget to come and join us if you haven't already, in Tando's Creative Zone where it will all be happening, and check out the rest of the team's interpretations of their folders on the blog this week.

Best Wishes,

Nikki K.
xxx

Products Used:


Deep Brick Stencil
Deep Cobbles Stencil
Binder & Tags


Black Gesso
Modelling Paste
Triple Thick Glaze
Metallic Lustre - Copper Kettle
Prussian Blue Hue
Pthalo Green Blue
Quinacridone Gold
Raw Umber

Andy Skinner Cogs Stencil


Other:
Stamperia Paper.


Sunday, 4 November 2018

Anything Goes Week - Mechanical ATC by Nikki K

Morning all,

Today I have a little project for you, but with a lot of texture! 
I used a Tando ATC for my base, which are pre cut to the perfect size.  These are greyboard and take nearly any punishment with mediums and paints you want.  I started by painting it with a coat of Metallic Silver.

The raised area's are Sand Texture Paste, which I also used a spatula to add dimension, by just tapping and lifting it lightly off the surface.This gave a really nice cratered effect. 


I carefully added paynes grey to the textured area's, and when dry, washes of Quinacridone Gold over the whole piece, concentrating more on the raised parts, to show deep rusting.

The Tando cogs were painted in Raw Umber, and a wash of Quinacridone Gold. I then used Stampendous Embossing Powder in Aged Copper, and then made a mix of powder's to get the dark green/copper effect on the others.  These were partially heated, to keep the particles from melting in completely, but enough to give the mottled rusted effect. The round bolts on top were painted with Raw Umber, and then Cobalt Turquoise mixed with a little Titan Buff for a verdigree look.


The Mechanical sign was just printed onto a piece of paper, and aged with watered down Quin Gold and Paynes Grey. 


You can make a completely different look to your ATC's by glueing patterned paper to them, an easy design choice.  This is another one I made, totally different but still fun with embellishments from your stash.


I gave the paper a wash of Raw Umber on this one to make it more 'vintage' looking. 

Hope this inspires you,

Best Wishes,

Nikki K.
xxx

Products Used:

Tando Creative:
ATC's.
Cogs.
Industrial Elements Kit.

DecoArt Media Line:
Metallic Silver
Paynes Grey
Quinacridone Gold
Titan Buff
Raw Umber
Cobalt Turquoise
Texture Sand Paste.

Other Items:

Stampendous Embossing Powders.
Printed Sentiment.
Embellishments from own stash.

Wednesday, 31 October 2018

Halloween thrills with Tando Supplies - Brenda

Hi Everyone. 
HAPPY HALLOWEEN
As it's an Anything Goes week I thought I would pop in with a project and some photos of a class I taught recently at Country View Crafts using lots of Tando greyboard embellishments and their fabulous media boards.

This was my sample, a Halloween Triptych with three media boards held together with a back panel and lots of grungy techniques and images.


Several people had said they would love to do the project but were not fans of Halloween so I made a nature inspired autumnal board to use as inspiration fo those who wanted to mix it up a bit.


I took a stamp platform with me to show how to get clear stamped words on textured paper.


We had a fabulous group of ladies join us - some who had been to my workshops before and some new to CVC.


As always there were moments of fun and laughter .....


... and some of focussed concentration.


It was not long before people were designing their boards and choosing the fabulous chipboards from Tando to add to their projects.


Then we started to see different colour combinations ......


.... and the different compositions shine through.


We also saw how the DecoArt media paints and metallic lustres could combine to create some fabulous effects .....


... and how some splattering added another dimension.


You can see the mix of flowers and leaves, combined with cobwebs and spiders worked well for the Autumn boards ......


.... and how the skulls, cogs and bats could be added into the mix for the Halloween designs.


It's when all of this design and composition work is happening that I start to get excited to see how my original ideas and the techniques I used on my project get applied in different ways to create some really fabulous and unique work.


Each set of three boards were individual and personal to each participant as I encouraged them to follow their own muse and instincts putting their own personal stamp on their work.


Once the boards had come together and people were happy with the stories they were telling, we spent time on the finishing details ......


.... and everyone's projects together looked amazing. 
What do you think?


 The raven and the pumpkin are not chipboards but were created using stamps and embossing powders - they added some great textures to the pieces.

Thanks for taking time to scroll through and see the finished projects.

hugs Brenda xxx