Tuesday 28 June 2022

Hex Tex Tuesday- Abstract Wall Art- Fiona Randall


Welcome back for another Hex Tex Tuesday.

I love abstract art so decided to create a simple wall panel using the hexagons in a Monochromatic style.


I cut a Panel measuring 8x8ins from a Tando Grey Board Sheet and gave it a coat of DecoArt Chalky Finish in Carbon to both sides of the panel. Once dry I gave both sides of the panel a coat of DecoArt Ultra Matte varnish to seal and protect the chalky finish.
For this project I used 7 of the  hexagons . 

I gave all the hexagons a coat of DecoArt Media Tinting  base and dried with a heat tool.
Once dry I stamped all the hexagons with textures from Chocolate Baroque's Harlequin Fragments Rubber Stamp Set with Black Archival Ink.
I cut one of the hexagons as shown in the diagram below.


I drew a line from corner to corner left to right and then right to left.
As you will see you end up with a cross and have two diamond and two triangle shapes.
Cut along the cross lines with a ruler and a craft knife.

Next up arrange your hexagons onto the panel as shown.
To finish add a sentiment strip if desired.
I chose to go with a Monochromatic theme but this would look just as good using a riot of colour. The possibilities are endless.
A quick and easy project that would look great on any wall in your home or studio.
Thanks for taking the time to stop by and read
Fiona.

PRODUCTS USED.


Friday 24 June 2022

Tando Advent Winter Lodge Box by Art Angel x


Today I have another Tando Advent Box for you to complete and add to your Collection
This one has been decorated using rice paper with text over the top,
Simple but very pretty


First lay all your pieces out so you know which bit goes where, then glue together using a good PVA glue


You will have enough components to make a drawer and a box for the drawer to slide into


Once assembled, base coat using DecorArt Lace Chalk paint


I had some rice paper elements in my stash that i wanted to use to decorate my box, the elements were round going on to a square box but that didn't bother me as the very nature of rice paper allows for almost seamless adhesion


Use a wet paint brush or water brush to go around your design then gently pull apart where you want your rice paper to tear, the nature of rice paper means that your edges will be feathered this means the edges almost get lost when stuck down


Make sure you have enough pieces to cover all the panels you want decorated, the circles above will do the front of my drawer and the inside back panel of my drawer


These pieces will do the top and two sides of my box


Adhere the rice paper to the drawer by covering the panels and the reverse of the rice paper with DecoArt Matte Medium, then marry the two wet surfaces together, this gives you a little bit of slip and slide which helps if you find you have creases to get out.
With a soft brush, smooth from the centre of your design towards the outside edges, removing any air bubbles or creases, another light coat of Matte Medium over the top will seal your design


Once dry, i laid a text stencil over the drawer front, top and sides of my box and spread transparent gel medium through it using a palette knife, again i left this to completely dry.
I used Decorart Fluid Acrylic Gold Paint on a very dry brush to highlight all edges and over the raised surface of the gel medium to bring out the detail of the text.

These little boxes make great projects and gifts for all occasions, are ideal for kickstarting a lost mojo or for when crafting time is limited, keep some in your stash you never know when you may need one, they are perfect beginner pieces too for anyone new to this style of crafting x x

I used 
Rice paper
Text stencil


Tuesday 21 June 2022

Hex Tech Tuesday - Freedom by Kim

 I'm trying something a bit abstract this time. I hope you like it.
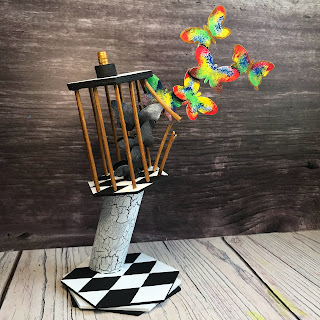
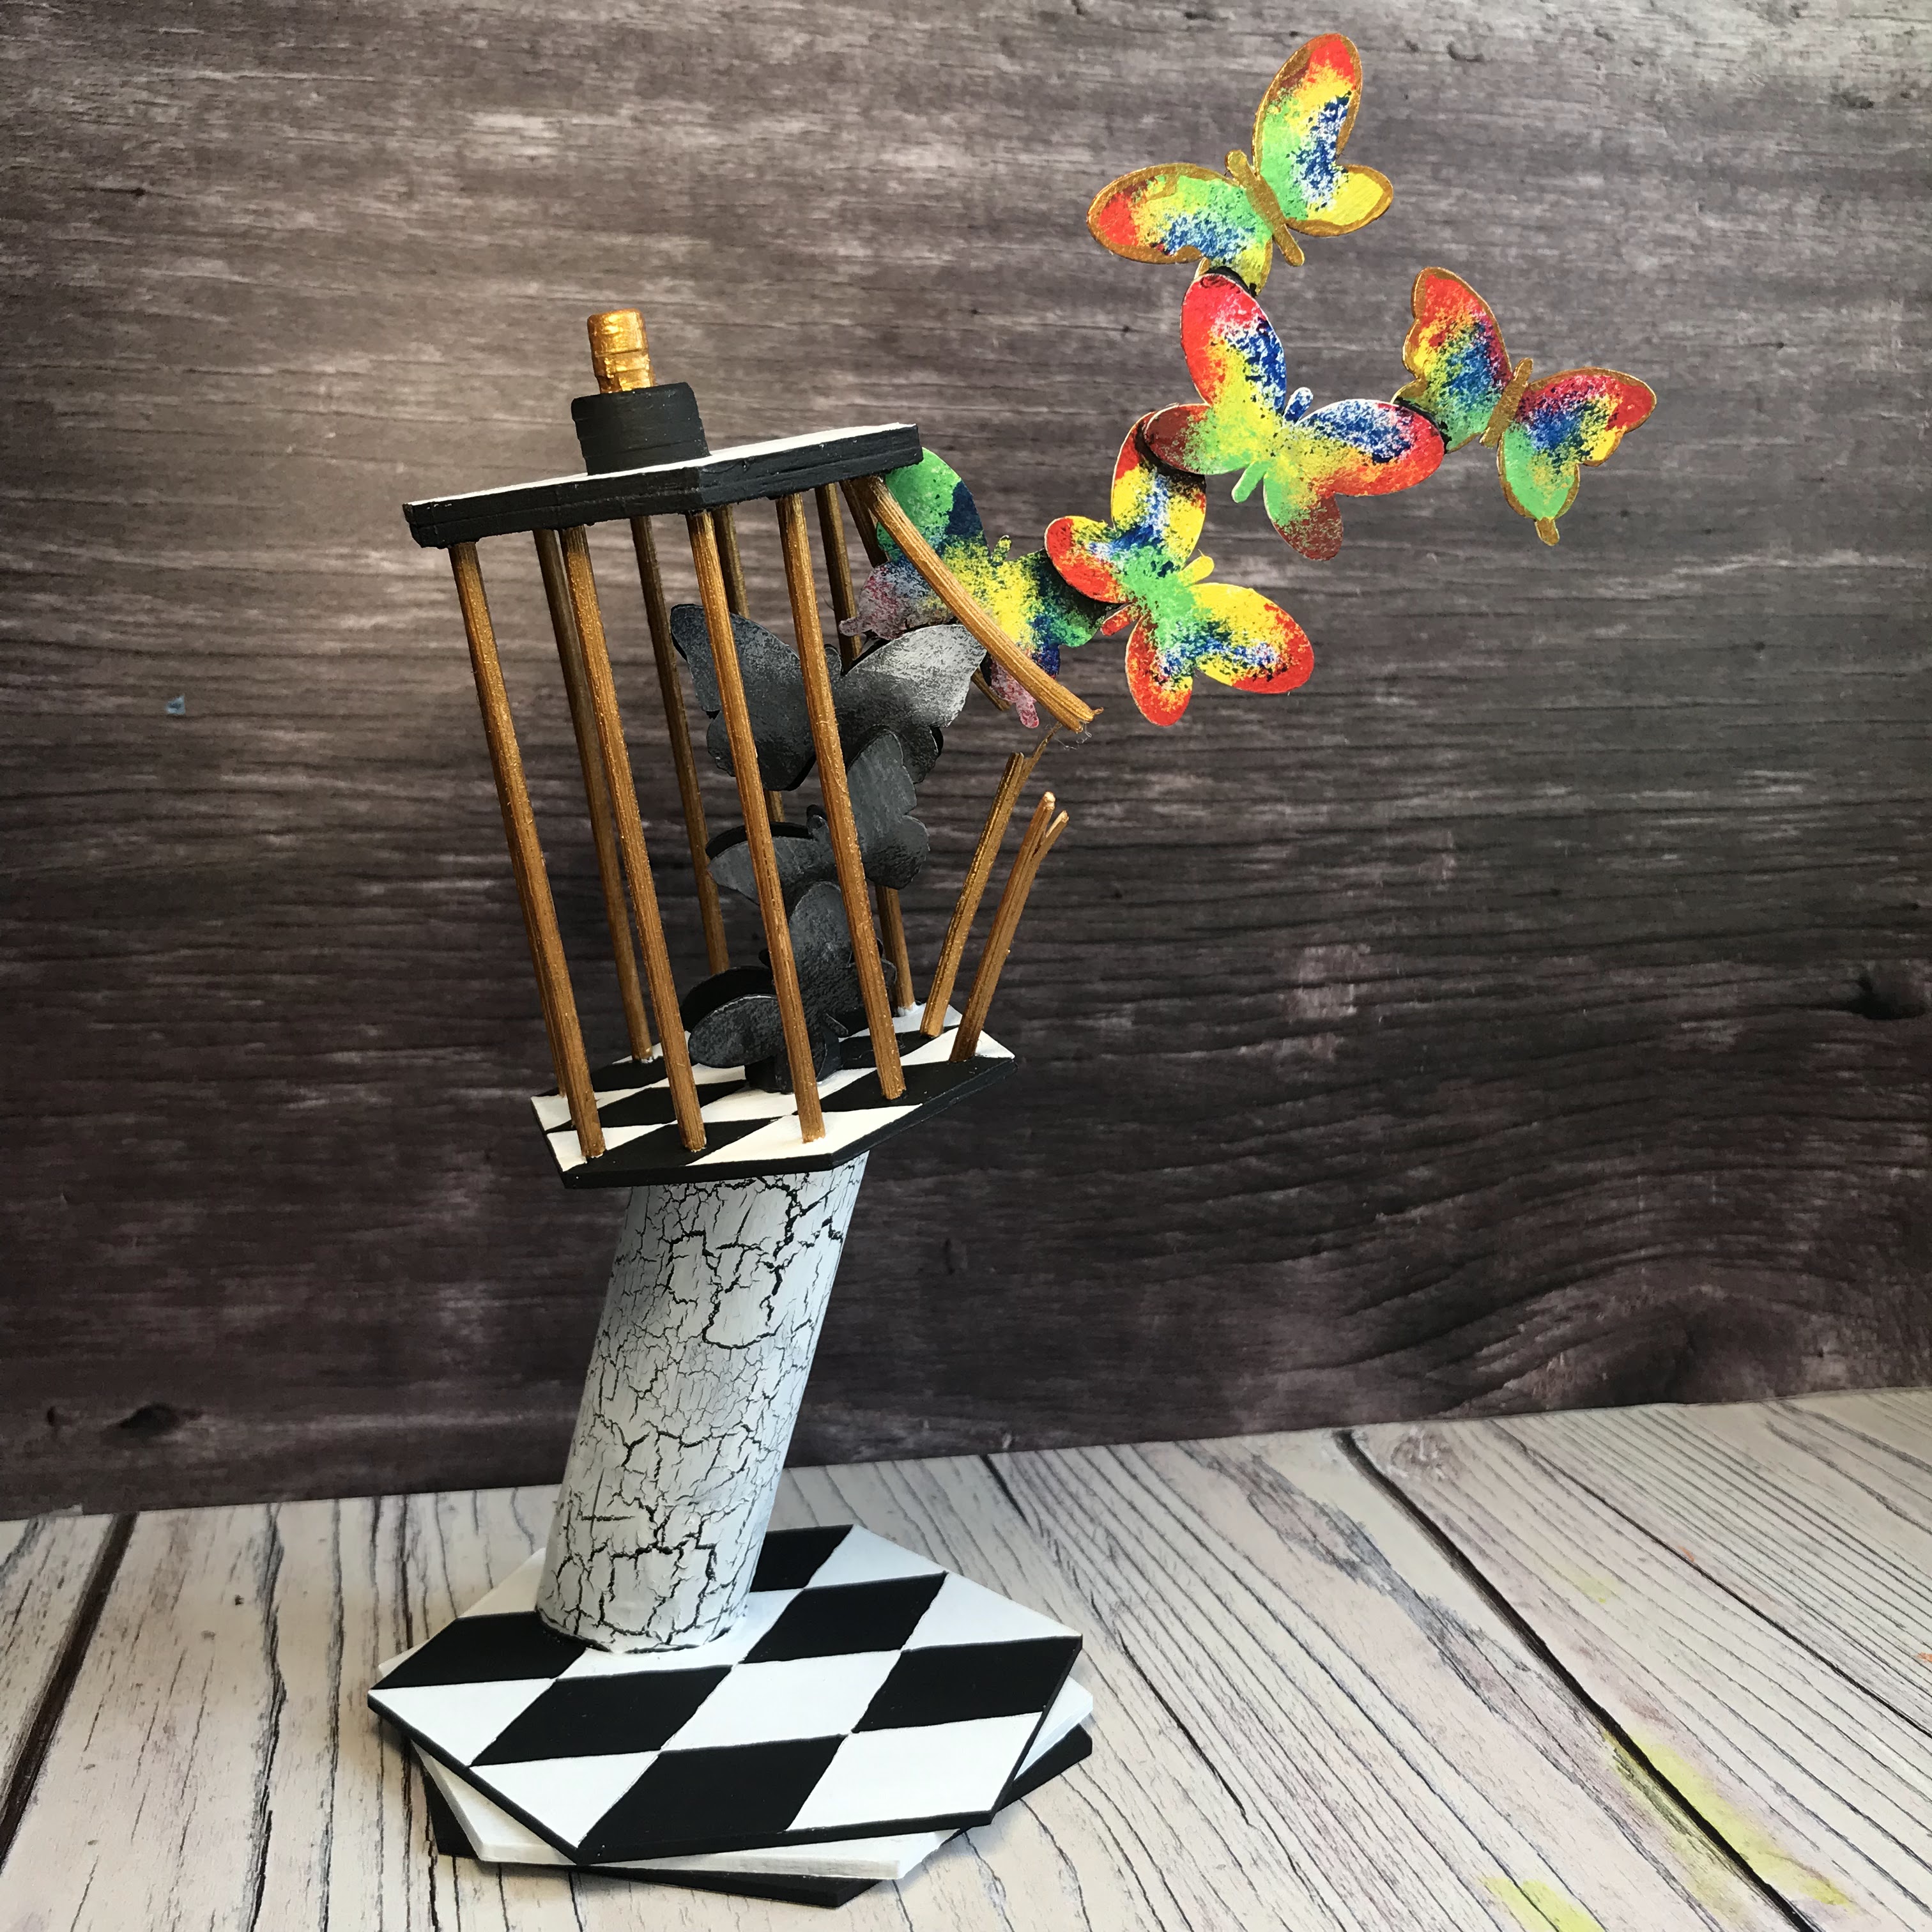
"Freedom!"


From the Tando Creative Hexagon set I used 3 x 3.5mm hexs, and 3 x 5mm hexs (that's length of the sides)

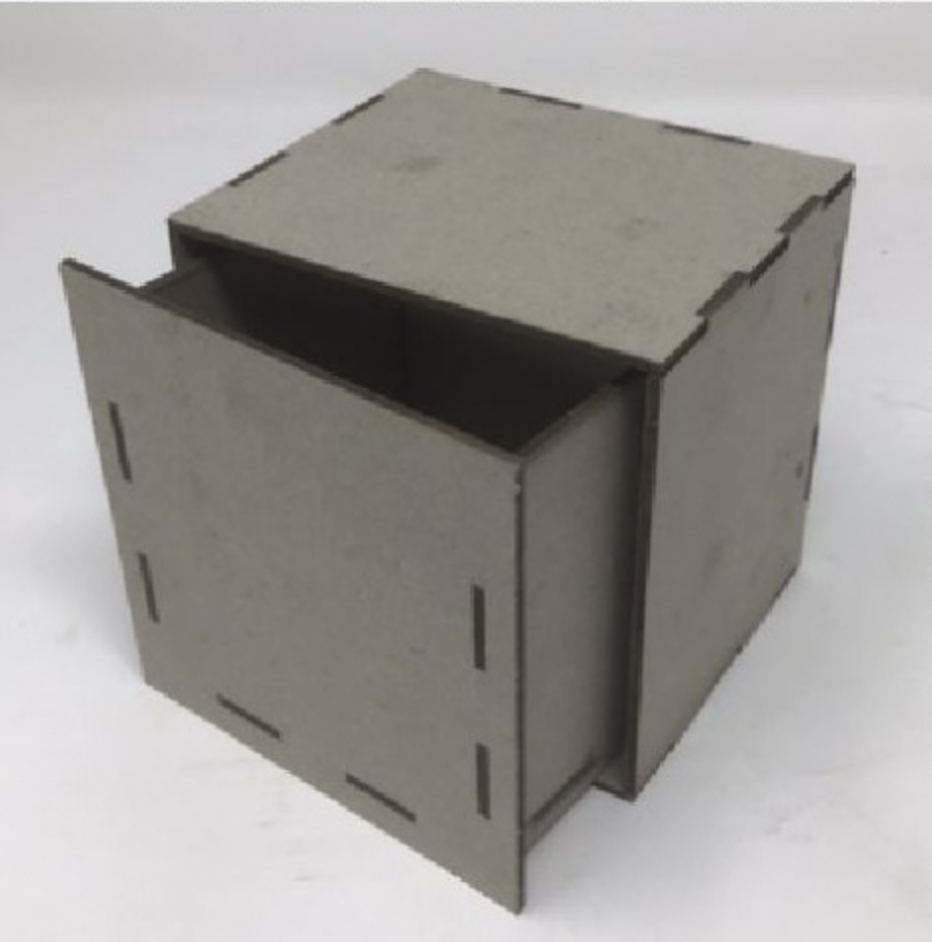
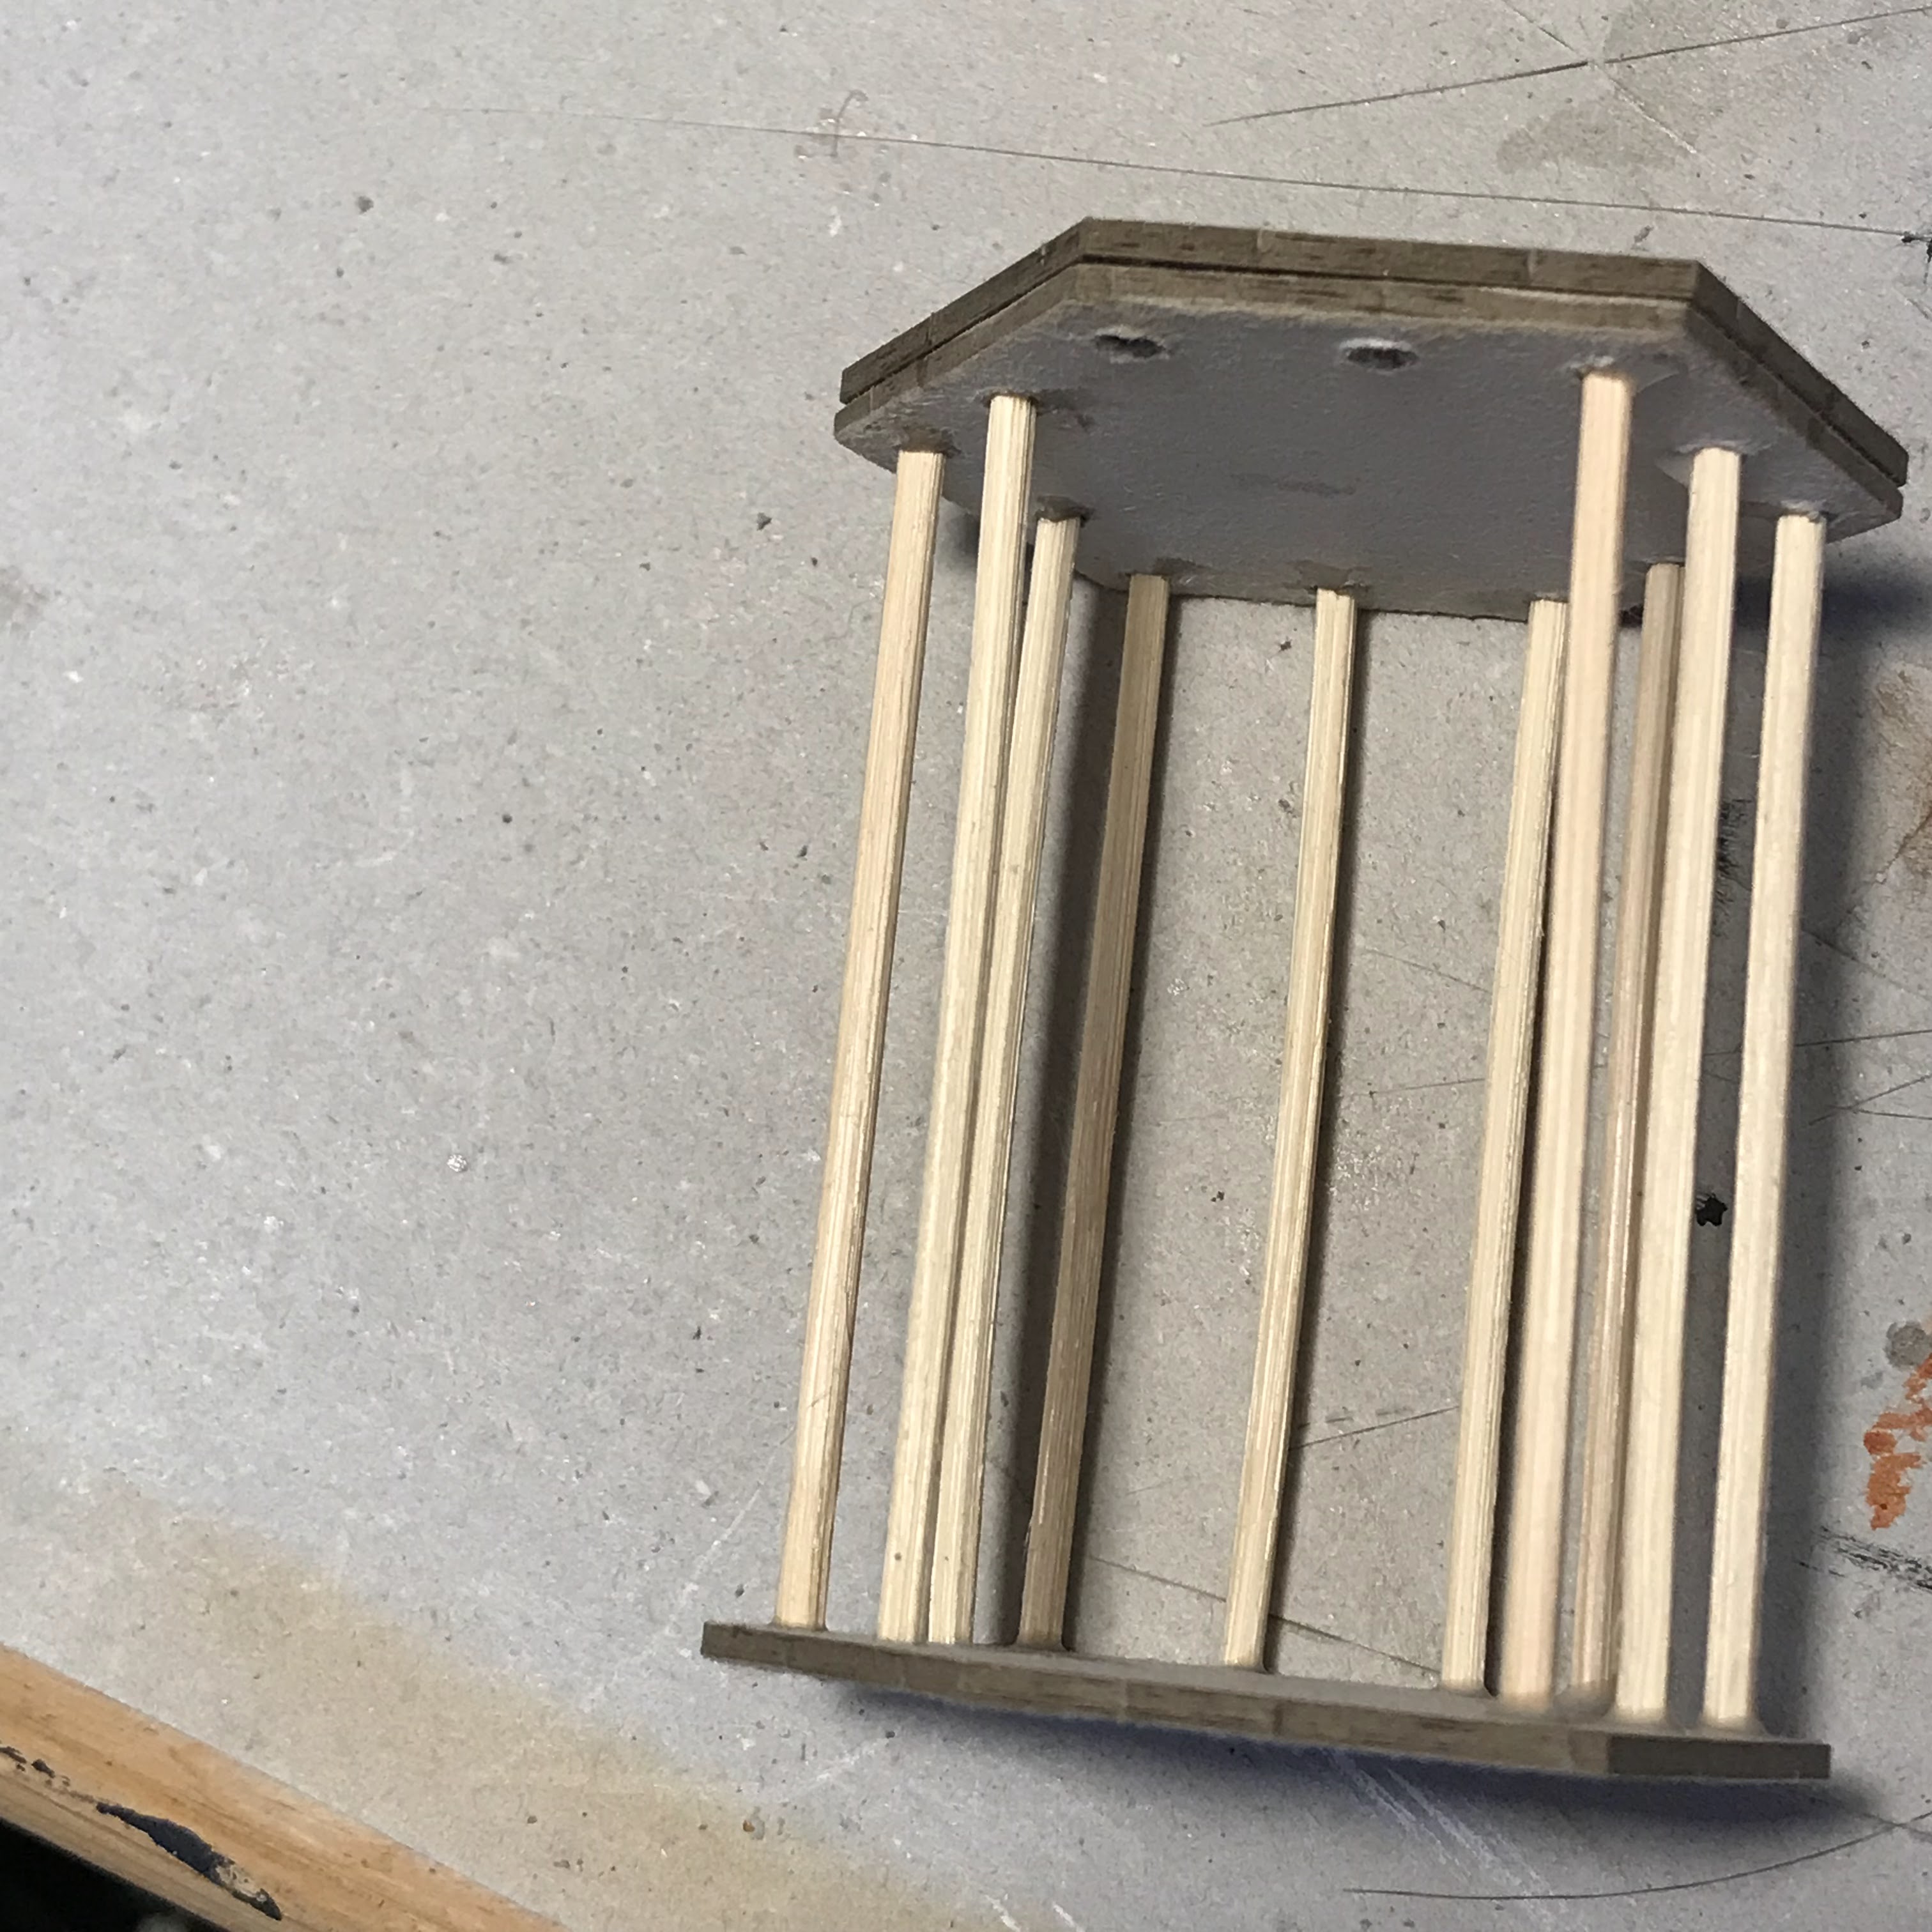
I started with the cage. For the bars I used clean bamboo sticks from a room infuser (the thing that has smelly oil in the bottom and sticks poking out to make the room smell nice). I drilled holes (as shown) in two of the 3.5mm hexs to take the bamboo sticks. The sticks were a bit too long so I cut them to 8cm. Before I glued them in I bent and broke two of them to allow the butterflies to escape.

Next stage was to glue the remaining ten sticks in place. I put them all in one hex then lined up the second hex to complete the cage. I glued the third 3.5mm hex on the top to cover the drill holes. I added some washers and rivets left over from Tando's Industrial Elements kit to decorate the top of the cage.

The stand is made from a piece of cardboard tube cut from a cooking foil roll. I wanted the whole thing to be skew-if, so I cut the bottom at an angle, and the top at an angle but not matching the bottom angle (see picture). I stuck the cut piece on a large hex. All was set aside to dry while I arranged the butterflies.

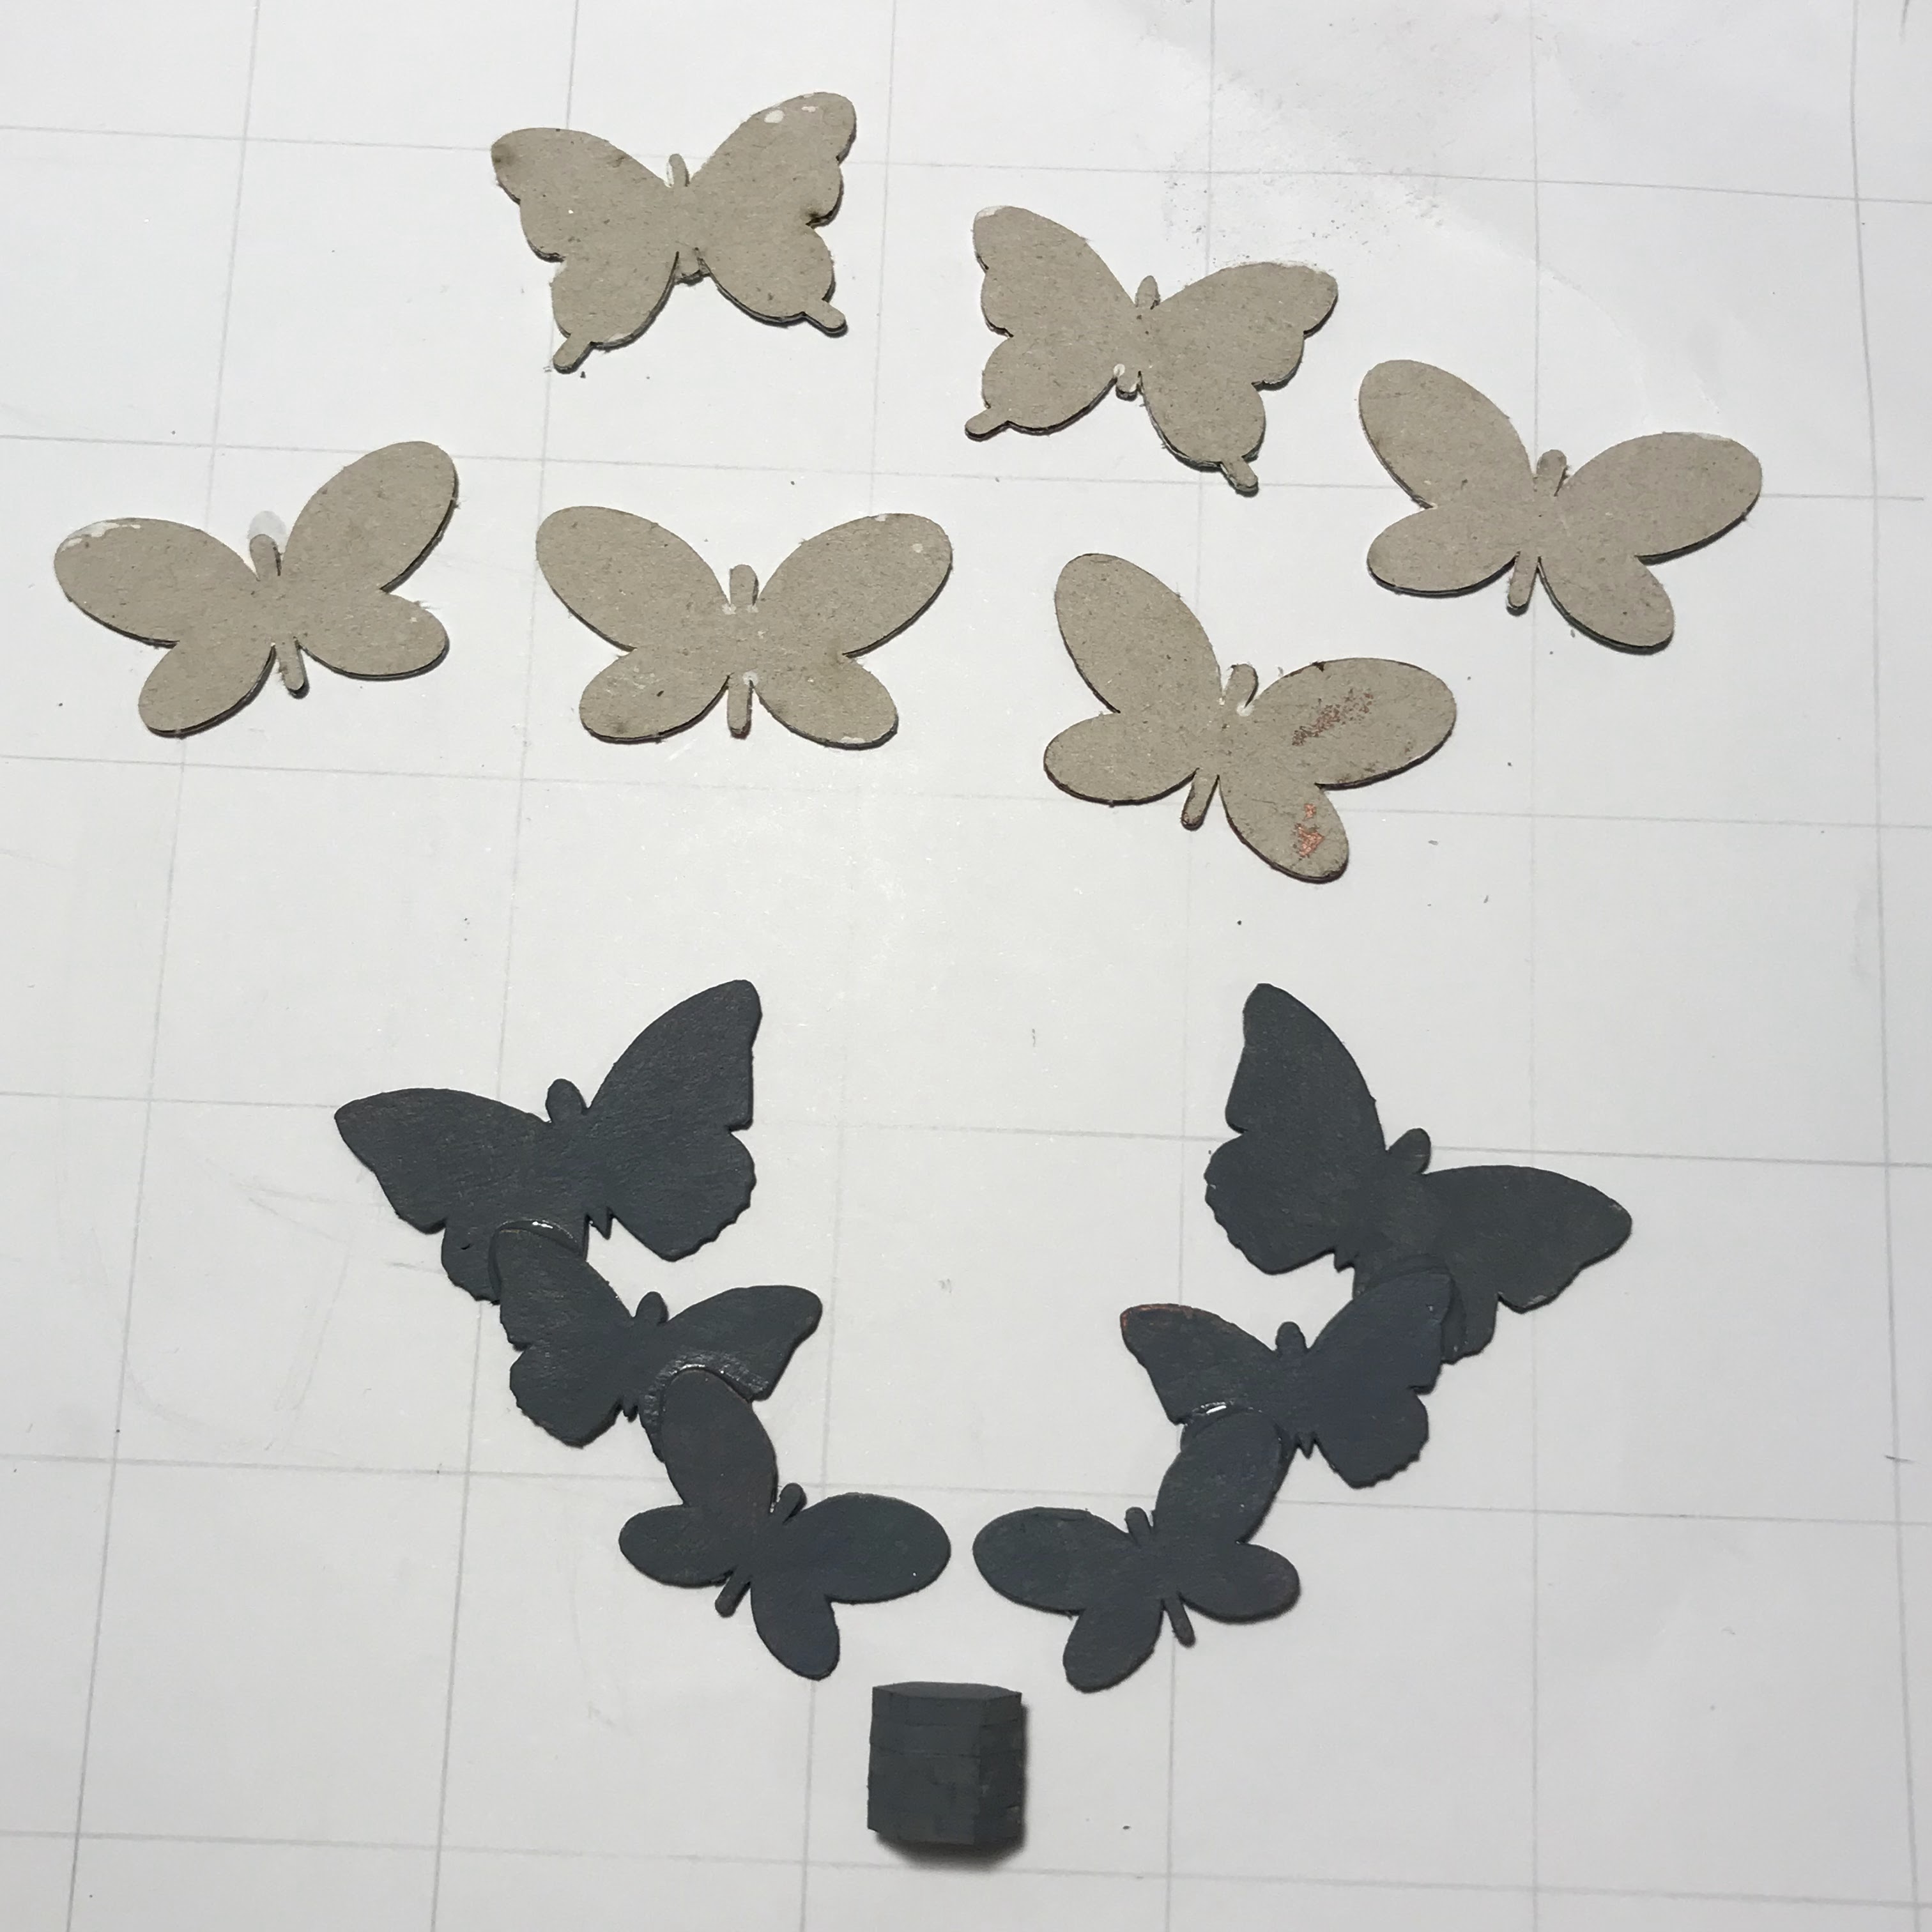
I took 11 butterflies from a set of Tando Mini Butterflies. I used six, three matching pairs, attached to a pile of four washers from Industrial Elements, to make a firm base section. The remaining butterflies were arranged as if flying out of the cage, their wing tips were glued together with PVA.


Before I assembled the sections I painted them. I used black and white for everything except the cage bars and escaping butterflies.

The cage floor was painted with a harlequin diamond shape, as was the top hex base. I feel there is something sinister about the design. The two remaining large hexs are painted one black, and one white.


The tube support for the cage was painted Lamp Black. When dry a coat of DecoArt Weathered Wood was applied and allowed to dry. White was painted over that to give the lovely crackle finish.

The cage bars are painted with Venetian Gold. The escaping butterflies are stippled with bright colours - I used yellow, green, red and blue, with the top two having gold edges to their wings. The three pairs of butterflies not escaping from the cage are painted black, with Zinc (grey) and white lightly dry brushed on to add texture.

Assembly (not the sort we had at the start of our school day!)

Glue the two large hexs under the base section. Make each one twisted slightly out of alignment, black on the bottom, white next.

Glue the dark and coloured butterfly sections together at the wings, making sure they fit nicely in the cage. When they are dry glue them in the opening of the cage. I added a bit of support by glueing the wing to the top of the cage. Allow to dry.

The broken cage bars can now be added, arranged to look like they have burst open. It is a bit fiddly and you will need to support each bit until the glue has set - might be worth using a solvent, quick drying glue here.


Last is to glue the cage to the stand, sit back and admire your handiwork!

I hope you enjoyed this Hex Tech. Thanks for stopping by!

Product:

Tando Creative Hexagons

Tando Creative Mini Butterflies

Bamboo sticks, or similar

DecoArt Americana Colours

DecoArt Weathered Wood

Wednesday 8 June 2022

Spread Your Wings. Butterfly Tag Plaque- Fiona Randall


Morning all Fiona Here with another Butterfly Tag Plaque.


I used one of the Tando Long Tags which come in a pack of 5 and are great value for money. I traced around the tag onto a piece of white card stock and cut with a craft knife.
Next up I sprinkled some Lindy's Magical powders ( you can use Brushos too) onto a tim holtz acrylic stamping block. Now this was a happy accident as the block has a grid system etched into it so you can line up your stamps and I sprinkled the powders onto this side by mistake as opposed to the smooth side.. I gave the block a spritz of water and then used the block as a stamp to transfer the now dissolved powders onto the tag. This is where the happy accident occurred as you can see it picked up the grid lines of the block too. What a cool effect. This was then attached to the long tag with DecoArt Decoupage Matte Glue.
Next I applied a coat of white DecoArt Media Gesso to two of the Tando Square frames and dried with a heat tool. I then gave them a spritz of water and applied the Lindy's magicals as a watercolur and dried. I then splattered with a brush another colour from the set of Lindy's magicals to both frames and then inked the edges with black archival ink when dry.
I then gave a coat of DecoArt Chalky Finish in Carbon to one of the Tando Mini Keys and added a chinese coin to the top of it as shown.
I then stamped two butterflys from Chocolate Baroqus Butterfly mind stamp set with versafine ink onto a piece of vellum. Then heat embossed with white embossing powder. The butterflies were then fussy cut out. I added a wash of colour to the smaller of the butterflies with Lindy's magicals.
I then glued the frames to to the tag and then glued the key on top of the frames. The butterflies were then glued and layered together and some black gems added to form the body. This was then attached to the key as shown.
I then stamped the sentiment from the Butterfly Mind Stamp set with black Archival Ink and cut out. I then layered onto black card stock and trimmed before applying to the tag base.
I then cut a piece of Tando Grey Board to size and attached a piece of the same white card stock to create a totally white base. I could have painted this but I wanted the same colour base  as the tag.
I am quite pleased how this happy accident turned out.
Thanks for stopping by today
Fiona xx

PRODUCTS USED.


OTHER PRODUCTS.

Lindy's Stamp Gang Magicals- Deutch Deserts.

White Card Stock 300gsm

Black Archival Ink Pad

Versamark Ink Pad

WOW White Embossing Powder

Tiny Black Gems.

Small Chinese Coin


Tuesday 7 June 2022

Hex Tech Tuesday - Time warp hexs by Kim

 It's Hex Tech Tuesday! This time I have a simple design for anyone to try.


I used Hexagon frames from Tando's Hexagons set, and a large box and drawer set. The set fits together really easily, so no problems there.


Once the glue was dry I started with a base coat of DecoArt Lamp Black all over the box and drawer, inside and out. While that was drying I chose my hexagon frames: 2 with 5cm sides, 1 with 4cm sides, 1 with 3cm sides.

To get the 3D effect I started with the 2 x 5cm hexs and glued them on top of each other with the sides offset (as in the picture). On top of that was glued the 4cm hex. This was in the same aspect as the first hex, but the tips of the points only just overlapped the one below, so you'll have to make sure it is lined up just right. The 3cm hex was oriented the same direction as the second, but the tips of the points only just reach the edge of the inside of the 4cm hex. So with this one I eased it inside the 4cm hex.

Once all the fiddly bits were dry I painted the whole group with DecoArt Titanium White. I wanted bright and gaudy colours for the dots on the white hexs, and found Daler Rowney System 3 fluorescent colours in Pink, Yellow, Orange, Green, and Blue. You may decide to use a different, tasteful combination. The dots were applied with an embossing tool with different sized ends. The group of hexs was set aside to dry.

On the front of the drawer, where the hexs are to be attached, I found the centre, and marked where the corners of the inner hex will be. Then from the corners towards the centre I added reducing dots. When all six corners have been done this gives the impression of a vanishing centre - through a time warp!

The edge of the drawer front was painted white. More reducing white dots were added to the box for decoration and to continue the effect of movement.

The group of hexs was then glued in position on the front of the box, making sure the corners of the inner hex matched the dotty pattern.

Thanks for dropping by. What are you creating with your hexagons? 

Products:

Tando Creatives Large boxes and drawers

Hexagon frames from the Hexagon set

DecoArt Americana Colours