Showing posts with label Hexagon. Show all posts

Tuesday, 28 June 2022

Hex Tex Tuesday- Abstract Wall Art- Fiona Randall


Welcome back for another Hex Tex Tuesday.

I love abstract art so decided to create a simple wall panel using the hexagons in a Monochromatic style.


I cut a Panel measuring 8x8ins from a Tando Grey Board Sheet and gave it a coat of DecoArt Chalky Finish in Carbon to both sides of the panel. Once dry I gave both sides of the panel a coat of DecoArt Ultra Matte varnish to seal and protect the chalky finish.
For this project I used 7 of the  hexagons . 

I gave all the hexagons a coat of DecoArt Media Tinting  base and dried with a heat tool.
Once dry I stamped all the hexagons with textures from Chocolate Baroque's Harlequin Fragments Rubber Stamp Set with Black Archival Ink.
I cut one of the hexagons as shown in the diagram below.


I drew a line from corner to corner left to right and then right to left.
As you will see you end up with a cross and have two diamond and two triangle shapes.
Cut along the cross lines with a ruler and a craft knife.

Next up arrange your hexagons onto the panel as shown.
To finish add a sentiment strip if desired.
I chose to go with a Monochromatic theme but this would look just as good using a riot of colour. The possibilities are endless.
A quick and easy project that would look great on any wall in your home or studio.
Thanks for taking the time to stop by and read
Fiona.

PRODUCTS USED.


Tuesday, 29 March 2022

Hex Tech Tuesday - A Beacon of Hope - by Kim

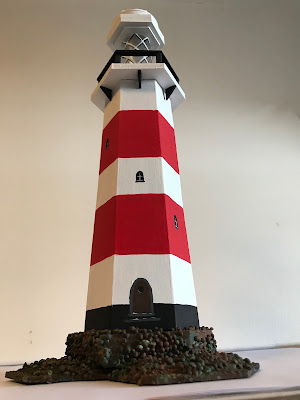
 Let's make it difficult for ourselves! All the best lighthouses are tapered towards the top, so my challenge was to achieve that with the Hexagon kit.

We'll start with the tower. You'll need an empty cereal box, a hexagon with 3cm sides, and a hexagon with 4cm sides. My tower section is 20cm tall. Mark out the shape on the cardboard box (see diagram at the end - it's easier than trying to explain in words!).

Cut out the complete shape. I scored along the fold lines with an embossing tool and steel ruler, fold carefully and sharpen the folds with a bone folder.

I used a fast setting solvent glue for this bit. Starting next to the flap glue the larger hexagon in place with the first two sides - this will hold the hex better than trying to do just one side. Repeat with the smaller hex.

Allow the glue to set before you move on. Continue glueing just one side at a time until you come back to the flap. Glue the last side over the flap and hold until set. (Phew! that's the difficult bit done!)


I loosely stacked the shapes together to see what made an attractive shape before I started glueing.

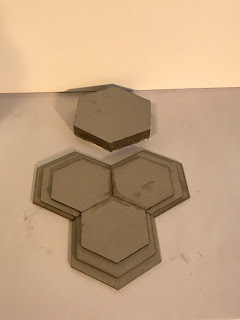
Next was the platform with handrail.For this I glued three 4.5cm hexs together, topped with a 4cm hex. The hand rail is a 4cm frame. I found a bamboo stick from a plant pot label and cut six 1.5cm lengths for the uprights. Using solvent glue I arranged the uprights to support the handrail. When dry I glued this to the three larger hexs to form the platform. Arrange it so all the hexs are facing the same direction.


Later I found that the platform could do with being a little more stable so I cut some 1cmx1cm right angled triangles from greyboard sheets to help seat it on top of the tower.

The lantern is a plastic miniature rum bottle (hic!), cut off at the shoulder (be careful when using sharp tools!). This is glued top and bottom to two 2.5cm hexs.

The canopy was built using five 3cm, three rings left over from Industrial Elements, one 2.5cm hex, three smaller rings from Industrial Elements, two washers, two large nuts, two small nuts, all leftover from Industrial elements. You can use whatever you have to make an attractive canopy.

The central base  is made from three 5cm hexs and two 5cm frames. The base extensions are each of a 4.5cm, 4cm, and 3.5cm hex. These are arranged and glued as in the photograph to make a good stable base for the lighthouse.


Decoration:

The base was smeared with texture paste then large and small Art Stones were pressed in to the damp surface. This took more than 24 hours to set properly! When dry, with a stiff-ish brush, I dabbed a watery mix of Zinc all over to get in the nooks and crannies. Next came Burnt Umber dabbed randomly over the top, followed by Burnt Orange. Then to get the seaweedy slime look, some patches of Forest Green. The flat part of the base is Lamp Black.

The tower was gessoed first to cover as much of Kellogg's colours as possible (perhaps I should have used the plain side on the outside!) then at least two coats of Titanium White to get good coverage. I used True Red for the stripes, and Lamp Black for the damp proofing around the bottom. The door was added with Burnt Umber, outlined in Zinc. Zinc was used for the steps to the door. Windows are Lamp Black, Titanium White for the frames, Zinc for the window sills.


The platform is white with black handrails and supports and walking surface. I added a red band for fun. Underneath the supporting triangles are black.

The lantern has white plates top and bottom. I painted a white lattice pattern on the glass, with black shadows.

The canopy is white with one section in red and a red bit on the top.

This project used a whole set of hexs and leftovers from other kits. I measured the flat sides of my hexs. Use whatever you have to hand to make your lighthouse. Nobody with know what you have used once it has been painted! 

(Diagram for tower:
1 - set base line width A
2 - Mark vertical centre line 
3 - Set height B
4 - set top line width C
5 - Draw sides from ends of A and C
6 - Measure angle X (mark it on a spare piece of paper if you don't have a protractor)
To add sides:
7 - copy angle X as shown
8 - Draw top and bottom lines at that angle
9 - copy lengths A and C to new lines and draw fold line 

Repeat until you have six sides - then add a flap for glue (about 6mm))

Thank you for visiting - if you get stuck please ask and I'll help.

Supplies:

Hexagons for Hex Tech Tuesdays

DecoArt Americana Colours, various

Texture Paste

Art Stones (optional)

Odds, sods, and leftover bits

Tuesday, 8 March 2022

Hexagon Tuesday - Zoë Sanderson

 It is my turn this week to share some ideas for using the Hexagons.  When we were asked to do these it was suggested that we might make Video demonstrations of our process.  I've never made a video before so it was a bit daunting but a challenge worth trying.  You can decide for yourself if it was successful or not.

This is the finished piece under natural light .


Having chosen to work on a box canvas 20" x 8" it quickly became apparent that it was  not going to be easy to take photographs of this on my work table.  Added to which this is to be my first Video demonstration and the canvas certainly would not all fit into view.  The canvas was prepared with structure paste pressed through a Hexagon stencil, not using the whole stencil just bits of it here and there.  When the paste was ready various metallic Glimmer Mists were sprayed over and allowed to run down the canvas.  A day or so later when the canvas was fully dry it was time for my first attempt at a video demonstration;  Scary but exciting.

I did it in 2 parts 

The canvas was finished by adding the Hexagons, not necessarily in the ways suggested in the video but in a pleasing manner.

This is the finished piece under electric light.


Doing this was so much fun and a great opportunity to try lots of new ideas, I hope you enjoy watching the videos as much as I enjoyed making them.

Products Used.


Canvas and all other mediums and embellishments from my Stash

Thursday, 3 March 2022

Tando on Create & Craft tomorrow 4th March 2022 - by Zoë Sanderson

Good morning, don't know if you have heard but tomorrow at 9am Di, Mrs Tando herself will be live on the newly combine Craft Shopping channel.  She is taking some absolutely brilliant samples from the team to show what can be done with the products and will of course be demoing herself.   Hope you can tune in or catch up later Di's presentations are always popular.


Thought I'd share a step by step with you by way of a teaser, using just 1/2 of the Tando Hexagon kit.  This is a 3D mixed media wall hanging.   The starting point an A4 size sheet of Tando Grey Board.


This is the humble board that all the wonderful shapes, designs and kit parts are cut from.  You can also buy just these bare sheets.  Believe me this stuff will take a battering, what ever you throw at it this board will take it.  


First Layer in this case a mix of Modelling paste and some Mica Powder.


Before you spread it, it looks quite yucky but once applied the textures and tones in the mix can be seen and are interesting.  While it was still wet some Brushos were sprinkled over for added interest.  Sadly as the project progressed this background did not fit in and was covered.  Thought I'd show you the process as it is something you want want to try for yourself.


Back to the elements that I did use and which can be seen on the finished project.   As mentioned I've only used 1/2 of a Hexagon set, that in turn was split into 3 groups.

1st group
 

 These were sprayed first with DecoArt Media Shimmer Mister in Yellow.  Then again with the just their Mister in Orange.
The glass work surface was first mopped up with a couple of journal pages for future use.  There was still paint there so a baby wipe cleaned up the rest, more about this later.

For the next set the frames are reversed and it is the middle hexagon that has a frame.  The base one has been covered with kitchen foil.   The middle one painted with Silver Modelling Paste, a black fluid/paste used on the frame.  The top hexagon has a star attached, it was also going to be covered with foil but the pre-used foil (not used for cooking but hair colouring) was to fragile and later on that idea was abandoned.


For the third set it was back to the shimmer spray, this time in Violet.  First the Hexagons were covered in part with the modelling paste to give more texture and an uneven spray finish.


Once again the over spray was mopped up with both journal pages and baby wipe.

Hexagons will put you in mind of bees and their honey combs, for this project the inclusion of bees felt right.  An AALL and Create stamp provided just the right sort of image and fussy cut details I wanted.  First the entire image was stamped once onto each of the now dry baby wipes.


It was also stamped onto a scrap of white card and the 3 main bees fussy cut from that.  Time to start finishing.  Everything laid out on the A4 board, the baby wipes glued in place with gel medium and a piece of AALL and Create tape placed across the middle.  the tape is in fact torn so that the two pattens show each side of the middle Hexagon set, without the next patten on the roll creeping in.  I just love the almost jarring effect this use of the tape gives.


I needed to find another way to decorate the middle hexagon and decided to cover the star with a silver and gold gilding flake mix.  The actual hexagon was painted in with the same medium as the frame.

All finished the various pieces were glued into place.  On the reverse is a hook, it came with a bra from a well known high street store that sells cloths for all genders and ages along side some rather tasty food.  Fixed it in place with Silicon glue.


Now don't forget tomorrow 4th March 2022 at 9am our Di is on the telly with among other things lots of the teams different Hexagon samples.  Enjoy.

Products Used


Stamp, Baby wipes, Mica Powder and anything else from my personal stash.