Showing posts with label Zoë Sanderson. Show all posts

Thursday, 28 April 2022

Tando 6 inch Ring Binder - by Zoë Sanderson

 Today I'm sharing the steps and stages in transforming a bare Tando Kit to something both useful and to my mind attractive.


For me the start looking at the basic kit and thinking about what to use with it is the beginning of a journey that might go in any direction!  Having a good look at the kit and getting a feel for it is important in getting a feel for the direction to go in.  Once the ideas start to take shape you can start to stamp and colour.


Of course I had to experiment this time the first stage was to stamp and emboss the cover.  For the embossing both black and clear powders were used.  The result is a worn looking image, that was further aged and distressed with a blending of different coffee coloured inks.


The light must have changed for this picture because the camera settings were not changed nor were colours/light edited later.   Hay Ho at this point a gold ink pad had been run over the edges and hinges of the cover.  An application of Viva Maya gold had been brushed over the two stamped images.


The last element of the aged distressed process was a rough application of clear crackle glaze.  I spread this with a pallet knife leaving it in different thickness over the board.  As the glaze dries the cracks appear being bigger and more obvious on the thicker parts.

Time to start dressing the cover up.


From a bag of assorted Tando shapes four pieces had been selected for embellishments.  To get a good cream finish they were painted with Viva Ceramic effect.  This medium is a thicker finish which can be applied to any surface including glass, plastic and metal.   I'd also got some more stamps out used on card coloured and fussy cut.  

When fussy cutting you need to keep as close to the outside line as you can even cutting into it, unless you have embossed the image a cut into embossing will possibly lead it to start flaking off.   The art of cutting is also to move the card in the open scissors rather than opening and closing the blades while moving them along the card.


A variety of stamps from different manufacturers were used with Archival coffee coloured ink to stamp little sentiments, then the gold ink pad dragged round the edges.


The inside was painted with black gesso and then some very old printed paper cut down to fit over.  Gel Medium used to attach the papers both below and above it for a good secure hold.


Prior to working on the inside a slit was cut in the hinge on each side and ribbon threaded through.   A fussy cut stamped image attached to the right front  making a bridge there ribbon was passed under to meet up with the piece on the other side and tie the cover closed.

I'm really pleased with this it is wonderfully inky, messy and textured and was great fun to do.

Products used

Tando 150gram Offcuts these are great to have to hand and are useful for all sorts of projects.

Tando Ring Binder for 148x82mm stencils

DecoArt Clear Crackle Glaze

Stamps, ribbon and other mediums from my personal stash.

Saturday, 23 April 2022

Tando Art Block - by Zoë Sanderson

 This is my little block of Butterflies.


This is a very light hearted piece, playing with lots of different mediums and ideas.  As always it started with a Tando kit waiting to be put together.


As always precision cut making them easy to assemble with snug fitting sides.  I'd decided to leave one end of my block open so the picture above shows one piece less than the full kit provided.  The box is constructed with PVA art and craft glue.


Once the glue had dried it was time to paint them.  On the outside Pretty Gets Gritty Chalk paints were applied with a sponge.   Both colours on the same sponge and blended together.


On the inside a grey colour applied.  Then of course another wait for the paint to dry.


An older Tando stencil placed over the corner on one side.  Now I did have the bright idea of applying a stencil glue to this to help keep it in place.


With transparent embossing paste pushed through glitter were sprinkled over.  Problem the residue from that stencil adhesive left on the box also attracted some of the glitter.   Fortunately it is a glue that is designed for repositioning the stencil and when the paste had dried I was able to brush away the mess, well most of it anyway.

Time to stamp and fussy cut a couple of butterflies, using one of my old trusted and favourite butterfly stamps.


With another stencil and gilding glue my favourite work Laugh had bee added along with some random lines.  Silver gilding flakes had been added here, and as the glue had spread under the stencil to make the word stand out a silver liner pen went over the actual letters stopping it from becoming a messy silver spolge.

As butterflies had become the dominate them I pulled out some Tando butterflies and coloured them with Pearlywinks keeping to the pink purple pallet.


Before the butterflies had dried they were popped into the tray with the glitter still in it.  A couple of them randomly picked up glitter.


A fun little muck around that with drying time, and other projects also calling for attention, actually took a few days to complete and is now a handy little box for the desk.

Products used

Tando Art Blocks

Tando Stencil 

Tando Butterfly Grab Bag

Heavy Gel Medium

Anita's Tacky PVA Glue

All Other items from my craft stash.

Friday, 15 April 2022

Spooky Tando Advent Box - Zoë Sanderson

Yep, teach a girl how to make videos of herself and there is no stopping her!   Actually it is quite good discipline for me.  My process is very random I am as likely to start in the middle working back from there to the start and then picking back up to get to the end as I am to work beginning, middle, end.  Making a video of it there is at least a plan in principal to start.

So today I'm sharing the bones of a Tando Advent Box.  Again the process takes time and these videos take a long time to upload to you tube so it comes to you in 2 parts.


And yes if you are wondering the acetate did stick without any further help from me!  When you open the box it pops up like the good scary spider it is intended to be!

Products Used

Tando Advent Boxes
Tando Stencils

Paints, pastes, paper, and other embellishments from my stash.

Sunday, 10 April 2022

Tando Wall Hanging - By Zoë Sanderson

Something I really enjoy is looking through the Tando catalog to see what kits there are, and what I'd like to have a play with.  Recently it was the Wall Hangings that caught my eye.   Here then is a look at how I mucked around with one of them. 


These kits are in 4 parts making for a 3D piece and you have the options of how to layer them up.


As I intended to use various mediums on there the first step was to Gesso them.   I only applied Gesso to the areas that will be painted and visible at the end.


The base plate was give a gesso coat on what will become the back.   The side that the layers will be built on I decided to cover with some coated paper.  I also pulled out a plastic sheet with a water like finish.  Don't ask where they came from, they have lived in a draw for the last 15 years or so.  If I see something I like and imagine using at some time I get it and then live with it until it's time comes.


Preparation complete time to start adding colour and interest.   We are so lucky and have so many mediums available to us and can achieve so many different effects with them.  For the first two layers I used Mica Powders


Time for a little check to see how it is starting to look.   You can see now how the plastic sheet is going to look in the completed piece. 

For the top layer various acrylic paints were used.  A quick search on the internet for colourful fish had also suggested spots and stripes rather than flat single colour.


I might have got a little carried away at this point and started using Sakura Pens, White Gel Pen, Viva Gel Pen, Crackle Glaze and I'm not sure what else.  Time to start glueing everything together, where the plastic film was sandwiched between two layers I used glossy accents as the adhesive, regular glue not so good for the plastic material.


The final thing was some washi tape around the side, and a hole to push through the top where it already exists on the Tando base.


In this last picture I've tilted the completed wall hanging to try to show you the effect of the crackle paste.  There you have it another little fun to do project.

Materials used


Everything else as shown/described from my personal stash.

Tuesday, 5 April 2022

Yet more Hexagons - Zoë Sanderson

This was a last minute piece made for Di's appearance on the telly!  Don't think it made it to air but I had a ball doing it.  Here's a brief step by step of how it, mistakes included.


For my wall hanging I only used 1/2 of a Hexagon kit and still have the other half left to play with another time.   I split the hexagons into 3 groups and started with some sprays.


 These were sprayed first with DecoArt Media Shimmer Mister in Yellow.  Then again with the just their Mister in Orange.  A second set was given random patches of Modelling paste and then sprayed with  Violet Shimmer.

Between sets the glass work surface was first mopped up with a couple of journal pages for future use.  There was still paint there so a baby wipe cleaned up the rest, more about this later.

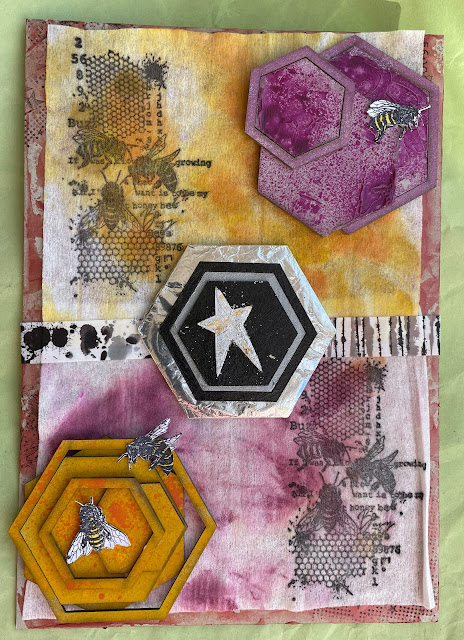
For the other set the frames are reversed and it is the middle hexagon that has a frame.  The base one has been covered with kitchen foil.   The middle one painted with Silver Modelling Paste, a black fluid/paste used on the frame.  The top hexagon has a star attached, it was also going to be covered with foil but the pre-used foil (not used for cooking but hair colouring) was to fragile and later on that idea was abandoned.


Hexagons will put you in mind of bees and their honey combs, for this project the inclusion of bees felt right.  An AALL and Create stamp provided just the right sort of image and fussy cut details I wanted.  First the entire image was stamped once onto each of the now dry baby wipes.


It was also stamped onto a scrap of white card and the 3 main bees fussy cut from that.  Time to start finishing.  Everything laid out on the A4 board, the baby wipes glued in place with gel medium and a piece of AALL and Create tape placed across the middle.  The tape is in fact torn so that the two pattens show each side of the middle Hexagon set, without the next patten on the roll creeping in.  I just love the almost jarring effect this use of the tape gives.


I needed to find another way to decorate the middle hexagon and decided to cover the star with a silver and gold gilding flake mix.  The actual hexagon was painted in with the same medium as the frame.

All finished the various pieces were glued into place.  On the reverse is a hook, it came with a bra from a well known high street store that sells cloths for all genders and ages along side some rather tasty food.  Fixed it in place with Silicon glue.


Yep the baby wipes do make it a bit rough round the edges, but then so is life!

Products used

Tando Hexagons
Tando Grey Board
Tando Star

DecoArt sprays

Everything else from my craft space/stash

Tuesday, 15 March 2022

Hex Tech Tuesday - By Zoë Sanderson

 I think it would a challenge for someone to use all the Hexagons you get is the pack in just one project.  Which is great news because you can try out so many of your ideas!


For this piece I was inspired by a set of stamps that came with a magazine, set myself to play and made another little video of basic elements for you.

I hope you enjoy it.  Once the recording was finished there were a couple more hexagons to be stamped and painted.  Everything was then glued together and a piece of card trimmed to fit on the back.

Products used

Tando Hexagons 

DecoArt Media Fluid Acrylic

Stamps, Inks and other Acrylic paint from my stash.

Tuesday, 8 March 2022

Hexagon Tuesday - Zoë Sanderson

 It is my turn this week to share some ideas for using the Hexagons.  When we were asked to do these it was suggested that we might make Video demonstrations of our process.  I've never made a video before so it was a bit daunting but a challenge worth trying.  You can decide for yourself if it was successful or not.

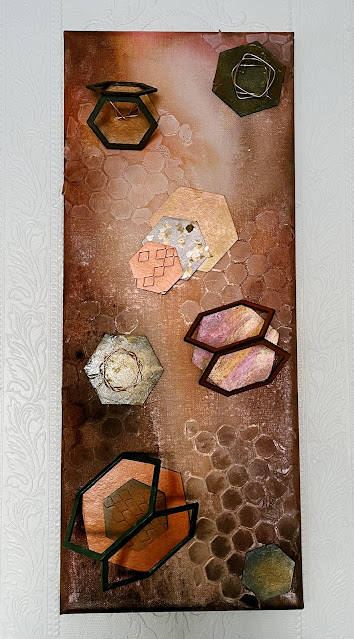
This is the finished piece under natural light .


Having chosen to work on a box canvas 20" x 8" it quickly became apparent that it was  not going to be easy to take photographs of this on my work table.  Added to which this is to be my first Video demonstration and the canvas certainly would not all fit into view.  The canvas was prepared with structure paste pressed through a Hexagon stencil, not using the whole stencil just bits of it here and there.  When the paste was ready various metallic Glimmer Mists were sprayed over and allowed to run down the canvas.  A day or so later when the canvas was fully dry it was time for my first attempt at a video demonstration;  Scary but exciting.

I did it in 2 parts 

The canvas was finished by adding the Hexagons, not necessarily in the ways suggested in the video but in a pleasing manner.

This is the finished piece under electric light.


Doing this was so much fun and a great opportunity to try lots of new ideas, I hope you enjoy watching the videos as much as I enjoyed making them.

Products Used.


Canvas and all other mediums and embellishments from my Stash

Thursday, 3 March 2022

Tando on Create & Craft tomorrow 4th March 2022 - by Zoë Sanderson

Good morning, don't know if you have heard but tomorrow at 9am Di, Mrs Tando herself will be live on the newly combine Craft Shopping channel.  She is taking some absolutely brilliant samples from the team to show what can be done with the products and will of course be demoing herself.   Hope you can tune in or catch up later Di's presentations are always popular.


Thought I'd share a step by step with you by way of a teaser, using just 1/2 of the Tando Hexagon kit.  This is a 3D mixed media wall hanging.   The starting point an A4 size sheet of Tando Grey Board.


This is the humble board that all the wonderful shapes, designs and kit parts are cut from.  You can also buy just these bare sheets.  Believe me this stuff will take a battering, what ever you throw at it this board will take it.  


First Layer in this case a mix of Modelling paste and some Mica Powder.


Before you spread it, it looks quite yucky but once applied the textures and tones in the mix can be seen and are interesting.  While it was still wet some Brushos were sprinkled over for added interest.  Sadly as the project progressed this background did not fit in and was covered.  Thought I'd show you the process as it is something you want want to try for yourself.


Back to the elements that I did use and which can be seen on the finished project.   As mentioned I've only used 1/2 of a Hexagon set, that in turn was split into 3 groups.

1st group
 

 These were sprayed first with DecoArt Media Shimmer Mister in Yellow.  Then again with the just their Mister in Orange.
The glass work surface was first mopped up with a couple of journal pages for future use.  There was still paint there so a baby wipe cleaned up the rest, more about this later.

For the next set the frames are reversed and it is the middle hexagon that has a frame.  The base one has been covered with kitchen foil.   The middle one painted with Silver Modelling Paste, a black fluid/paste used on the frame.  The top hexagon has a star attached, it was also going to be covered with foil but the pre-used foil (not used for cooking but hair colouring) was to fragile and later on that idea was abandoned.


For the third set it was back to the shimmer spray, this time in Violet.  First the Hexagons were covered in part with the modelling paste to give more texture and an uneven spray finish.

Once again the over spray was mopped up with both journal pages and baby wipe.
Hexagons will put you in mind of bees and their honey combs, for this project the inclusion of bees felt right.  An AALL and Create stamp provided just the right sort of image and fussy cut details I wanted.  First the entire image was stamped once onto each of the now dry baby wipes.


It was also stamped onto a scrap of white card and the 3 main bees fussy cut from that.  Time to start finishing.  Everything laid out on the A4 board, the baby wipes glued in place with gel medium and a piece of AALL and Create tape placed across the middle.  the tape is in fact torn so that the two pattens show each side of the middle Hexagon set, without the next patten on the roll creeping in.  I just love the almost jarring effect this use of the tape gives.


I needed to find another way to decorate the middle hexagon and decided to cover the star with a silver and gold gilding flake mix.  The actual hexagon was painted in with the same medium as the frame.

All finished the various pieces were glued into place.  On the reverse is a hook, it came with a bra from a well known high street store that sells cloths for all genders and ages along side some rather tasty food.  Fixed it in place with Silicon glue.


Now don't forget tomorrow 4th March 2022 at 9am our Di is on the telly with among other things lots of the teams different Hexagon samples.  Enjoy.

Products Used


Stamp, Baby wipes, Mica Powder and anything else from my personal stash.