Wednesday 29 January 2020

Layered mini folder

Hi everyone!  Karen here with a layered up *LITTLE RING BINDER* for you.  This is one of the smaller ones that comes in a pack of 3 for you to decorate.


To start I glued on a grid to the front and then painted both sides with a pale lilac.  Watering down some blue and purple acrylic I applied it wet and let it run where it wanted.  I also lightly brushed the inside with it.


Taking some leaves from the *MINI LEAVES* pack I painted these green and a little bird was painted off white.  These were added as shown.  I spruced up the spine with some fancy flowery trim, ribbon and beads.  I also added some trim to the leaves to add more texture. The folder stays closed with ribbon.

Thank you for taking a look, hugs, Karen x

Tuesday 28 January 2020

Layered Tags- Fiona Randall

 
Morning all the theme on the Tando Blog this week is Layers. So I thought I would use one of my Layered Tags from set 2. I chose to use the keyhole tag from the set.
 
I started by giving  the top tag layer and the keyhole plate a rusty treatment using DecoArt Media Texture Sand Paste and then adding washes of DecoArt Media Fuid Acrylics. I then created a collaged image in photoshop and printed out to create the focal point through the Keyhole and glued to the base tag in the set. I then glued all layers of the tag together and added a quote. I then cut a piece of Tando Grey Board to mount the tag onto. I added DecoArt Media Modeling Paste through a stencil and once dry gave this  the same Rusty Treatment as the layered Tag. I then cut another piece of Tando Grey Board slightly larger than the previous piece, gave this a coat of DecoArt Chalky Finish in Carbon and when dry applied a coat of DecoArt Media Ultra Matte Varnish to seal and protect. I then layered the rusty Greyboard piece and the Layered Tag on top of the black base to finish. A truly layered piece and quite substantial too to hang on my studio wall.
 
 
Products Used.


Thanks for stopping by today.
 
Fiona.


Saturday 25 January 2020

Anything Goes Week - Twinchies by Nikki


Hi all,

You might have seen Di on Hochanda with the fab Twinchies sets a few weeks back.  I thought I'd make a few really quickly, to show you how easy it is to make some up for swaps etc.

I decided to use my Media Mister sprays as they were still on the table from a previous post.  And they are super easy!


I started by sorting the Twinchies, and playing with the layout of them.  Once decided, I layed them in the lid of a box for spraying, and kept the leftover parts in there too, I thought I'd spray them for another day.

I started with black spray all over, then dried between layers, and put white, then yellow on.


After the yellow I put white shimmer on again, and then blue and pink, then white again, and kept going until I liked the way they turned out.


They were a bit plain still, so I found some metal embellishments, and added to the tops.  A white pen highlighted some of the areas to make the layers stand out.


You could mount the three Twinchies on a board for hanging up, or leave them as they are for quick ready made swaps.

Thanks for joining us this week, don't forget to check out my teammates makes. 

Best Wishes,

Nikki K.

Products Used:

Tando Creative Twinchies - Industrial

DecoArt Media Misters: Primary Cyan, Shimmer Yellow, Shimmer Turquoise, Primary Magenta, Purple, Shimmer White, Carbon Black.


Wednesday 22 January 2020

Layered tags

Hi everyone Dee here with one of Fiona's layered tags, there is so many layers to this tag not sure where to begin. Painted the base with magenta followed by quit gold then a layer of crackle paint over that. Top tag burnt amber and Prussian blue mixed and painted, then weather wood and resist paste left to crack some was put through the small Tando harlequin stencil.


Once it was all dry I gave the top tag a coat of white crackle paint once dry I knocked back the white paint over the resist paste. A couple of watery washes of raw umber was applied i followed with a very watery wash of quinacridone gold.


I went back to the base layer and gave that a watery coat of transparent yellow iron oxide. I then glued them together and started adding more detail to the top tag.


I added quinacridone gold to area's along with turquoise the base tag that appeared through the panel was given a wash of Prussian blue. I attached a butterfly some small cogs and made a word panel.
I hope you enjoyed my post try out these amazing tags.designed by Fiona for Tando creative.

Cheers Dee x

Tando Products used.


Layered Tags Bundle 1

Layered Tags Bundle 1


Sunday 19 January 2020

Spray Inks/Paints Week- Fiona Randall

Morning all Fiona here with my contribution to this weeks theme which is spray Inks/ Paints.


I've gone for the paint approach but sprayed it. This is achieved by mixing the colour of paint with water in a mini mister bottle and voila you have spray paint.
 
I started by base coating a piece of Tando Chipboard with DecoArt Media Titan Buff. I then applied Paste through a stencil and allowed to dry. Next Up I sprayed with DecoArt Media Fluid Acrylic in Dioxazine Purple. Varying the strength of mixes to get different tones of the same colour drying between each application. Further spraying was added with DecoArt Media Fluid Acrylic in Carbon Black and DecoArt Extreme Sheen in Vintage Brass but in short sharp bursts to create a spatter effect. A  Large and Small Tando Distressed heart were given a coat of DecoArt Media Fluid Acrylic in Quinacrodone Violet mixed with a little Carbon Black. Both were the spattered with the Vintage Brass Spray Mix and then edged with the neat paint of the same colour. Cogs from my Craftalong Kit Cogs Sheet and a Tando Embelishment were then given a coat of the vintage brass paint also. A set of wings from a Finnabair mould were given a coat of watered down DecoArt Media Fluid Acrylic in Dark Grey Value 3 and then swiped with DecoArt Metallic Lustre in Burnished Brass to highlight the raised Areas. All pieces were then layered with off cuts of grey board to give depth and dimension on the Chipboard  base. Finally the sentiment was added to the small Heart to finish.
 
 
Here's a Close Up of the Detail.


Thanks for stopping by
Fiona.
 
Products used.
 
Tando Products.


Saturday 18 January 2020

Paints, Inks and Sprays with Lisa

Hello lovelies, Lisa here and welcome to the Tando blog!! This is my first Tando post of 2020!!! 

This weeks theme is "paints, inks and sprays". These are great base products for creating mixed media pieces.


Products I used...

Tando: tag; extra thins - rectangles
DecoArt Premium Acrylic paints: Cobalt Teal; Titan Buff;
DecoArt Media: white gesso
DecoArt Media Misters: white shimmer; turquoise shimmer
Stamp/s: Imperial Rover Bike - Andy Skinner 


Thanks for popping by...

My Blog... www.thecraftaragestudio.blogspot.co.uk

Friday 17 January 2020

Spray Inks or Paints week - Nikki K.


Morning all,

This week it's Spray inks or paints week.

I've gone for the paints approach, super quick and easy, and permanent!

Firstly get something like a cardboard box, or big box lid, to use as a 'spray booth'.  This avoids accidents or different colour curtains to when you started.
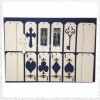

Then take a Mini book, and spray both sides and the covers, in paint, using the colours as follows:
Purple, do this all over until completely covered.
Shimmering Violet, spray but not covering completely.
Carbon Black, Add a few sprays over all area's, to look mottled.
Shimmering White, again, selective sprays to highlight the cover.
Shimmering Violet, over where you have sprayed white, this gives a galaxy effect and brightens where the white is.

Make sure you dry the book between each coat.  You can always add more paint at each stage if you need.

I used DecoArt Media Misters, but you can make your own paint sprays with a little acrylic paint, and water in a spray bottle.  The Media Misters are a permanent paint, and you can stamp and write over them after and no paint will come off or smudge like waterbased inks.

I also took some hessian string, and sprayed with purple, this made it the colour I wanted it to match the book.


The stars were painted silver, with a lot of paint, then heated to make the paint bubble.  When dry, I put a little purple spray on my craft mat, and watered down to coat the stars and let the silver show through.

Some sentiments and a sprig of lavender were added to the book to finish.


I will add some pages at some stage, you can do this by spraying your craft mat first with the purple or shimmering violet paint, then spray with water.  drop some A4 paper in the paint to colour, and scrunch it up then flatten and dry.  This makes great patterned paper.

I hope you like these ways of using sprays, it's also a super quick way of making something without having to paint everything by hand, and good if you need a project quickly.

The Media Misters are also one of my favourite paints, especially Shimmering White, as you can use it to knock back a project if it's too loud!

Best Wishes,

Nikki K.
xxx

Used: Tando Creative Mini Concertina Books.
Tando Mini Stars

Paints used:
DecoArt Media Misters
Purple, Shimmering Violet, Carbon Black, Shimmering White.

Tuesday 14 January 2020

Spray Inked Card

This week we're using spray inks. I made this quick card: 


I've masked off some of the Giraffe Stencil to make it smaller, then masked off the card completely before spraying lightly with spray ink.

I've used 4 different colours of spray ink onto one of the Mini Hearts until I got the mixture I wanted. Doing this, the heart was so wet the front and back layers came off so I now have 2 more hearts to use. I've inked the edges of the heart and stamped onto it.

I sprayed one of the Mini Clocks with black spray ink. Once this was dry, I've lightly dabbed the clock and added Aged Copper Embossing Powder and heated. 

I've torn washi tape and added it to the card blank, then stuck everything in place, finishing off with a stamped greeting.

Sunday 12 January 2020

Monthly colour post….

Hello, Carol with you today with this weeks last colour post.

The colour theme for January is:-


Have you seen the new 366 challenge? the principle is to journal daily using the wonderful new mini books - the mini book will hold four signatures each holding a week's worth of journalling.  There is a facebook page and a new blog which you can follow and participate in… There is also a new kit which has a fantastic holder for 12 books, it also has 12 mini books.  Take a look here.  The signatures, template and cartridge paper is also available here.

So, with that in mind, this year I will be decorating my monthly mini book in the months colours, so, here is January's offering:-


TFL xx


Thursday 9 January 2020

January Colour Theme

For this year's colour themes I'm going to be doing Twinchies as two different sets were released late last year.

This is the first colour theme:


I painted the base of the twinchie dark blue and then used PVA glue to crack the beige paint. 

I've painted a Mini Butterfly then stamped and doodled onto it before finishing off with a stamped word.

Very quick and easy apart from the glue drying.

Tuesday 7 January 2020

January Colour Theme

Helloooooo!!!  This months colour theme is lovely!!!  Though I did use the colours they seem to have come out a lot brighter in the photo's.....never mind!!!


I have made up and decorated the *ART JOURNAL STARTER KIT*  .  This is a lovely A5 book with sewn in signatures and comes with everything that you need including the needle and thread!!!!!.  The paper for the pages is wonderful quality and could stand anything you throw at it. Its very easy to put together with full instructions.

The front.... I added some texture paste and lace to the front before painting it.  The spine wraps around and that was painted then had *WEATHERED WOOD* added before painting again.  The * MINI BIRDS* were painted and added on at the end.

The back...

A look at the spine...

Thank you for taking a look today, do come back for more ideas from the team!

Take care, Karen xxx