Tuesday 30 November 2021

Kit Week - Large Whimsical Birds - by Kim

It's party season and Tando Creative's new Large Whimsical Birds are all dressed up and ready for a night in the barn!

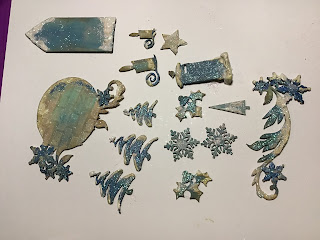
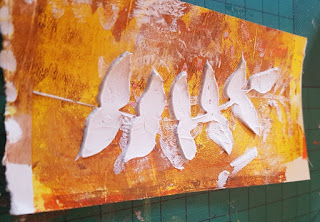
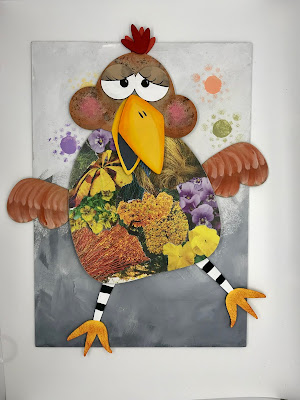
I ventured in to unknown territory this time - no, not parties in a barn - decoupage! I rummaged through some old garden magazines and tore out lots pages with bright colours. I chose them for the colours, not necessarily the flowers. I stuck bits and pieces on the bird bodies to make pleasing combinations. Any magazine will do - just tear out colours and textures not whole pictures.

The legs got black and white stripy socks for contrast. I used DecoArt Fawn and Burnt Orange together on the wings to look a bit feathery.

I base coated the faces with Fawn, the large areas of the eyes with white, the centres with black. The eyelids are Fawn, the eyelashes are Black. 'Cheeky Bird' got a little blusher in a pale pink (Coral Shell with a dab of Calico Red) for her cheeks, and some Burnt Umber speckles. I also stuck the extra beak section on a bit skew-if so it looks like she is singing along to the music.

The feet and beaks are Primary Yellow. I lightly sponged some Burnt Orange on the feet to 'dirty them up'. For the shading on the beaks I used DecoArt Media Fluid Acrylics, slightly watered down, first Diarylide Yellow then Cadmium Orange Hue

The background is Titanium White with Zinc blended up from the bottom in wispy strokes to give the impression of feathers laying on the barn floor - all being kicked up as they dance the night away! Some pastel coloured 'strobe lights' are sponged through the bubbles from the new Background and Flourish Stencils.

I glued the wings and legs to the back of the body. Stick your Party Birds on the background and they are ready to display. Make sure you pose them in their dancing actions!


Products: 

Tando Creative Large Whimsical Birds Kit

DecoArt Americana Colours

DecoArt Media Fluid Acrylics

New Background and Flourish Stencils (Bubbles)


Sunday 28 November 2021

Product Focus - Large Matchbox &inserts by Art Angel

  I thought it would be fun to create a Christmas themed project this week using the oh so versatile Large Match boxes and Inserts, perfect as a piece of home decor but works equally well as a gifting idea as there’s plenty of room inside to place something special

I started with the large kit and a selection of Christmas themed minis. The matchbox kit so easily fits together and its held secure with pva glue.


I very lightly spritzed three of my inserts with water and run them through my die cutting machine using Tim Holtz Texture fades 3D embossing folder to give a brickwork effect. This is one big added advantage of using Tando greyboard over MDF all the pieces can be embossed


I positioned two vertically ad one horizontally just for a bit of variation and added interest.


I then went on to base coat all surfaces with  Decoart Americana Timeless Chalk paint ready to mount my paper


I cut panels of patterned paper a quarter of an inch smaller that all my surfaces and inked all edges with walnut distress oxide ink, to give an aged feel and them adhered my panels to each of the outer sleeve sides and the inside and outside of the drawer 


I also inked the edges of the sleeve, drawer and all inserts


I used a the walnut distress oxide on a sponge blender lightly over the brickwork to bring out the texture


I picked a selection of Christmas minis, thinking carefully about which ones i wanted on insert, i wanted all the cards different but with a connected colour theme to make a cohesive set, so all were painted in the same way, i based coated with timeless, adding touches of Treasure and turquoise media shimmer mist,when dry i added a little structure paste to give texture and the appearance if snow and sprinkled with a little glitter for some extra sparkle!!


 added some sand paste for snow before adding my elements


Small pieces of abaca added more texture and a rustic feel behind my minis


stickles glitter glue was then added here and there for yet more bling

I even  embossed my flourish plaque before adding my candle minis


Autumn Cheer


I am a huge fan of Autumn, its my favourite season. So, when I received the printers tray and florals from Di I was excited to make something bright to cheer me up as we head into the Grey Winters. I am just not quite ready for it.


Materials

Tando Mini Round Shaped Printer Tray 152mmdiameter

Tando Leaves and Florals 1

Tando 10 of Tags Size 6 134x67mm

Gelli Plate

White cardstock

Kraft Cardstock

6” x 6” card blank

Decoart Paint in white, yellow, brown and orange

White gesso

Textured paste

Ribbon

Foam pads

Journal pen

Word stickers and text


Instructions

To start this project, I made background prints on my gelli plate using the Tando florals as stamps


I didn’t get perfect prints but I didn’t mind as nature and autumn leaves aren’t perfect either.


I used the greyboard space left from when I popped out my florals and used it as a stencil with some textured paste on random pieces of background print.


I took a journaling pen and doodled around the floral prints, once dried. At this stage I painted some extra florals and leaves too.


Printers Tray 

Next, I took the printer trays and painted it with white gesso. Once dry I painted it orange


I then cut pieces of the printed backgrounds and arranged them around the tray until I was happy with the arrangement.  Once happy I glued it down and added the top layer of the tray.


I then took all the florals that I had used as stamps on the gelli plate and added them to the top layer of the printer’s tray


To finish I added some word and letter stickers


Friendship Card

I took a 6” x 6” card blank and added a 5.5” x 5.5” kraft card matt. I took a piece of background print and added it to the matt. I made sure to use a piece with the textured paste on for extra texture. I added some of the extra painted pieces at this point too.


I added a strip of orange and brown paper along the bottom. I tied around some string and ribbon and added some flowers made from left over printed paper. Too finish I added some sentiment words


Tag

Finally, I had enough backgrounds and florals to make a cute little card. I added a piece of background to a tag that I had painted and crackled.

I randomly added some  more painted Tando florals and a handmade flower to decorate to make a very simple tag


I hope I have cheered up your day


Sarah

Friday 26 November 2021

The World in a Matchbox - by Kim


Ever thought it would be nice to carry your whole world in a matchbox? Well, I’ve sort of done it by putting all the Oriental astrological elements in one box; fire, earth, metal, water, wood.

I’ve used, from Tando Creative, their Matchbox, Medium with inserts. It arrives flat packed but assembly is easy and straightforward. I used ordinary PVA to stick it together.


I decided that I would use four inserts and the cover would be the fifth element, and that would be a dramatic ‘metal’ finish. 


For the individual 'metal' plates I used pieces from Tando Offcuts. I chopped the edges randomly to to make them less than perfect, and more interesting, then glued them to the surface of the cover. (Be careful when using sharp blades!)


Base coat the entire cover - except the plates - with Lamp Black, including going inside by a brush width incase it is visible on the finished piece.


I painted two coats of DecoArt Venetian Gold on the plates so that it was well covered. Next I aged the edges by blending Quinacridone Gold Media Fluid Acrylic. Finally, I blended Paynes Grey Media Fluid Acrylic around the outside, to give more depth to the ageing.


Now to the inserts. I printed four pictures*, one for each of the remaining elements, and glued them on. I cut them slightly larger than the insert so that I could use coarse sandpaper to ‘blend’ the edges to fit.


To embellish the pictures I printed the Chinese characters and words. For the back of each card I used the element’s associated colour; earth - yellow, wood - green, fire - red, water - black,(metal is white) and a slip-slap graduated blend of DecoArt colours. A little gold wax rub-on round the edges finished it off.


Back to the cover. I added characters, words. and title to the outer. The inner tray was painted black outside and white inside. I stamped ‘I paint what I like’, added characters, and finished with ‘long life’.


(*Make sure you have permission to use the pictures)


Products used:

Tando Creative : Matchbox Medium with inserts

Tando Creative : Off cuts 50g

DecoArt Colours:

Venetian Gold Metalic acrylic paint

Lamp Black

Titanium White 

Media Acrylics:

Quinacridone Gold and Paynes Grey

Various colours of your choice for the backs

Also:

Gold rub-on wax

Pictures as appropriate 

Rubber stamps with Chinese characters


Wednesday 24 November 2021

Product Focus- Twinchie Christmas- Fiona Randall

 Morning all Fiona here with a Product Focus Project.

I am really enjoying Seasonal makes at the moment so decided to create a focal piece using Tando Twinchies.


This is quite a large project but so fun to create using scraps of Scrapbooking paper from my stash with Tando Minis to further decorate the piece.
I started by adhering a piece of Scrap Book paper to a 12x12 piece of Tando Grey Board and inked the edges with Ground Espresso Distress Ink.
Next up I cut the squares to cover my Twinchies using a 2 inch square punch from christmas themed scrap booking paper. The paper squares were then adhered to the 25 Twinchies needed and the edges inked with Vintage Photo Distress Ink. Numbers and words were then stenciled and stamped onto the twinchies and coloured with Glitter Gel Pens. Glitter was then added to the Tando Stars and Snowflakes. The Tando Bells and Holly were coloured with Glitter Sparkle Pens.
The Twinchies were then arranged onto the board and Glued into place. Finally the Tando  Stars, Snowflakes, Holly and Bells were glued into place to finish.
A fun project with limited supplies but so effective when complete.
Thanks for taking the time to stop by and read.
Do check back the rest of the week to see what the rest of the team are creating.
Fiona xx.

PRODUCTS USED.


Other Products Used.

Tim Holtz Distress Ink- Vintage Photo, Ground Espresso. 
Tim Holtz Seasonal Glitter- Garland
Glitter Gel Pens.
Christmas Scrapbook Paper- My own Stash
2 inch square punch


Tuesday 23 November 2021

Tagged and Grabbed - Zoë Sanderson

Passing my craft table yesterday morning after locking the back door some of the things on said table sparked an idea.   How about covering the surface of a Tando Tag with glue stick and then covering it with Mica powder.   Then I went to work.  Returning home this is what the idea turned into.


First the glue stick was pulled down the tag.   The effect is so textural and interesting, various Mica powders sprinkled over.  They settled in the nooks and crannies of the glue as well as on top making things even more interesting.  Before starting on the other elements I swiped a white Brilliance inked over the top concentrating of the areas that the glue did not stick to.  The more matt appearance of the ink off set against the sparkle creates even more depth.

The two half circle cogs, from Steampunk Parts, on the sides were given an application of gilding glue and when that was ready they were dipped into gilding flakes.  The flakes went everywhere so it took a while to clean the cogs up and I even ended up with gilded fingers.   Next a hanging bar from the Assorted Plaques kit, this was given a covering of gold gilding wax.

The butterflies from a Butterflies grab bag were painted with Starlight paints.  The flowers from Floral grab bag pressed into an embossing ink pad and coated with Stampendous thick Shabby embossing powder.  PVC glue stuck everything together.

The picture above taken this morning in natural light angled to show the sparkle of all the different mediums used.  The picture below, taken moments later, has the tag laid flat and so is a better representation of the colours used.


Next time I want to create a running water/waterfall effect this is how I will do it.  How would you use this technique?  we would love to see you work in our Facebook group.

Products used

Tando Tag size 10

Steampunk Parts 

Assorted Plaques kit,


Colouring mediums, glues and embossing powder from my stash.

Friday 19 November 2021

Mixed Media Boards - by Zoë Sanderson

Hi, You will have heard this before and doubtless will again.  Tando Grey Board will take just about anything you throw at it.  Which is what happened this time.

I really enjoy experimenting with different mediums finding new ways to use them.  Tando mixed media boards are a great surface to work on.  Playing with Mixed Media offers so many ideas and opportunities it can be a battle sometimes to edit them down into a cohesive piece.  Another reason to use this little Tando Mixed Media boards big enough to work on but small enough to restrict the number techniques used.

Here are three boards that I've recently thrown all sorts of paints, pastes, glue and things at.  First they were all given a base coat of white gesso.


First the Blue Birds.   This board had a range of Distress Inks blended over with the lightest colours in the middle working out to darker shades around the edge.  Then water hand splattered over it.  My favourite world is Laugh and it is on an old stencil, tried to use it here with DecoArt Crackle Paste, but this did not work out so well, tried it again with Cosmic Shimmer Lava Paste.  This paste sucks up the colour but only with the parts not expanded by heating.  A while ago the waste from a die was saved and then used on another project as masks.  Those pieces we then added to this project using mat gel medium as the adhesive.  

As birds were to be the common theme with these boards Whimsical Birds provided the pair for this board.   These birds are great fun as you get various bodies different sets of eyes as well as wings and legs.  You get to decide how your birds will look.  Kept things fairly simple this time just painting bases Blue and Yellow then colouring the eyes white and gluing them on.


The next board was an experiment with Brusho's Aquawax.  This interesting fluid will take colour with Brusho pigment allowing you to extend these, it will also act as a resist.  Having given the base a colour wash various marks were made with a brush and the Aquawax.  More paint added then baby wiped over, makes for an interesting mottled background.  When dry a Tando Stencil Mish Mash laid over the board and an embossing fixative pushed through, the EP is an old stone effect one from my stash.  More of the die waste dropped on randomly.

The birds this time are from the Tando Mini's Owls 2.  The owls come in parts that you colour and build up.  Once again my Acrylic paints were put to work topped off with gilding wax.


For the third, and final for now, board the Aquawax was put to use again.  This time the fluid was tinted with Brusho pigment and then brushed over the entire surface. While it was still wet more Brusho sprinkled over it although a squirt of water was needed to activate the powder.

The stencil this time was Dotstream and a different crackle/embossing paste.  This paste also sucked up the colour and left to dry.  A section of the board swiped with a pallet knife and some DecoArt Crackle Paste.  I wanted to see how the two crackle pastes would interact the glossy paste filled the area between the stencilled dots but that was all.  When everything was dry the previously painted Tando Mini's Owls were added.


These were great fun to do and and are fabulous little sample boards that I can refer back to in the future.  

Products Used:

Tando mixed media boards

Whimsical Birds 

Tando Mini's Owls 2

Tando Mini's Owls

Tando Stencil Mish Mash

Tando Stencil Dotstream

DecoArt white gesso

DecoArt Acrylic paints

DecoArt Crackle Paste

DecoArt Crackle Paste

Brusho pigment

Brusho's Aquawax

All other mediums from my personal stash.