Showing posts with label decoupage. Show all posts

Tuesday, 30 November 2021

Kit Week - Large Whimsical Birds - by Kim

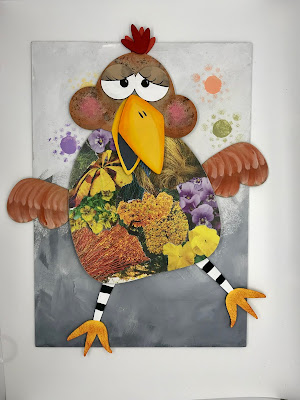
It's party season and Tando Creative's new Large Whimsical Birds are all dressed up and ready for a night in the barn!

I ventured in to unknown territory this time - no, not parties in a barn - decoupage! I rummaged through some old garden magazines and tore out lots pages with bright colours. I chose them for the colours, not necessarily the flowers. I stuck bits and pieces on the bird bodies to make pleasing combinations. Any magazine will do - just tear out colours and textures not whole pictures.

The legs got black and white stripy socks for contrast. I used DecoArt Fawn and Burnt Orange together on the wings to look a bit feathery.

I base coated the faces with Fawn, the large areas of the eyes with white, the centres with black. The eyelids are Fawn, the eyelashes are Black. 'Cheeky Bird' got a little blusher in a pale pink (Coral Shell with a dab of Calico Red) for her cheeks, and some Burnt Umber speckles. I also stuck the extra beak section on a bit skew-if so it looks like she is singing along to the music.

The feet and beaks are Primary Yellow. I lightly sponged some Burnt Orange on the feet to 'dirty them up'. For the shading on the beaks I used DecoArt Media Fluid Acrylics, slightly watered down, first Diarylide Yellow then Cadmium Orange Hue

The background is Titanium White with Zinc blended up from the bottom in wispy strokes to give the impression of feathers laying on the barn floor - all being kicked up as they dance the night away! Some pastel coloured 'strobe lights' are sponged through the bubbles from the new Background and Flourish Stencils.

I glued the wings and legs to the back of the body. Stick your Party Birds on the background and they are ready to display. Make sure you pose them in their dancing actions!


Products: 

Tando Creative Large Whimsical Birds Kit

DecoArt Americana Colours

DecoArt Media Fluid Acrylics

New Background and Flourish Stencils (Bubbles)


Sunday, 17 June 2018

Mini Book Store - decoupage project by Monika


 Hi all!
It's Monika here with my latest project. This time I've decided to decorate this mini books storage  using decoupage technique. These  mini books are perfect little gifts, keepsakes or mini albums. Can't wait to build my collection :)


For this project I've used Alchemy paper by Stamperia.


The storage comes in as a flat pack which helps you to decorate it easily! To start with I've primed all of the pieces with Decoart white gesso. Next I've cut my rice paper to the size and covered shelves and indside walls using Decoart decoupage glue. Then I've assembeled everything together using the same glue, and covered the outer walls. Using a make up sponge and Decoart fluid acrylics in raw umber I've darkened the edges and corners and I've added a cup marks and white paint splatters to give it an old, distressed look.

 I've also used Decoart ultra matte varnish to protect the surface.


When my pieces were drying I've prepared my resin embellishments and small greyboard hinges. These were painted with Decoart black gesso, then with Decoart antiquing cream in patina green, once dry I've wiped the excess with baby tissue and applied Decoart metallic lustre in gold rush all over to accent the textures.


Hope you've enjoyed this post. See you next time!

Monika
x


Products used:


Monday, 14 May 2018

Anything goes week -Shabby Home Sign by Monika

Hi all!
It's Monika here with my new project. For 'anything goes week' I've decided to decorate this gorgeous HOME sign by Tando.


I've started with painting the base pieces with grey chalky finish paint. 


Then I've rubbed wax candle around the edges. 


Next  was a coat of white chalky paint. Once dry, using heat gun and sanding paper I've distressed the edges to create peeled paint effect.


I've chosen to decoupage the letters with printed napkin, but first I've primed them with white acrylic paint.


I've cut the napkin into smaller pieces


Don't forget to separate the layers, we're only using the top printed layer.


 Using decoupage glue I've applied a thin layer on each letter under and over the napkin, smoothing out the surface with brush.


Once  glue was fully dry, I've trimmed the excess around the edges with sanding paper


 I've also added two coats of  mat acrylic varnish on each of the letters.


Each letter was glued on the base, and they were connected with wire.
I've also aged the letters and plates with patina to add the worn out look.


I hope you've enjoyed my post. See you next time.
x
Monika 


Products used: