Saturday 31 August 2019

Heat Embossing with Lisa

Helllllooooo.... lovely people. 

Lisa here, and this week at Tando Creative the theme is 'heat embossing'. 

As soon as I first discovered heat embossing (too many years ago to mention) I instantly fell in love, and still continued to be astonished with the process to this day.

So for this tag, I used a selection of Tando stencils, the new Andy Skinner Embossing Powder and stamps.


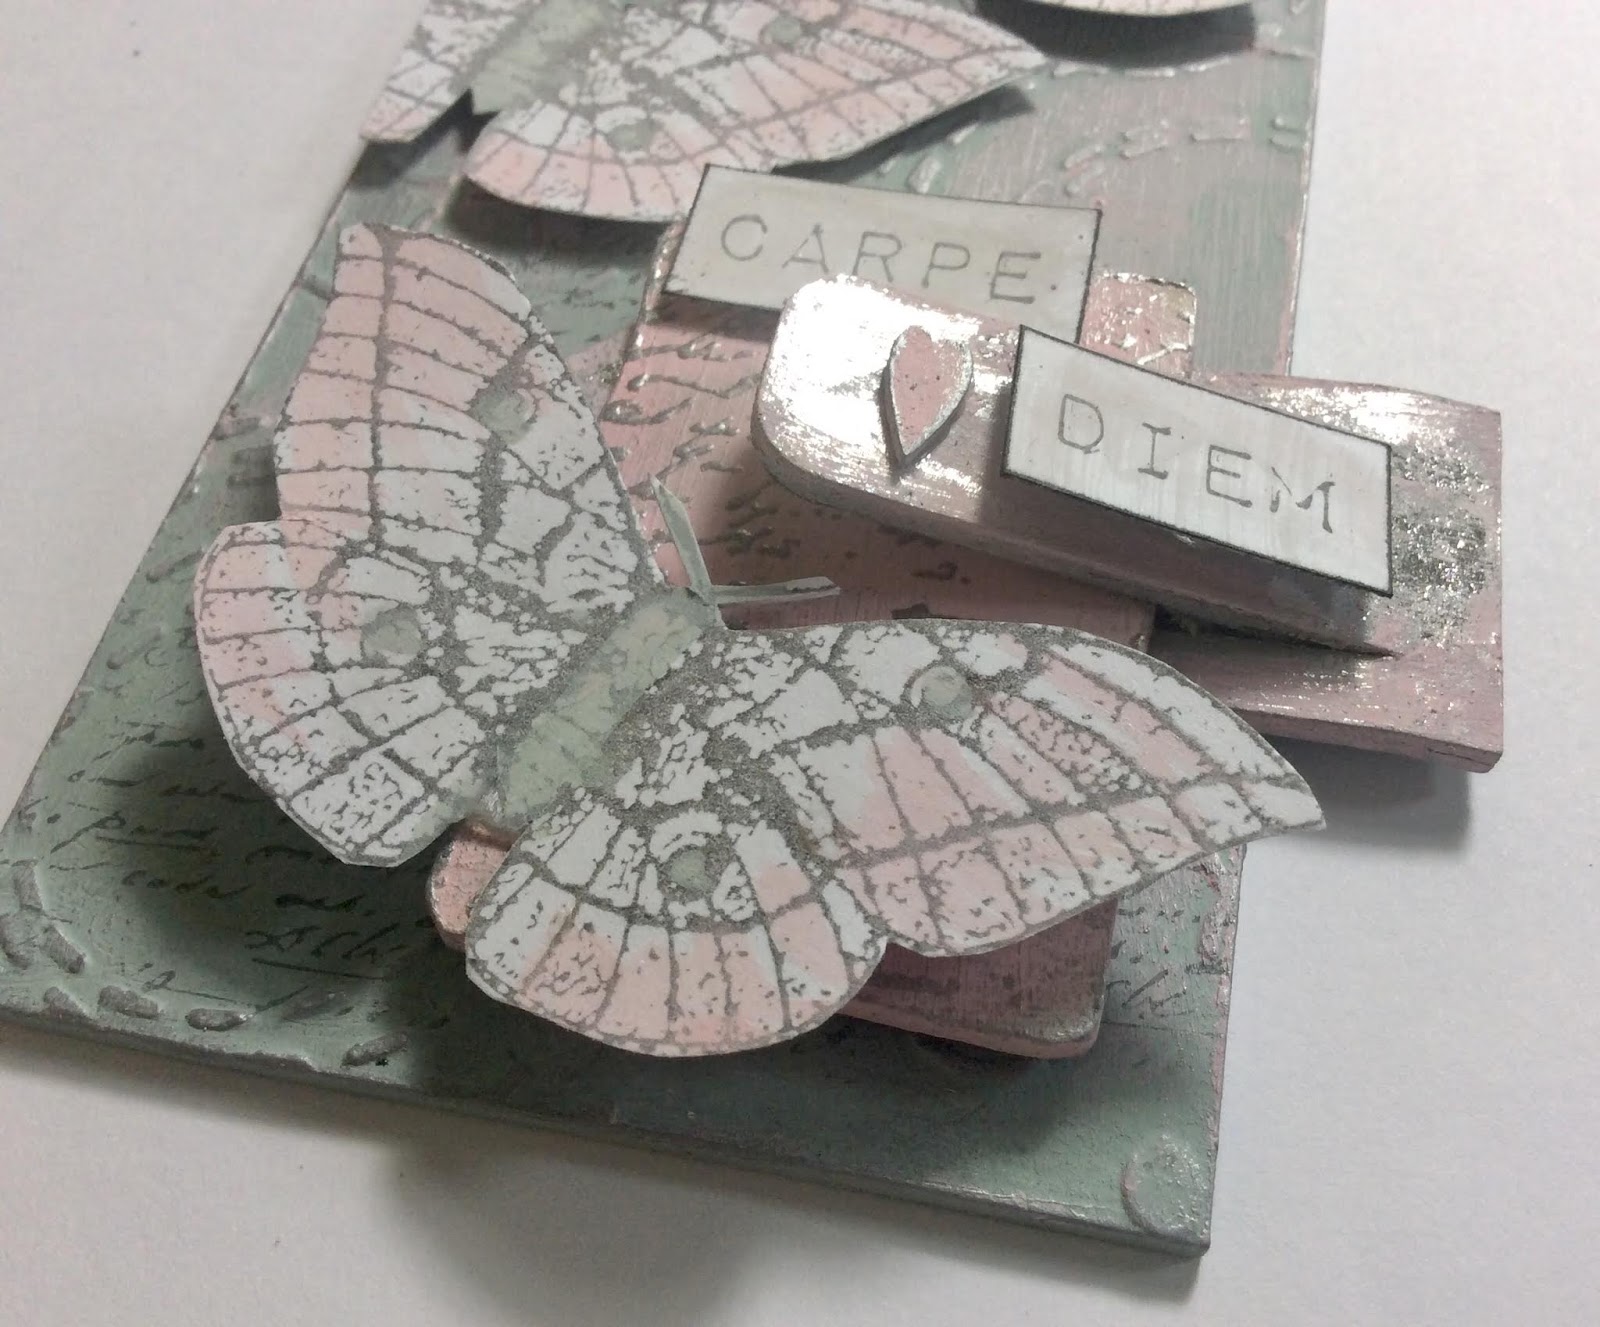
I first painted a Tando tag using DecoArt Premium Acrylic Paints in Colbalt Teal Hue mixed with White Gesso. Then heat emboss using a Tando stencil with clear embossing ink and Andy Skinner's Embossing Powder.


I then heat embossed Tando Thins with the clear embossing ink and another of Andy Skinner's Embossing Powder.


Using Andy Skinner's new stamp - Gypsie Queen stamped with clear embossing ink and White Embossing Powder, twice on to white card,cut out then inked one with a dark blue ink and one with a light blue ink. Then over layed them and glued them together.


Stamp the sentiment on to white card using clear embossing ink and white embossing powder. Then inked with the blue ink.


Add some blue wool under the sentiment and add some thread through the tag hole.


Thanks for popping by,
Lisa x

Friday 30 August 2019

Heat embossed tag


Hi there!

It's heat embossing week and I would like to show you how I made this embossed tag. I am slightly addicted to heat embossing - I put it on practically everything I make! I'm a massive Seth Apter fan, and he uses it in many different ways. I've used some of his techniques here.

I took a small Tando tag and undercoated it in DecoArt Timeless Chalk paint, then a wash of Burnt Umber fluid acrylic to give a quick background.

Then I stamped over a script stamp with Red Geranium Archival, and one of Seth's stamps in black. The background will hardly show - it just gives another dimension to the top layers.

I used an embossing pen to draw a few random scribbles on the tag, and sprinkled on some chunky gold & white embossing powder by Cosmic Shimmer. I then set this with the heat tool.

Then I swiped the tag with Versamark and sprinkled a layer of Stampendous clear chunky embossing enamel all over the tag. Before you start heating, get a few things ready to sprinkle into the clear enamel while it's hot. I used some Frantage flakes and glitter from Stampendous Encrusted Jewel kits. When the enamel is nice and hot (you can see it moving slightly), remove the heat tool and sprinkle a few flakes or glitter onto the tag. You can use you fingers, some tweezers, or a tiny spoon. Re heat, trying to keep the tool directly above so that the flakes don't get blown about.

Then I repeated this process but with various different embossing powders. You can concentrate different colours in one place, or go for an all over sprinkle. Sometimes you can see patterns develop in the background, and add more colour to those areas. I used Stampendous Seasonings and Aged Scarlet, Emerald Creek Baked Texture Patina Green and Rocky Road, and Andy Skinner's Funky Cold Patina.

Then I swiped the Versamark pad around the edge of the tag and edged it with more Rocky Road. I added another layer of clear chunky, then finally embossed another of Seth's mini stamps EM45 into the hot enamel, inking it first with Versamark. Always use rubber stamps for embossing into hot powder, as the clear acrylic ones will melt!

Embossing powder is a very versatile medium, and can be used in many different ways, as well as for stamping. I hope you feel inspired to have a play! 

Thanks for stopping by!

Celia  x


Wednesday 28 August 2019

Heat Embossed Butterfly Tag by Jane

Hello!

This week on the Tando Creative blog the theme is heat embossing.  This is one of my favourite techniques and mediums so I used some different types of powder to decorate one of the technique tags from my binder...


I started by painting the tag using black gesso...


Next I used my versamark clear inkpad on the bottom half of the tag then added ultra thick bronze embossing powder.  I added 3 layers of powder altogether, adding more powder whilst the layer before was still hot.  After the third layer I inked up my diamond background stamp from Bee Crafty (this is a photopolymer stamp so can withstand high temperatures but you may need to check other clear stamps if doing this technique) using black staz on.  Once I had made sure my powder was really molten I placed the stamp in then held it firmly until the powder had started to set.  Then I carefully peeled it off...


Using a large greyboard cog from Tando Creative that I had previously painted, I added some dabs of clear ink and patches of metallic embossing powder.  I then cut it into pieces and adhered it to the tag...


At this point I realised that I wanted some finer embossing detail at the top!  So I carefully added some clear ink to my script stamp from Bee Crafty and embossed with a fine gold powder.  There were speckles of powder left behind but I didn't mind as I was going for a grungy feel...


I had previously made some resin paper by coating old book paper with resin and leaving it to cure.  I stamped out 6 butterflies using my stamp with Versafine black ink and adding clear embossing powder over the top before heating it.  These were then cut out and layered up to create 3 embellishments.  I also wrapped some rusty wire around the tag for extra texture and interest and finally added some sentiments from the Tim Holtz small talk stickers which I stuck onto black card for extra stability...


I am really looking forward to seeing what the other team members do with their heat embossing this week and hope you will join them too.

Thank you for looking and happy crafting!

Jane xx


Tuesday 27 August 2019

Heat Embossing card

The theme this week is heat embossing so I made this card:


I've used distress oxides on card to make the base and then applied embossing ink through the {Flourish Layering Stencil}. 

I've applied white embossing powder and heated it up.

I painted a {Mini Butterfly} and then used a stamp and white embossing powder. As I'd edged the butterfly with an inkpad, this also gave the butterfly a white edge. I then doodled with a Posca pen and finished everything off with a die cut word.

Monday 26 August 2019

Hochanda Monday

Hi, every Monday we are showcasing a piece that has been seen on Hochanda.  It could be an older piece or a newer piece...we will mix it up!!!!

Today I am showing you some little books that I made for a show last year when all the gorgeous MINI BOOKS were launched.  I don't think these have been blogged before which was very remiss of me.


So here we have 2 of the rounded end ones and 1 wrap round.


Although the curved end looks like it make it difficult to make the pages all you need to do is to draw around the cover.  Both this one and the Christmasy one have patterned paper pages with a light layer of tinting base.


This one I turned into a Post-It Note holder...just the right size!!!!! It would have had a pen or pencil included but I couldn't find one small enough in the time I had.


I hope you enjoyed this little look back, come again soon, Karen xxx

Sunday 25 August 2019

France Papillon Week - Butterfly Tag by Jane

Hello!

This week on the Tando Creative blog we are using products designed by France Papillon...


* I started by using some of the greyboard tags and embellishments that were produced for France by Tando Creative
* These pieces were prepared with gesso then I used modelling paste through the warp grid stencil
* Chalky Americana paint was used to colour the different pieces and some silver foiling added to the 'paperclip' element
* One of the script stamps from 'London New York' was added to some of the pieces with grey archival ink
* The butterflies from the 'Creepers and Crawlers' set were stamped using grey archival ink then coloured using some of the chalky paint with a little added water
* All the pieces were then adhered together and the words from the 'Perfect Words' set were also stamped and added using glue gel


Thank you for looking and happy crafting!

Jane xx


Saturday 24 August 2019

France Papillon Week by Dee

Hi everyone Dee here with my post fo our France Papillion week.I hope you are all well and enjoying the summer its supposed to be a hot weekend. I have a tag for you that uses her stencil from Illusionary Artists along with her words stamp. 


I used a France technique that she used on one of her Journal on Mondays which can be seen Here!


I also used the mini heart from Tando creative to crate the mini heart along with black wire which I wrapped round a large paint brush and twisted into place.


The fragile words are from Frances stamp set Perfect Words stamp set. i used Deco art modelling paste and crackle paste and Finnabair translucent crackle paste.Lindys stamp gang magicals in 
blues and blue blacks along with rust paint from Finnabair.


Frances Driving Me Circles small stamp set was used over the top of the tag once it had dried followed by Black antiquing cream from Deco art. pewter treasure gold was then used inside
the circles to highlight them as well as along the edges.


Tags Mega bundle bag

Small hearts

France Papillon's stencil Driving Me Circles


Friday 23 August 2019

France Papillon style Printer Tray


Hi there!

Celia here, with my first post on the Tando blog, and it's France Papillion week. I have decided to make a Printer Tray to showcase a few of France's stamps and stencils. I started off by choosing some small greyboard embellishments from the grab bags, minis and the new mini tags. I also chose some of the medium Steampunk Parts to add a bit of machinery. I drew around the top part of the printer tray onto the baseboard to help with positioning.

I covered some of the pieces with various embossing powders, using Versafine straight onto the greyboard. I love how this effect makes the greyboard look so expensive!

For the butterflies, I stamped directly onto the untreated greyboard to give a nice shabby effect, using France's Creepers and Crawlers stamp set. I used Di's method of putting the greyboard butterfly onto the inked stamp, so that you can position it perfectly. I decided to fray the edges by wetting them with a wet paintbrush then allowing it to soak in. After a few minutes, it separates easily and can be coaxed into place with a knife.

I stamped the bee onto grey card and cut him out. I painted the base of the steampunk parts in DecoArt black chalk paint and the grid in Decoart fluid acrylic silver. 

The cogs were given a quick rust treatment by stippling with fluid acrylics in black, raw umber, quinacridone gold and transparent yellow iron oxide.

I made some of France's trademark red hearts using Pyrole red and Raw Umber and added some one step crackle.

For the tray, I glued together all three layers and painted it in in Teal, with a coat of Crackle Paint, then some washes of Cobalt Turquoise Hue and Teal. 

I primed the base with a white chalk paint, then drew round the frame to see where the squares would be. I masked off a couple of them with post its and scraped through some Decoart modelling paste through two of France's stencils - Honeycomb and Driving me Circles.

I decided to paint the base purple, because you have to have some purple in your projects don't you! I used the new colour, Byzantium, from Paperartsy, and swished through some Teal and Magenta. Then I drew in the frame again and stamped in some of the squares with Watering Can and Cactus Flower Archival, using the post-it masking method and the Rock and Rust stamp set. Lastly, I stamped 'Little Things' from the Small Talk stamp  set, using Versamark and fine black embossing powder. (Hint - do this BEFORE you assemble the tray! 😬)

This was then assembled and all the tiny embellishments stuck in with Cosmic Shimmer glue. Here's the finished piece:

I hope you feel inspired to have a go at a Printer Tray!

Thanks for stopping by,

Celia  x 
Tando products used:
Mini Printer Tray 152x152mm
Long Tags: Arrows, Butterflies, Clocks, Hearts
Hearts grab bag
Cogs Grab Bag
Steampunk Parts medium
Tando minis keys
Tando minis butterflies

France Papillon products used:
Driving Me Circles stencil (large)
Honeycomb stencil (small)
Rusted Rivits stencil (small)
Rock n Rust stamp set
Creepers & Crawlers stamp set
Perfect Words stamp set

Tuesday 20 August 2019

France Papillon Week- Fiona Randall

 
Morning all it's France Papillon week on the Tando Blog so here is my contribution.


For my project I decided to use one of Tando's large Media Boards to decorate. I got out the Gelli Plate and created my background paper with Distress Oxides and applied to the media board and the small tag. I then cut a piece of Tando Grey Board to the size I required and applied DecoArt Media Modelling paste through France Papillon's Rock Formation Stencil. Once dry a coat of DecoArt Dazling Metallic Bronze paint was applied and then DecoArt Media Line Patina Antiquing applied and then wiped back. The same treatment was given to the small frame and washer Embellishments from France Papillon's Tags and Embellishment Kit. Next up was stamping with Sepia Archival ink and a script stamp from France Papillon's Illusionary Artists New York Stamp Set onto the large media board, the small tag and the large washer. Two Moths were then stamped with Sepia Archival Ink onto scraps of leftover paper from the gelli print with France Papillon's Illusionary Artists Creepers and Crawlers Stamp Set. The tiny Hearts from the Tags and Embellishment set were inked in sepia and glossy accents applied. Once dry all elements were assembled and applied to the Large media Board using offcuts of Grey Board to add depth and dimension to the piece. Finally a word quote sticker was applied to a piece of inked cardstock and glued in place on the large washer to finish.
 
 
Close up of Detail.
 
 
I hope you have enjoyed the process of how this all came together. Keep a look out for more Inspiration from the Team this week.
Fiona x
 
Products Used.


Large Media Boards.
 
Grey Board Sheets.
 
France Papillon Stencil- Rock Formation
France Papillon- Tags and Embellishment Kit.
 
France Papillion Stamps
 
Creepers and Crawlers & New York.


DecoArt Media Line- White Modelling Paste & Patina Antiquing Cream.
 
DecoArt Dazzeling Metallics Acrylic- Bronze.
 
 
Other Products.
 
Ranger Archival Ink Pad- Sepia.
 
Ranger Distress Oxides- Vintage Photo & Weathered Wood.
 
Ranger Glossy Accents.
 
Gelli Arts- Gel Plate.