Showing posts with label reindeer. Show all posts

Saturday, 16 December 2017

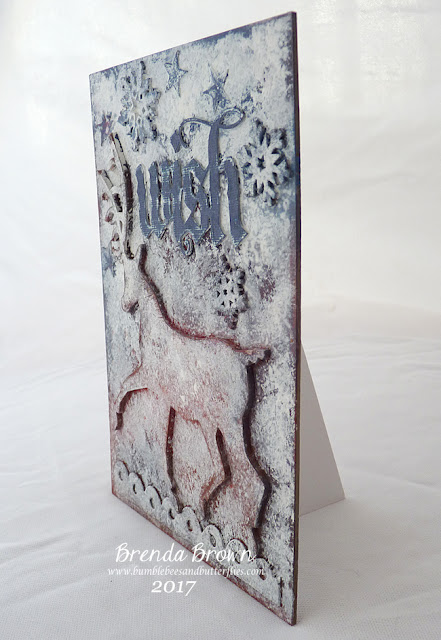
Reindeer Wish - Brenda

Hi Brenda here with another of my stand up media cards in a Christmas design. It was made in exactly the same way as the Snowflake Noel card I showed here on Monday using DecoArt media acrylics and chalky finish paints.


Di has this gorgeous reindeer in her Christmas selection both in this large size and in a smaller one too.


The sentiment is a Tim Holtz die, I love the very old manuscript style of font and the snowflakes can also be found in the Tando online shop. Just click the links and you will be transported over to the products.


I used various blue, red and brown paints to get the background colours and stippled Everlasting chalk paint over the top when it was dry.


I also added an easel to this particular card but others I have designed have a stand up frame on the back just made from two pieces of card.

I hope all your Christmas preparations are going well.

Have a great weekend.

hugs Brenda xxx

Thursday, 27 November 2014

Christmas - A bit potty!

Hi there!

I have posted one of these pots for this months Tando Challenge also, so pop along there if you want to take part.  But I thought it fitting if I showed you more of them here, to fit in with the Christmas theme.

Shabby Chic your pots with some Tando chipboard!


They started life as plain wooden pots and with a little bit of Annie Sloan chalk paint and a Tando chipboard shape they ended up as nice little pots, ideal to pop a little plant in and give as a gift!

I used Tando Creative Reindeeer Large Running...


and a pack of 5 Snowflakes...


Caroline ♥

Monday, 10 December 2012

Quick and Easy Cards and Gifts


The focus for this week is quick and easy cards and gifts....so I created a mixture of both.


This is the gift part - the little glassine envelopes will be filled with smarties which correspond with the stamped instructions!  They make a great treat for teachers of tree present, or just a little thank you for a friend.  I used the Tando mini snowflake which I covered in white ink, and then inked the edge with distress ink, and also the mini reindeer just covered in brown ink and glossy accents.


For the cards- I layered up lots of offcuts of paper and then inked the stocking with some red, and the cuff with a matt gold colour, I then covered it all in glossy accents and whilst that was still wet sprayed on some red glimmer mist which is why you get the watercolour spots on the stocking.


A really simple card for my last one - I used the snowflake mask as a stencil, just using a gel pen, and then found the co-ordinating mini snowflake which I covered in white ink and stickles, the final touch was to stamp Merry Christmas.

Katherine


Saturday, 1 December 2012

Deck the Halls - Christmas Wreath

Hi, Caro is here. As you know we deck the halls this week. For that I have created this Christmas Wreath. First I have thought that that would be much work and couldn't believe it that i didn't take that long as I thought and I had much fun with crafting this piece.

Please hop over to my blog for details of the how to.


Click on the picture to go to the shop:


Monday, 26 November 2012

Homemade Decorations


This weeks theme on our blog is 'Deck the Halls'...which made me think of this photo - from time to time my kids make decorations at school which have pride of place on our Christmas tree, so the photo is of my sons penguin.

I started the page using the 5 snowflakes mask - which are great as you can get 2 different effects with it all in one mask, I used white gesso and scraped it through the snowflake mask, then I used the snowflakes that pop out the centre of the masks, scattered them around my page and spritzed them with white glimmer mist.  

My favourite thing to do with the mini reindeer is ink them brown and then cover them with glossy accents layering them up with paper and stickers.  

The other thing that I really love about chipboard is it is far easier to cover up your mistakes or things that you don't like on it.  So my holly branch started off by being coloured in with pro markers and then covered in glossy accents, but it didn't really go with the painty feeling of my page, so I then covered it in gesso and then crackle paint and got some lovely crackles.  Still not sure about it as I missed all the colour so I then water coloured over the top with red and green distress ink!


Katherine