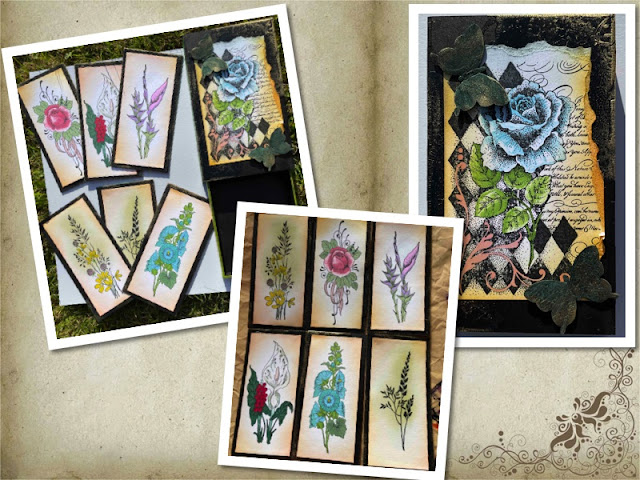
I love mixed media, 3D, projects. Any excuse to get inky and messy I'm in the thick of it. This is the second of the two Matchbox Kits I got from Tando, purchased before I became a Kit Ambassador for them but it was fun recording all the stages and now sharing the process with you all.
This is the finished result, yes starting at the end is a good way to start with this!
These kits come in laser cut chipboard, the 6 inserts are much thinner chipboard and are supplied as separate pieces. The individual parts just need to be gently eased out of the board. All the parts are precision cut to fit together.


Next, the outer shell and the inserts were also painted with Carbon Black paint. This paint going directly onto the naked board have covered brilliantly.
The 6 inserts were also given a partial covering with Deco Art Media Crackle glaze. Each one received the glaze in different places and thicknesses.
The crackle glaze was left overnight to completely go off then using the best applicator around gold tone Treasury Gold was gently touched over the glazed areas. That applicator? my little finger.Six pieces of white card stock were cut 5 1/2 inches x 2 1/2 inches to fit inside the 5 3/4 x 2 3/4 inch inserts. These pieces of card were then stamped with Chocolate Baroque floral images. Wild Honey Distress ink blended around the edge of the cards, the stamped images were coloured with Chameleon Pens. Then it was simply a matter of attaching the cards to the inserts.
Turning back to the outer shell, and loving the effect of the crackle glaze and Treasury Gold the same technique was used on the top. Over that is another piece of white card dusted, stamped and coloured in the same manner as the inserts.
For extra interest and embellishment butterflies seemed like a good idea. 2 painted black all over, now I wondered if interference green would look better if it was applied and then crackle glaze placed over that or if the crackle should go on first.
Hang on wasn't there something about experimenting with some paints? Below is a picture of the backs of the inserts which have been painted and in some cases had a corresponding interference top coat added.
I hope you have enjoyed this look at my process and that it will encourage you to get your paints out and play.
Products used.
Tando Large Matchbook Kit with 6 inserts
DecoArt Acrylic paint Carbon Black
DecoArt Acrylic paint Green Gold
DecoArt Interference Paint Green
DecoArt Clear Crackle Glaze
From my own supplies
Treasury Gold Gilding Wax
Chocolate Baroque Rubber Stamps
Chameleon Pens
Wild Honey Distress Ink
White card stock


No comments:
Post a Comment