Showing posts with label Long Tags. Show all posts

Wednesday, 8 June 2022

Spread Your Wings. Butterfly Tag Plaque- Fiona Randall


Morning all Fiona Here with another Butterfly Tag Plaque.


I used one of the Tando Long Tags which come in a pack of 5 and are great value for money. I traced around the tag onto a piece of white card stock and cut with a craft knife.
Next up I sprinkled some Lindy's Magical powders ( you can use Brushos too) onto a tim holtz acrylic stamping block. Now this was a happy accident as the block has a grid system etched into it so you can line up your stamps and I sprinkled the powders onto this side by mistake as opposed to the smooth side.. I gave the block a spritz of water and then used the block as a stamp to transfer the now dissolved powders onto the tag. This is where the happy accident occurred as you can see it picked up the grid lines of the block too. What a cool effect. This was then attached to the long tag with DecoArt Decoupage Matte Glue.
Next I applied a coat of white DecoArt Media Gesso to two of the Tando Square frames and dried with a heat tool. I then gave them a spritz of water and applied the Lindy's magicals as a watercolur and dried. I then splattered with a brush another colour from the set of Lindy's magicals to both frames and then inked the edges with black archival ink when dry.
I then gave a coat of DecoArt Chalky Finish in Carbon to one of the Tando Mini Keys and added a chinese coin to the top of it as shown.
I then stamped two butterflys from Chocolate Baroqus Butterfly mind stamp set with versafine ink onto a piece of vellum. Then heat embossed with white embossing powder. The butterflies were then fussy cut out. I added a wash of colour to the smaller of the butterflies with Lindy's magicals.
I then glued the frames to to the tag and then glued the key on top of the frames. The butterflies were then glued and layered together and some black gems added to form the body. This was then attached to the key as shown.
I then stamped the sentiment from the Butterfly Mind Stamp set with black Archival Ink and cut out. I then layered onto black card stock and trimmed before applying to the tag base.
I then cut a piece of Tando Grey Board to size and attached a piece of the same white card stock to create a totally white base. I could have painted this but I wanted the same colour base  as the tag.
I am quite pleased how this happy accident turned out.
Thanks for stopping by today
Fiona xx

PRODUCTS USED.


OTHER PRODUCTS.

Lindy's Stamp Gang Magicals- Deutch Deserts.

White Card Stock 300gsm

Black Archival Ink Pad

Versamark Ink Pad

WOW White Embossing Powder

Tiny Black Gems.

Small Chinese Coin


Thursday, 7 October 2021

Circles Week- Fiona Randall


Morning all it's circles week on the Tando Blog.

I love a circle or two or three.


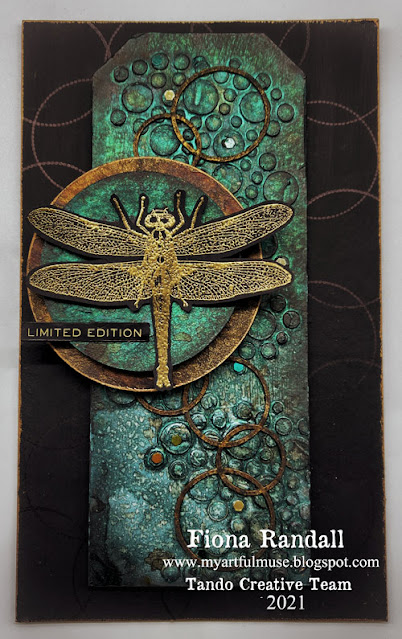
For this project I decided to decorate one of the Tando Long Tags which was then backed onto a piece of Tando Grey Board cut to size to create a Plaque.
Starting with the Tando Long Tag.
DecoArt Media Modelling paste was applied through the Tando Bubbles Stencil.
When dry this was given a coat of DecoArt Chalky Finish in Everlasting and dried with a heat tool.
The tag was then spritzed generously with Lindy's Stamp Gang Starburst sprays in Galactic Teal and Tainted Love teal and dried with a heat tool.
Next up a spritz of Lindy's stamp gang Moonshadow mist in Burnished brass was applied and dried with a heat tool. The edges of the tag were then inked with a black archival ink pad.
Tando extra thins circles were then given a coat of DecoArt Chalky finish in carbon and dried with a heat tool. These were then spritzed with Lindy's stamp gang sprays in Burnished brass and Golden Doubloons and dried with a heat tool before gluing to the tag base as shown.
Next I chose two sizes of circles from the Tando Grab Bag of Circles.
For the largest circle I repeated the process as explained for the Tando Thins circles.
The smaller circle I repeated the process of the sprays as the tag base.
These were then layered with an off cut of grey board to give depth and dimension and applied to the tag as shown.
I then stamped the Dragonfly from my Sacred Rubber Stamp set with versamark ink onto black card stock and heat embossed with gold embossing powder. this was then fussy cut and adhered on top of the small circle on the tag.
Next I cut a piece of Tando Grey Board to size and gave it a coat of DecoArt Chalky Finish in Carbon then dried with a heat tool.
 I then gave this two coats of DecoArt Media Ultra Matte Varnish to seal and protect.
Next I stamped with a circle stamp and black Archival ink all around the edges of the grey Board base.
I then applied the tag to the Grey Board with with off cuts of grey board to give depth and dimension.
To finish a Tim Holtz word sticker was applied 
and small sequins added in various places.
Thanks for taking the time to stop by and read.
Fiona xx.

Products Used.


Other supplies.

Lindy's Stamp Gang Sprays.
Ranger Black Archival Ink Pad.
Versamark Ink Pad
Gild Embossing Powder
Circle stamp from my stash.


Wednesday, 8 July 2020

Butterflies- Use Your Wings- Fiona Randall

Morning all Fiona here with my project for this weeks theme on the blog BUTTERFLIES......
Yay I love me a Butterfly in all sizes shapes and form . These Beautiful creatures are a an absolute joy to create with.
 
 
I used one of my favourite Tando Long tags and gave it a base coat of DecoArt Tinting Base. Next up I sprayed the tag with DecoArt Media Misters in Turquoise Shimmer and Yellow Green spritzing with water to make them move around and blend.Once dried with a heat tool I stamped all over the Tag with a script Stamp from Chocolate Baroque's Eccentric Edwardian Stamp Set in black archival ink. I then created a master board with DecoArt Media fluid Acrylics in Primary Magenta and Pyrrole Orange blending the colours together to get an ombre effect. I then stamped onto the masterboard using the butterfly stamps from Chocolate Baroque's Butterfly Mind set in black archival ink. These were then fussy cut and the edges inked. The tag was then edged with black archival ink and some doodle lines added with a black posca paint pen. A piece of tando grey board was then cut to size to create a plaque and this was given a coat of DecoArt Chalky Finish in Carbon. The tag was then applied to the plaque with off cuts of grey board added to give depth and dimension. The butteflies were then added down the centre and to finish a sentiment added. I do hope you have enjoyed this short tutorial. Do stop by the rest of the week to see what the other team members have in store for you.
Stay Safe
Fiona xx
 
Products Used.


Other supplies.
 
Black Archival Ink Pad.
Posca Paint Pen- Black


Tuesday, 17 September 2019

Anything Goes Week- Fiona Randall

 
Morning all it's anything goes week here on the Tando Blog.
 
For my project I decided to just go for it and throw everything painty and and Inky at it.


I started by creating a master board on 300gsm cardstock using DecoArt  American Premium Acrylic Paints in Primary Magenta, Primary Yellow, Green Gold and Cobalt Turquoise Hue. I applied with my fingers blending the colours all over the cardstock. I used the same colours to stamp and stencil over the top. Next up Stamping all over with a stamp and Black Versafine ink. To finish my master Board Spatters of white using a Posca Paint Pen.
 
I then cut a piece of my master Board Cardstock and applied to a Tando Long Tag. ( the leftover masterboard can be saved for another project) I then applied the same colours of paint to decorate the Tando Heart and Word Strip. Posca Paint Pens in Black and White were used to add the dots on the Heart. I then stamped the Butterfly and painted with watered down Green Gold and Cobalt Teal Hue paints and then fussy cut.. All embellishments were then added to the tag and to finish the tag was edged with black Ink.
 
Here's a close up shot of all the detail.
 
 
Thanks for stopping by today. Do check back to see what the other design team members have in store for you this week
Fiona x
 
Products used.


Other Supplies
 
Paper Artsy Stamps- Tracey Scott A5 Set no 26
 
Impression Obsession Stamps- Seth Apter- Planetarium
 
Carabelle Studio Art Printing Stamp- noAP60007
 
Ranger Archival Ink- Black
 
Versafine Ink- Onyx
 
Posca Paint Pens- Black and White


Thursday, 15 November 2018

Spray Ink/Paint week- Rusty Heart Tag Fiona Randall


Morning all  the Team are playing with Spray Inks/ and or Paints. Here's my contribution a Rusty Grungy Paint Sprayed Tag.


I started by priming all my greyboard pieces with DecoArt Media Tinting Base. I then Used DecoArt Media Fluid Acrylics in Prussian Blue Hue  And Raw Umber mixed with a little Carbon black to make a darker brown in a couple of mini mister bottles to make my spray paints. These were then misted onto the tag base and dried between layers until I got the effect that I was after. Next up DecoArt Media Modelling paste was applied through a woodgrain stencil to the greyboard circle and Heart and once dry spritzed and sprayed with the Raw Umber Carbon black mix. Again drying between layers to achieve depth.  I then applied DecoArt Media Fluid Acrylic in Raw Umber to the large Washer from Andy Skinners Industrial Elements set. When dry it was bound with Rusty Wire. Stamping was then added to the tag base using France Papillion's London New York Stamp set from Illusionary Artists .Potting soil Archival Ink applied to the edges and  finished with a swipe of  DecoArt Metallic Lustre in Burnished Brass. Splatters of DecoArt Media Fluid Acrylic in Titanium white applied to finish the Tag Base. On the Greyboard circle and Heart DecoAt Media Antiquing Cream in Patina was applied to my craft mat and water added to make a wash. The circle and heart were then dipped into  it to create spotting and splatters. All pieces were then assembled onto the tag base and a sentiment added to finish.
 
 
Close up detail.
 
 
Thanks for stopping by today
Fiona.
 
PODUCTS USED.


Saturday, 20 May 2017

Hi Gez here, I am delighted to be sharing a creation with you today for the 'anything' goes theme.

I LOVE the new little [Whimisical Houses]  ♥♥


Using [DecoArt Media Fluid Acrylics] and [Clear Crackle Glaze] make these projects so much fun to create ♥


Beautiful finished [Long Tag]


As seen on TV! 

Did you know Tando Creative will back on your screens on the 24th May at 10am and 5pm GMT over on the Hochanda craft channel. Tando and the Design Team have lots of new products and inspiration to share with you. 

Not to be missed!

Sunday, 19 February 2017

Love tag by Gez ♥

Love is most definitely in the air as the designers have been sharing their love inspired creations all this week.

Today it's my turn and I am delighted to be sharing this little project with you!


Here is my love conquers all tag ♥


I started with one of the set of 5 [Long Tags] and gave it various coats of DecoArts [Fluid acrylics] 

I left the tag to dry and painted 3 cogs from the [Heart Cogs Mix] then added a coat of [Clear Crackle Glaze] 


Everything dried fairly quickly and I assembled my tag adding some of the gorgeous [Spoonful of RUST] to the finished tag, where I added it to the hearts I sealed it in with a thick coating of clear glue.

Thank you for calling, I hope you like my tag ♥

Happy creating, Gez ♥ 

Wednesday, 1 February 2017

Color Theme - Luv Tag


Hi friends! Dana here today sharing the tag that I created for the Color Theme this week. I first painted a Long Tag with a coat of DecoArt White Gesso. Once that was dry, I added red, pink, yellow, and orange dye ink to the tag and used a sponge to blend the color. To add some visual interest to the background I sprinkled the tag with water and set it aside to dry.


I colored two hearts with pink paint. I added gold glitter glaze to one heart and a glued a piece of netting over the second heart, and then glued both hearts to the tag. There's room for a lot of embellishments on this long tag!


I used the Stampendous Luv Heart stamp and black ink to decorate a piece of canvas ribbon. I added a metal charm to the ribbon and then brushed it with DecoArt White Gesso for a slightly distressed finish. I added a plastic bow and piece of ribbon to the top of the tag.


You can find the chipboard I used for this project, and a wonderful selection of Stampendous and DecoArt products, in the Tando Creative Retail Store. We'd love to see your creativity! Share your work with us in Tando's Creative Zone on Facebook.

Saturday, 14 January 2017

Let It Snow! Tag by Gez ♥

Hi Gez here, I am delighted to be sharing a creation with you today using one of the [Long Tags] 

This last week has seen us have Thundersnow! And so it inspired my tag!


The background was created using the [Joined Snowflake] mask and Distress Inks.

[Urban - Cityscape] stamp by Stampendous was stamped and embossed directly onto the tag and coloured with watercolour paints, these [Long Tags] will keep their shape with heat, water and whatever medium you choose to use.

Chunky white embossing enamel from the white [Frantage Jewel Kit] was used to pave the street with snow!


Three [Snowflakes] were painted with silver acrylic paint and then given a delicious coating of  glitter from the [Silver] Stampendous Frantage Jewel Kit.


Tando products used:


Thank you for calling and leaving a comment if you get the chance.
 Stay warm and safe if you are in the Northern hemisphere.

 Happy creating, Gez ♥

Tuesday, 10 January 2017

'Tag It' week with Nikki

Good morning everyone, 

Here at Tando Creative HQ we are really excited to announce our new design team member Nikki Killinger:


Hi everyone, I'm very excited to be a part of this amazing team, and was honoured to be asked.  I love everything mixed media and painty, and have been crafting since an early age.  I can't wait to get stuck in and share lots of projects with you.  I especially love Tando products, they are well made, well thought out, and take a lot of mediums beautifully.  There is such a range too!  I don't think I have a particular style, as I am slightly eclectic in how my makes turn out, and I love anything from Shabby Chic to Steampunk, and even to the downright strange! 

We're so looking forward to seeing Nikki's stunning projects and do look out for her excellent shows on Hochanda TV.

Hi all, I'm very happy to be sharing my first project today. 

 I started by painting the background of my main tag with a sponge, in Americana chalk paints.  I added a layer of crackle paint around the tag, varying the coverage on each edge, and over a small tag.


There is a lot of paint on top of paint here, I first gave the crackle on the tags a 'wash' of prussian blue hue, and quinacridone gold.  Then various colours were 'dripped' down the length of the tag, including metallic peacock pearl, venetian gold, chocolate and raw umber.


I stencilled with chalk paint through Andy's Industrial Elements stencil, in lace chalk paint for the main tag and raw umber on the small.  A 'rusty' tando screw was added for detail to the small tag.  More gold was added to the edges of the tag, and then slightly diluted raw umber, and the circles stamped with a bottle lid.

The feather was treated in the same way, I painted a background onto card, stamped in raw umber, and coloured with the co-ordinating metallic colours.


My little tag was glued with 3d glue above the feather, and I thought the 'air mail' was appropriate.


I hope you like it, I'd love to know what you think. 

Best Wishes,
Nikki
xx

Products Used:

Tando - Set of 5 Long Tags, Industrial Elements (screw), mini tag from stash.
Andy Skinner Stencil: Industrial Elements.
Bottle lids & stamp from stash. 


Monday, 24 October 2016

Spooky!

I'm kicking off our Spooky week with a tag. I'm very late to the party as far as the {Tando Tags} go, this is my first and it won't be my last. I love how sturdy they are.


I gave the tag a coat of gesso and then used a selection of {DecoArt Media Fluid Acrylics} in Halloween shades to colour it. I added some text stamping and then used the flying bats from the {Haunted HouseStencil Set} and some {Black Modelling Paste} which is gorgeous, but a devil to clean up!

I stamped {Danse Macabre} and cut out the skeleton. Then soaked a bat from the {Mini Bats} in water and split it so it was half the thickness. This was cut in half, painted and stuck onto the skeleton.

I finished off with a computer generated quote, some doodling and some grey fabric tied in place and hacked at with scissors to make it raggedy.

Kaz xxx

Sunday, 19 June 2016

City Tag!

What a treat this week to work with the beautiful long tags and gorgeous NEW to Tando, Stampendous stamps.


I painted a background using acrylic paints onto one of the [Long Tags]

Set of 5 Long Tags 
 
The tag was also sprayed with a clear texture spray to add some interest. Then simply stamped with a gorgeous cityscape stamp from Stampendous coming soon to Tando.

I was going to add the sentiment, Find joy in the journey, but I really didn't want to cover up any of the stamp details.


click to enlarge..

I've been doing a lot of travelling since the start of the year and one of the lovely distractions is to look at all the beautiful architecture even in cities beauty can be found :)

This stamp is just GORGEOUS ♥

Thank you for calling and leaving a comment if you get the chance.

  Happy Sunday, Gez ♥

Sunday, 29 May 2016

Things with wings by Gez

It's my turn today to share something with wings for this weeks challenge. Remember, you can join us any time throughout the month for your chance to win a grab bag of Tando goodies..... 

Here is a tag I decorated for the challenge..


I started with one of the blank [Long Tags] from the 5 pack.

Set of 5 Long Tags

My first time working with one of these tags, they are a good thickness, and won't buckle under heat or wet medias and the length is so awesome!

The background was created using anything laying around my desk, mostly paints, inks and a few pastels.

Texture paste was applied to the long tag through the [Letters] mask to add some dimension to the background. 

Mask - Letters


Then the fun began decorating one of the large butterflies from the [Butterfly Grab Bag]

Butterfly Grab Bag

Again, anything that was laying around my desk got thrown onto this lil guy! Just so sparkly in the sunshine!

Too much fun! 

Thank you for calling and leaving a comment if you get the chance.

  Happy Sunday, Gez ♥