Showing posts with label Grab Bag of Circles. Show all posts

Thursday, 7 October 2021

Circles Week- Fiona Randall


Morning all it's circles week on the Tando Blog.

I love a circle or two or three.


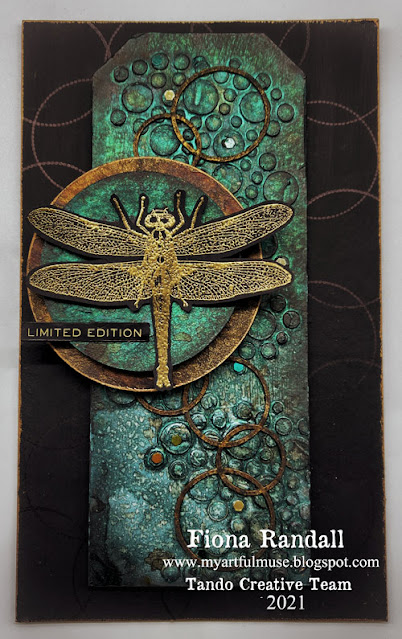
For this project I decided to decorate one of the Tando Long Tags which was then backed onto a piece of Tando Grey Board cut to size to create a Plaque.
Starting with the Tando Long Tag.
DecoArt Media Modelling paste was applied through the Tando Bubbles Stencil.
When dry this was given a coat of DecoArt Chalky Finish in Everlasting and dried with a heat tool.
The tag was then spritzed generously with Lindy's Stamp Gang Starburst sprays in Galactic Teal and Tainted Love teal and dried with a heat tool.
Next up a spritz of Lindy's stamp gang Moonshadow mist in Burnished brass was applied and dried with a heat tool. The edges of the tag were then inked with a black archival ink pad.
Tando extra thins circles were then given a coat of DecoArt Chalky finish in carbon and dried with a heat tool. These were then spritzed with Lindy's stamp gang sprays in Burnished brass and Golden Doubloons and dried with a heat tool before gluing to the tag base as shown.
Next I chose two sizes of circles from the Tando Grab Bag of Circles.
For the largest circle I repeated the process as explained for the Tando Thins circles.
The smaller circle I repeated the process of the sprays as the tag base.
These were then layered with an off cut of grey board to give depth and dimension and applied to the tag as shown.
I then stamped the Dragonfly from my Sacred Rubber Stamp set with versamark ink onto black card stock and heat embossed with gold embossing powder. this was then fussy cut and adhered on top of the small circle on the tag.
Next I cut a piece of Tando Grey Board to size and gave it a coat of DecoArt Chalky Finish in Carbon then dried with a heat tool.
 I then gave this two coats of DecoArt Media Ultra Matte Varnish to seal and protect.
Next I stamped with a circle stamp and black Archival ink all around the edges of the grey Board base.
I then applied the tag to the Grey Board with with off cuts of grey board to give depth and dimension.
To finish a Tim Holtz word sticker was applied 
and small sequins added in various places.
Thanks for taking the time to stop by and read.
Fiona xx.

Products Used.


Other supplies.

Lindy's Stamp Gang Sprays.
Ranger Black Archival Ink Pad.
Versamark Ink Pad
Gild Embossing Powder
Circle stamp from my stash.



Tuesday, 11 August 2020

In The Round Week- Fiona Randall


Morning all Fiona here with this weeks theme- In The Round.
I love circles and use them whenever I can.
 
 
I've used various circles on this tag stamped and given a mystical astrological feel from Tando's Grab Bag of circles. The Tando grey board tag was given a coat of DecoArt Chalky finish in Carbon. Next up some splattering with DecoArt Media Fluid Acrylic in silver and stamping to create the night sky. The Circles were then layered up onto the tag using off cuts of grey board to give depth and dimension.I then added  the little Tando Arrows embossed with white embossing powder on top of the moon circle. Of course I had to add a butterfly from my favourite stamp set from Chocolate Baroque. The tag was then mounted onto a grey board panel. To finish a sentiment was then added to the base of the tag.
 
Thanks for stopping by today.
Do check back to see what the rest of the team have in store for you this week.
 Stay Safe
Fiona.
 
Products Used.


Other Supplies
 
Ranger Archival Ink- Black
 
Stamperia Cosmos Rubber Stamps
 
Paper from my own stash.


Tuesday, 21 April 2020

Apeture week- Box Frame by Fiona Randall


Morning all,

It's Apeture week here at Tando, and today I thought I would share a Box Frame with you.
 
 
I used the Fabulous Stamperia Paper Pad - Time is an Illusion to cover all the greyboard pieces that come with the kit and inked all the edges before adhering to the box frame. Next up Stamperia Gold Crackle paste through the Tando Flourish long stencil. The frame and the Tando compass and the rest of the embellishements were given a coat of DecoArt Media Fluid Acrylic in metallic gold. DecoArt Black Antiquing Cream was then applied to all embelishments and the frame before wiping back to give an aged / eroded metal effect. Another piece of the stamperia paper from the pad was applied to the inner box frame, Then the embellishments were all layered up using off cuts of grey board to give depth and dimension. The frame pieces were then attached and futher embelishments were added to opposite corners finish.
 
Thanks for stopping by today.
 
Stay Safe
 
Fiona xx
 
 
Products Used


Other Products.
 
Stamperia Paper Pad- Time is an Illusion.
 
Stamperia Gold Crackle Paste.
 
Stazon Midi Ink Pad- Ganache.
 
Tim Holtz 3d Impresslits-663298


Wednesday, 10 April 2019

Floral Grunge by Fiona.


The theme on the Tando Blog this week is 'Flowers'.
 
Unusual for me to have Flowers in my project but I adapted to fit in with my usual Grungy Style.


I used a stencil to apply modelling paste onto the Tando Rectangle frame. This was given a coat of DecoArt Dazzling Metallics in Iced Espresso and once dry Patina Antiquing cream applied and wiped back.  I then used some papers created with a new technique that I have been experimenting with to cover a piece of grey board to make a backing for the frame. The same paper was then used to stamp the flowers from The Butterfly Poppy Collage stamps from Chocolate Baroque. A quoute was then stamped and applied to the frame insert before assembling and attaching the flower.
 
Products Used.


DecoArt Dazzling Metallics - Iced Espresso
DecoArt Modelling Paste
DecoArt Antiquing Cream- Patina
DecoArt Media Fluid Acrylics- Prussian Blue Hue, Quinacrodone Gold.
 
 
Miscellanous products used.
 
Butterfly Poppy Collage Stamps- Chocolate Baroque.
Versafine Ink Pad- Vintage Sepia.
 
 
Thanks for taking the time to stop by and read.
Hugs Fiona.


Friday, 14 December 2018

All that Glitters- Fiona.


Morning all, Fiona here with a bit of Christmas Sparkle to inspire you. I've stepped outside my comfort zone yet again and used GLITTER. But it had to be black glitter for me.


I was inspired to make a Christmas bauble so I went to my go to Tando grab bag of circles. I sorted the sizes needed and gave them all a coat of DecoArt Media Fluid Acrylic in carbon Black. Once dry all circles  and a medium sized snowflake were given a coat of DecoArt  Americana Deco-Page glue matte and then a generous amount of black glitter was added. The excess was then dusted off. All circles were the edged with DecoArt Metallic Lustre in Burnished Brass. Three Tando Snowflakes ( the large snowflake was specially cut by Di for me ) were then given a coat of DecoArt Extreme sheen Metallic in Vintage Brass. Once dry the large snowflake was then stamped with a text stamp from Andy Skinners Textures Stamp set. All three brass snowflakes edges were then inked with black Archival ink.
Now to assemble the piece. All circles were laid face down and lined up. Then to attach them all together to form a complete piece a coffee stirrer stick ( the ones you get in the coffee shops) was glued to the back of the circles in a complete length from top to bottom. All three snowflakes were then layered onto the large centre circle using grey board offcuts to give depth and dimension . The tiny snowflake was added to the bottom small circle and a tassel added to finish.
 
 
Close up detail.


Thanks for stopping by today.
Hugs Fiona.
 
Products Used.


Other.
 
Black Superfine glitter ( my own Stash )
 
Ranger Black Archival Ink Pad.


Tuesday, 1 March 2016

Some upcycling!

Hello, its Karen here with a bit of upcycling for you using this months colour theme.  I have altered a cat food container into a holder for my little art journals....


The colour theme for March...


The box before...


The box had a couple of layers of gesso before I painted it with the darker green.  When dry I covered it with PVA and, while still wet, added some pale pink.  The flowers are made from circles from the *circles grab bag*.  I painted these with DecoArt Primary Yellow and while still wet added flicks of DecoArt Magenta.  They look very messy but much better when I had stamped and embossed flowers over the top.


The *leaves* were painted in the darker green and brown. You can see how they look better in the top picture.  The stems are painted coffee stirrers.

Thank you for taking a look today, take care, Karen x

Monday, 19 October 2015

Spokilicious by Dee

Hi everyone I hope you are well and getting ready for
Halloween. I have for you today a piece
that just evolved.
I started by painting a Tando media board with buff and a 
bit of burnt umber deco art media paint.
I then used black modelling paste through Andy's 
skulldugger mask. 
I had put crackle paste on to card and coloured it with raw umber and
dry brushed with gesso.
The compass was stamped onto a Titan buff painted tando circle
and sprinkles with gold embossing powder.
it was then painted with washes of 
Deco art paint.  
Any of you that know my work will know I am a high fan of 
Deco art's antiquing creams which were then used over 
the top of the skull. once it had dried.

The book plate again was painted with deco art paints. various stamps were used from my stash.
I hope you have enjoyed my Spokilicious piece and don't forget to join us.

PRODUCTS USED
  1. Tando products Mixed Media Boards 80mm x 116mmSkinner Stencil/Mask - SkullduggeryGrab bag of CirclesMini Book Plates
  2. Deco Art paints, antiquing creams, crackle and black modelling pastes. 
  3. Stamps from my stash.

Sunday, 19 July 2015

Christmas in July !!


Hi! Gez here today, delighted to be sharing a little Christmassy offering with you for the 'Anything Goes' theme this week!


I started with one of the circles from the {Grab bag of circles} 
 These are so versatile..

Grab bag of Circles

I sprayed the circle with ink sprays and water and allowed it time to dry. 

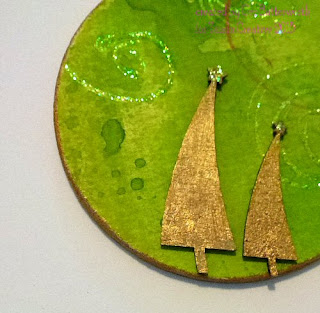
While the circle was drying I painted two of the wonky trees
with gold acrylic paint..

Grab Bag of Wonky Trees

close up..


with Christmas in mind I added a little glitz!

Thank you for calling I hope you like my idea for an early Christmas card.
Happy creating, Gez