

Read Tando's instructions - they are included in the pack and will help. Don't try to rush this project.
First I marked the back of each of the greyboard sheets with the pieces to be removed later (each sheet is different) according to the instructions.
As the top sheet will have the patterned paper glued on, I removed the marked sections then laid the sheet, face down, on the glued paper. When dry I trimmed the paper and removed the outer ring.
The middle sheet was painted, I used Moss Green from the patterned paper as my lead, with a little white, grey, and black for interest. The marked sections


remained in place until the paint was dry.
On the MDF back sheet I painted black only the areas that would be visible, but you could paint the whole surface black if you wanted to. I glued the layers together making sure that all the sections lined up. I painted the exposed edge of the clock with black to keep it neat.

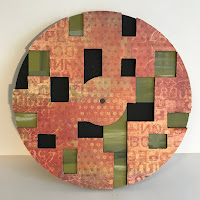
Next the numbers. There are a lot. Tando's instructions suggest they are left in the sheet to paint them. This is good advice. As I wanted to paint the sides of some of the numbers I had to remove them - but it was a fiddle. The big 12, 3, 6, 9 are grey with white sides.

The numbers on the patterned paper are grey, those on the green middle sheet are white, and those on the black areas are gold. I stuck them on with reference to the instructions.
Mount the clock works, the hands, and a battery (battery not in the kit) - and ... tick tock.
Products:
Patterned paper of your choice
No comments:
Post a Comment