So, are you up for another challenge with another chance to win some Tando Creative chippie. This time we have donated 10 packs of from our Christmas range for a challenge over on our dear friends blog Rosie-Dee's Challenge Blog.
Do pop over and have a go....oh....and while you're there, check out our own DT member Karen's entry who is also a DT member of the blog. She has used our Holly flourish chippie that you can find HERE.

Monday, 30 November 2009
Saturday, 28 November 2009
A Scrumptious Thank You
Hi, it's Sharon here. Boy, oh boy have I had great fun playing with a new set of chippie!!
I got a chance to play with this beautiful THANK YOU sentiment that Karen used earlier in the week here.....
I got a chance to play with this beautiful THANK YOU sentiment that Karen used earlier in the week here.....

.....and immediately knew that it would be perfect to team up with a gorgeous paper cupcake gift holder that I saw on the Bubbly Funk blog, (Bubbly Scrumptious) here.

At 85mm the chipboard sentiment is the perfect size to add to the cupcake. I applied a few coats of Ultra Thick Embossing Enamel (UTEE) to the chipboard in a few different shades including dark pink, light pink and dark brown and fastened it to the top of the paper cupcake with a cocktail stick.

There is a polytyrene ball inside the cupcake that hides a gift card inside it. The outside is decorated with paper, ribbons, flowers, brads and of course glitter!

It was a bit fiddly to make but I think it is well worth it in the end. A perfect gift to say THANK YOU to someone special!!
For full instructions on how to make the cupcake please visit the tutorial at Bubbly Scrumptious here.
Friday, 27 November 2009
Large Mum

Hi, it's Kaz here again and I've been using the larger sized chipboard Mum. This one is about 18 cms long, so it really is the focus on any project. I had the perfect sized tin for it too.

The tin has been decorated with alcohol inks.
I gave the chipboard a coat of gesso first then, once dry, I used distress inks to colour it. Distress inks tend to 'sink' a little bit into the gesso which gave it a lovely softer shade base. I also gave the sides a coat of white acrylic paint.
I then went to town with a variety of stamps and versamagic inkpads to produce a collage effect.
Finally I used a cotton bud to add ink to the edges of the chipboard and added a few flowers for decoration.
Kaz xx
Thursday, 26 November 2009
THANK YOU WORD
Hello, its Karen here today! Tando now have a whole range of chipboard words for using on our projects. Some come in 2 sizes which makes them very versatile too! I am showing you what I did with the joined up 'thank you' today.

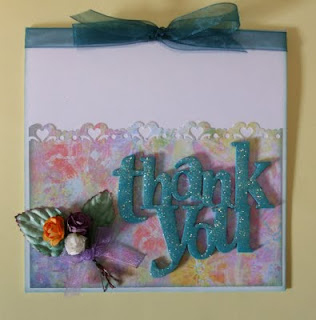
I painted the lerrs with 2 coats of turquoise acrylic & sprinkled glitter over the last coat before it dried....simples!!! These words have a lovely thickness to them without being bulky so they really stand out on your work.
Thank you for looking, HUGS XXX


Thank you for looking, HUGS XXX
Wednesday, 25 November 2009
Oooooo a challenge to win some chippie.....
Tando Creative are sponsoring a challenge blog for December. The blog is Dotty Divas, there is a link on the left hand side, but for speed why not just click HERE to take you straight to the challenge.
We have donated some chippie as a prize so do pop over and join in. Even if you haven't got time to do the challenge I'm sure you'll agree that the work over there is truly inspirational.
Enjoy!
We have donated some chippie as a prize so do pop over and join in. Even if you haven't got time to do the challenge I'm sure you'll agree that the work over there is truly inspirational.
Enjoy!
Tuesday, 24 November 2009
Small Mum
Today, I'm showing another birthday card using the small Mum chipboard word first shown by Sharon ~{here}~. It's my mum's birthday too in December so the release of the words has timed itself perfectly!
I've made an easel card, which are all the rage on crafty blogs lately.

I've glued some Prima paper onto the chipboard, then carefully cut around it with a scalpel. It is a bit fiddly, but it is worth the effort to file the edges to smooth everything out. You will need a nail file to get between the letters. I've then carefully painted the sides of the chipboard with white acrylic paint.

The rest of the card has been made using prima papers and flowers.
Kaz xx
Monday, 23 November 2009
HOME HEART WALL HANGING
Hello, its Karen here and I have been playing with this lovely wall hanging! You can decorate this in colours to suit your decor and of course you can use this as part of another project...I love the choices you get!

I have chosen to match my decor haha! I covered the hearts with some pretty paper & then blitzed them with gold Glimmer Mists. I had some pretty pearls on bias binding which I glued arounds the edges to create a bit of bling. The letters have been painted to match & then I have applied Glossy Accents and sprinkled with glitter before they dried. I threaded ribbon through the holes to bring it all together.


Thank you for taking a looksee, hope you like it! HUGS XXX
Saturday, 21 November 2009
Mum Birthday Card
Hi, it's Sharon here with my first project.

I have finished making a card for my mum's birthday using the small "MUM" chipboard word which is approximately 90mm long. I knew that I wanted a feminine card and of course a glittered word!

I have finished making a card for my mum's birthday using the small "MUM" chipboard word which is approximately 90mm long. I knew that I wanted a feminine card and of course a glittered word!

I painted the chipboard with two coats of Buttermilk acrylic paint and inked the edges with Chestnut Roan chalk ink. I then applied glossy accents and Crystal Glamour Dust for sparkle. The chipboard piece is really thick and sturdy and really stands out on the card.

The paper base is Pandora from the Victorian 7 gypsies collection.
The flourish border and 60 has been cut using the Storybook cartridge on the Cricut. The butterflies have been punched, stamped, blinged and layered.

I have really enjoyed making my first DT project and hope that you like it too.
Thanks for looking and any comments you leave are really appreciated.
xxx
Wednesday, 18 November 2009
Introducing Sharon.....
I'd like to give a warm welcome to Sharon as she joins the Tando Creative Ltd Design Team.
Sharon's work is stunning, do please visit her blog HERE to take a look at the fabulous work she has done.
Here is a bit about her:
My name is Sharon and I live in Aberdeenshire, Scotland. I am 38, married and have two gorgeous boys aged 9 and 6 who keep me on my toes! I am a primary teacher and work part-time in a local school.
When I get the time I like nothing more than to hide myself in my craft room and indulge in some crafting! I started scrapbooking in 2004 and started making cards last year. I love trying out new techniques and more recently have found myself enjoying the challenge of "altered art" where I often get to try out these new techniques.
I am looking forward to working on the Tando Creative Design Team and the challenge that it will bring.

Tuesday, 17 November 2009
LARGE OWL - TWIT TWOO!!!
Hello, its Karen here!!! I have had such fun playing with the large owl this week. The owls come in a pack of 2...not sure what the collective term for owls is tho!!! Here they are as they come:


I hope that you like him. Keep checking back for more designs, which are on their way!!! HUGS XXX

I fancied my owl really bright soI have covered him in some fabulous paper that has gold highlights in it. I traced off the eye & beak shapes and cut them out of plain card, which I edged with Distress Inks. Then I added bright buttons with embroidery thread tied in the holes.

Monday, 16 November 2009
Hip...hip....hippo!
Kaz did a fabulous job on the hippo back HERE on this post and Caroline has just another fantastic card using this little fella.
Caroline painted the hippo in metallic silver acrylic paint and stamped a swirl onto the body, using a grey pigment ink and then dusted pearl pigment powder onto the swirls. This is the same for the swirl in the corner.


Caroline painted the hippo in metallic silver acrylic paint and stamped a swirl onto the body, using a grey pigment ink and then dusted pearl pigment powder onto the swirls. This is the same for the swirl in the corner.


His head has been mounted on a spring so it wobbles.

Thursday, 12 November 2009
Kaz here again and I've finished making a mini canvas using this gorgeous Dove with Hearts chipboard.

The extra dove and hearts give you the option of using these separately or, as I have done, use them for dimension.

I have painted the birdcage part with Pearl acrylic paint and covered the bird and hearts with Prima papers and simply inked the edges of each.
You can see the dimension you get from this second photo.

The canvas itself is 7 x 5 inches and has been painted then inked. The bead hook at the top was made by winding some wire through and around the hole in the cage, threading some beads and winding the wire around again. To cover the wire, I have just tied some ribbon. I would, however, recommend not hanging it by this but use it just for decoration.
Kaz xx
Tuesday, 10 November 2009
Hippo
Hi, it's Kaz again and I've been playing with this cute hippo. He has engraved eyes, nose and mouth so you can give him a good bit of detail.


He was so much fun to do. I've used acrylic paint on him and used a stipple brush for the second coat to give him some texture. I've then just inked the edges and painted the eyes and nostrils. The eyes have been glossy accented to make them shine. He has been in the mud again, just look at his grubby feet!!!
Kaz xx
Saturday, 7 November 2009
Anchor Ring Holder
Hello again. Today I'm going to show you how I have decorated one of the anchors from the two part set shown ~{here}~. I have my eldest niece to thank for the inspiration for this ring holder.

I have painted the anchor with acrylic paint, stamped it with versamagic ink, carefully inked the edges using a cotton bud and then used glossy accents all over to protect it. Very quick and simple, but different and imagine what it would be like with a few of these hanging together with lovely beads and bits on them.
Kaz xx
Friday, 6 November 2009
NOAH'S ARK
Hello, its Karen here and just look what I got to play with!!! I just love this piece & can see lots of versatility in it. Its around 4x4inches so a good size.


I covered the top half of the Ark with paper & the bottom is painted, first with gesso & then with Spiced Marmalade Distress Inks. Then I went round the edges with a Brilliance inkpad. I decorated the pull out hearts the same way. I couldn't resist making lots of stamped images to peep out of the wondows & over the edges.
I can also imagine this with an adult theme...maybe someone who does a lot of boating etc with their faces peeping out haha
Thank you so much for looking today XXX

Here is what I did with it...I made a canvas...

I can also imagine this with an adult theme...maybe someone who does a lot of boating etc with their faces peeping out haha
Thank you so much for looking today XXX
Monday, 2 November 2009
PUB HAND PUMPS!!!
Hi, its Karen here today and I am bringing you something which I have never seen made in chipboard before.....PUB HAND PUMPS! These come in packs of 2 different ones.

Here is what I did with them...


Here is what I did with them...

This card is for a friend of ours who makes the most lovely home brew! I double embossed the base with old gold embossing pawder then I painted the handles with Aged Mahogony Distress Ink, which I glazed. Then I covered the 'middles' with paper & added some thick card ovals which I painted then ran a gold pen round. The initials are for our friend & I had to have 'home brew' on it!!!
These are really fun shapes for a man (or lady) who like anything draught aren't they? Thank you so much for looking today. HUGS X
Subscribe to:
Posts (Atom)