Tuesday, 31 October 2023

ATC Matchbox - A Clockwork ...

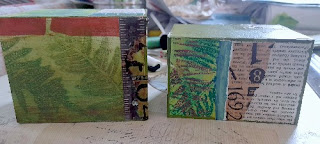
 Just a simple ATC box this week, with a little faux leather and steampunk.

You will need tissue paper and some old watch or clock parts. 

Once you have glued your box together, and it is dry spread a thin coat of PVA glue on one side. Lay the tissue on the glue then give a little squidge with your fingers to wrinkle the surface. Repeat on the other sides. Set it aside to dry.

First, base coat the entire box with Burnt Umber, when dry, dry brush the surface with Primary Red.

To enhance the texture of the wrinkles lightly dry brush with gold.

I just happened to have a few cogs and an old strap. I gave them a bit of a polish and used strong glue hold them in place.


Products:
DecoArt Burnt Umber
DecoArt Primary Red
DecoArt Venetian Gold
Tissue Paper
Random watch/clock parts


Tuesday, 24 October 2023

Back to Nature ATC Match Box


Materials

ATC ATC Matchbox with ATC cards and Coins

Gelli plate prints

Book pages

Acrylic paint

Glue

Vintage Flower images

Tando Stencils

Textured paste

Black Ink

Stamps

Tassel


Instructions

I began by painting the box and ATC’s in green paint.


Once dry I gathered a selection of previosly made gelli plate prints in natural colours or prints with a botanical feel to them. I also picked a selection of book text too. I began adding pieces of gelli print and book text randomly to the box and sleeve and each ATC.


I wanted to added a bit of texture so added lots of black stamped images to the box and sleeve. I used some Tando stencils and white textured paste to add detail to all the ATC’s.


Once the paste was dry I fussy cut out some lovely vintage flowers and added them the the ATC’s and  box/ sleeve.


 I added ATC trade stickers to the back to keep track of what and when they where made and just incase I want to trade in future.


I doodled around the outside edges of everything

When everything was dry I gave everything a coat in clear varnish to give it a glossy look

I hope you like my version of the ATC Match box

Sarah 

Tuesday, 3 October 2023

hearts and butterflies ATC matchbox collection


Today I have for you all another of the ATC Matchboxes complete with coins and cards

This one has a more mixed media feel with lots of texture as the matchboxes are very deep, perfect for  allowing you to build up dimension on your pieces

as with all Tando Grey board these matchboxes, coins and cards are easy to put together and will take a variety of wet mediums without bending, buckling or distorting so they are perfect for all your different technics and lots of layering


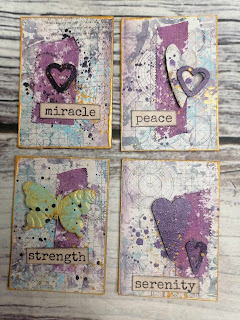
i have used four of the ATC cards as individual art pieces to go inside my box and the remaining fifth piece as a topper to decorate the outside top of my box.
I have used the same blue and purple theme throughout so that everything co ordinates


Each of the cards have been layered with first a decorative backing paper taken from the  12 x 12" Stamperia Cosmos Infinity Scrapbooking paper pad.
I used a matte pva glue on both the backing paper and the grey board which allows for a bit of movement when aligning both surfaces, this had been trimmed roughly to size, allowed to dry thoroughly and when dry the edges sanded to create a  professional finish.

 I pulled colours used in the backing papers from my stash that would compliment and coordinate (in this case, ice blue Antique paint from Majas Memories, Finnabair Sparks in Iris Potion and  ginger magic from the carnival collection) and used these to colour elements from the Tando mini tags you can  find the butterflies here and the hearts here

I  have incorporated a  little of the  paint colours onto each piece so that the foreground and background pieces have some continuity, just a few splats is enough to bring everything together

I used the same colours to  paint the sides and base of the drawer as  well as  the  inner  sleeve that the drawer slides into and more of the ginger magic to paint the inside of the drawer and to edge the pieces


on both the  coins and  cards you can  see I have embossed  some of the added elements this is a  big advantage of  grey board over mdf and similar and provides an extra dimension that can be highlighted with wax to bring out the embossed detail
I didnt have enough of the same paper to decorate the coins in the same fashion but wanted all of my pieces to match so I used mural paste texture paste from Majas Memories to create the same feel as the  texture portrayed in the papers and used  paint to emulate the same effect. I think it coordinates quite well. the  added texture was created using rubber stamps from the Cosmos infinity range and an inkpad before the same butterfly and hearts  elements from the mini tags were added

I have  coloured stripes of cotton self adhesive surgical tape with polite purple squirts from Lindy's Stamp Gang and used a piece like washi tape under all of the elements as well as adding single word sentiments edged in black to match the typography

Hope you like this  project and will share your version with us
Art Angel x x
 

Tuesday, 26 September 2023

Halloween B and H Collection ATC Matchbox - by Kim

 You'll have plenty of time to get this done for Halloween!

Construction:

First, build your ATC matchbox and drawer (see previous posts for construction if necessary). 

We need to make a space for our skeleton, a hidden layer! For this I used leftover greyboard, about 85x105mm, and some coffee stirrers. 
I cut a coffin shaped hole in the main board and built up the edges with coffee stirrers, I used clothes pegs to hold it all in place until the glue had set. 

Paint everything black. When dry paint the skeleton onto the box top so that it will appear to be laying in the coffin. I used some pumpkins from the Minis - Mixed Halloween set to add extra scariness. After painting I glued them so they appear to be coming out of the coffin.

When it's done, glue the coffin layer on the box top so that the skeleton is revealed behind the pumpkins.

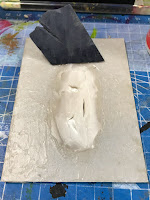
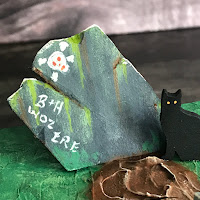
Next, I needed the graveyard scene to go on top. I used another piece of leftover greyboard for the ground, same size as the coffin layer, and a smaller piece for the gravestone. The 'freshly dug' mound is made of texture paste - this will take quite a while to cure properly as it is a thick layer. The spade is a piece if bamboo stick from one of those room smelly jars with a piece of greyboard for the blade. As the texture paste dried a crack appeared just the right size for the spade, but otherwise use a craft knife to cut a slot. The cat was leftover from a Casa Bonita project.

I used ribbon as a hinge for the graveyard scene.


Painting:

I used Forest Green and Foliage Green for the grass, the mound is Burnt Umber with a light beige dry brushed on to the raised detail. The gravestone was painted Zinc grey with random streaks of black, Green Gold and Quinacridone Gold Fluid acrylics, and light beige. The inscriptions are in light beige. 
The cat is black with Tangerine eyes,

Underneath, the coffin layer is Burnt Umber, Forest Green edging, and black surround to the hole - all drybrushed on to blend with each other.

The bat dangles from a piece of narrow ribbon and 'appears' from the coffin when the grave is opened. It is from the Minis - Mixed Halloween set.

The matchbox is black inside and out.

ATC cards and coins:


I just had to make the cards in to mini gravestones. Trim the top to a suitable shape, base coat in Zinc grey, add an inscription in light beige, then add colours as per the gravestone on the lid.

The coins are decorated to look like pumpkins. Basecoat in Burnt Orange, add dark stripes with Burnt Umber - use this colour to round-off the bottom of the segments to give it a pumpkin shape. Drybrush Burnt Umber as shadow around the bottom. Use light beige to add highlights to the tops. Finish with a green stalk.

Add a suitable title for your collection of ATCs and ...

... that's it.

If you don't have large enough pieces of greyboard hanging around for the coffin and graveyard, heavy cardboard or art board will work. Paint colours are not too important, any greens, browns, beige, and orange will do.

I hope you enjoy putting this spooky project together for Halloween - post yours on the Tando Creative Zone on Facebook!

(Why Burke and Hare? - Link to their Wikipedia page)

Products:

ATC Matchbox with cards and coins
Tando Minis - Mixed Halloween
150g Greyboard Offcuts - useful for projects
Coffee stirrers or similar

DecoArt Americana Paints
I used Lamp Black, Forest Green, Foliage Green, Burnt Umber, Burnt Orange, Oyster Beige.
Green Gold and Quinacridone Gold are DecoArt Media Fluid Acrylics.

Tuesday, 19 September 2023

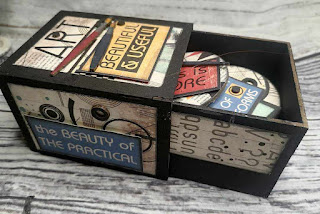
Art Angels Bauhaus box


These fun little boxes can be used in so many different ways and can be used to store a multitude of things if you want to swap or gift your ATC coins and cards
I have decorated this one quiet simply with Samperia Bauhaus papers as it is just so bright and colourful and suits these matchboxes to a tee
The whole Bauhaus movement embraced the idea of form following function, that is to say where fine art becomes functional and practical and that is just what these little match boxes are.
Decorate them  to your hearts content and they will still serve a  purpose that is, to store your mini pieces of  artwork


Treat each surface of your box sleeve and drawer  as a  blank canvas for your artwork, I have decorated each side with elements from the Bauhaus scrapbooking pad, layering up sentiments and focal images for a pleasing aesthetic and placed them onto a black gesso base.
I have glued my pieces in place with a matte finish pva that dries clear and top coated the  surface for added protection. The papers where cut to size and edges sanded for a  more  professional finish, I also inked around all the edges or the sanded paper to cover the white exposed core.


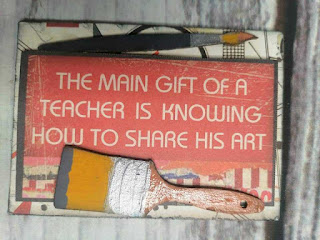
I coloured paintbrush elements from the Tando Mini calligraphy tags which can be found  here and adhered them to my pieces using gel medium,  along with elements taken from the steampunk parts.grey board kit. I used glossy  accents clear varnish to make the  paintbrushes  shiny


the brushes  work perfectly with one of the character elements from the paper pad


what an apt sentiment for all the pieces we share with you on this blog, we share all our pieces with you so that you can recreate your own


the mini  tag elements are so  useful and  perfectly sized for these mini projects, they finish off  atcs so well and  just like the cards and  coins themselves they take all sorts of  mediums and stand up well to a lot of moisture without distorting


i edged all my coins with black ink to frame them, this really  does make your colours pop


beautiful and useful


so  easy to decorate and even in its  simplest form,  just using papers and ink it is  so effective


use 3d  glue gel or foam pads to really build  dimension,  there is  more than  enough room in these deep matchboxes to store even the most textured cards


hope you have liked this  project and it has inspired you to get your papers out and have a play