Showing posts with label ATC BOX. Show all posts

Tuesday, 31 October 2023

ATC Matchbox - A Clockwork ...

 Just a simple ATC box this week, with a little faux leather and steampunk.

You will need tissue paper and some old watch or clock parts. 

Once you have glued your box together, and it is dry spread a thin coat of PVA glue on one side. Lay the tissue on the glue then give a little squidge with your fingers to wrinkle the surface. Repeat on the other sides. Set it aside to dry.

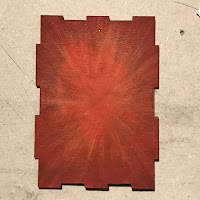
First, base coat the entire box with Burnt Umber, when dry, dry brush the surface with Primary Red.

To enhance the texture of the wrinkles lightly dry brush with gold.

I just happened to have a few cogs and an old strap. I gave them a bit of a polish and used strong glue hold them in place.


Products:
DecoArt Burnt Umber
DecoArt Primary Red
DecoArt Venetian Gold
Tissue Paper
Random watch/clock parts


Tuesday, 26 September 2023

Halloween B and H Collection ATC Matchbox - by Kim

 You'll have plenty of time to get this done for Halloween!

Construction:

First, build your ATC matchbox and drawer (see previous posts for construction if necessary). 

We need to make a space for our skeleton, a hidden layer! For this I used leftover greyboard, about 85x105mm, and some coffee stirrers. 
I cut a coffin shaped hole in the main board and built up the edges with coffee stirrers, I used clothes pegs to hold it all in place until the glue had set. 

Paint everything black. When dry paint the skeleton onto the box top so that it will appear to be laying in the coffin. I used some pumpkins from the Minis - Mixed Halloween set to add extra scariness. After painting I glued them so they appear to be coming out of the coffin.

When it's done, glue the coffin layer on the box top so that the skeleton is revealed behind the pumpkins.

Next, I needed the graveyard scene to go on top. I used another piece of leftover greyboard for the ground, same size as the coffin layer, and a smaller piece for the gravestone. The 'freshly dug' mound is made of texture paste - this will take quite a while to cure properly as it is a thick layer. The spade is a piece if bamboo stick from one of those room smelly jars with a piece of greyboard for the blade. As the texture paste dried a crack appeared just the right size for the spade, but otherwise use a craft knife to cut a slot. The cat was leftover from a Casa Bonita project.

I used ribbon as a hinge for the graveyard scene.


Painting:

I used Forest Green and Foliage Green for the grass, the mound is Burnt Umber with a light beige dry brushed on to the raised detail. The gravestone was painted Zinc grey with random streaks of black, Green Gold and Quinacridone Gold Fluid acrylics, and light beige. The inscriptions are in light beige. 
The cat is black with Tangerine eyes,

Underneath, the coffin layer is Burnt Umber, Forest Green edging, and black surround to the hole - all drybrushed on to blend with each other.

The bat dangles from a piece of narrow ribbon and 'appears' from the coffin when the grave is opened. It is from the Minis - Mixed Halloween set.

The matchbox is black inside and out.

ATC cards and coins:


I just had to make the cards in to mini gravestones. Trim the top to a suitable shape, base coat in Zinc grey, add an inscription in light beige, then add colours as per the gravestone on the lid.

The coins are decorated to look like pumpkins. Basecoat in Burnt Orange, add dark stripes with Burnt Umber - use this colour to round-off the bottom of the segments to give it a pumpkin shape. Drybrush Burnt Umber as shadow around the bottom. Use light beige to add highlights to the tops. Finish with a green stalk.

Add a suitable title for your collection of ATCs and ...

... that's it.

If you don't have large enough pieces of greyboard hanging around for the coffin and graveyard, heavy cardboard or art board will work. Paint colours are not too important, any greens, browns, beige, and orange will do.

I hope you enjoy putting this spooky project together for Halloween - post yours on the Tando Creative Zone on Facebook!

(Why Burke and Hare? - Link to their Wikipedia page)

Products:

ATC Matchbox with cards and coins
Tando Minis - Mixed Halloween
150g Greyboard Offcuts - useful for projects
Coffee stirrers or similar

DecoArt Americana Paints
I used Lamp Black, Forest Green, Foliage Green, Burnt Umber, Burnt Orange, Oyster Beige.
Green Gold and Quinacridone Gold are DecoArt Media Fluid Acrylics.

Tuesday, 15 August 2023

Tando ATC matchbox - Arachnophobia by Kim


 Today we are using the Tando ATC Matchbox and Cards and Coins set. 

First, put your ATC box together and paint all surfaces. I used DecoArt Lamp Black on the matchbox, and DecoArt Black Gesso on the cards.

I wanted to create a spooky feel to this project and there are always spiders lurking in the woods. On the main surface of the matchbox I created a misty woods scene. I started by dry-brushing the mysterious distant light with DecoArt Indian Turquoise. 

To dry-brush you need a fairly firm bristle flat brush. Dip the brush in the paint and make sure the bristles are loaded, then wipe the brush on a paper towel until nearly all the paint has been removed - you really do need it to be dry! Lightly draw the brush across the surface so that the barest minimum of paint is left on the surface. It is better to apply more light coats than a single heavy application. Practice on a spare piece of greyboard if necessary.

The distant glow was created by choosing a centre point for the glow and dry brushing outwards from it so that I got 'rays' radiating. These rays got fainter the farther out they travelled. 


Next, I added some creepy, distant trees and bushes by dry-brushing the shapes lightly with Lamp Black over the turquoise. Then a little more turquoise 'rays' to push the trees back into the woods. 

Paint foreground trees with Lamp Black, with a few additional 'rays' in Whispering Turquoise. Finish with a small white dot in the centre of the light source.

To frame the picture I used one of Fiona's small ornate frames, chopped to make two 'L' shapes (sorry Fiona!) and painted gold.

I repeated the spooky turquoise rays on either side, but without the woods.

I used the small hanging web spider from the Grab bag of Spiders set for the main surface. It was painted Lamp Black with small white highlights and Zinc grey detail. One one side I used the large round spider, but had to trim the legs at the edge of the box. On the last side I used the small creeping spider.


I used white and creepy lettering to add text to the sides. I snuck the small round spider in the bottom of the drawer just for fun.

The ATC cards were painted with black gesso and, when dry, a very watery mix of Zinc was layered over the top giving a creepy look. I found some fear-relevant quotes and hand lettered the cards.


(Image inspired by the work of Jane Font (Painting with Jane)

Products:

Tando ATC Matchbox set: ATCMTCHBOX
Fiona's Ornate Frames set, small: FRORNTFRMMEDSML
Tando Grab bag of Spiders: GRBBGSPDERS
DecoArt Americana colours:
    Lamp Black
    Indian Turquoise
    Whispering Turquoise
    Zinc
    Titanium White
    Venetian Gold
    Black Gesso

Monday, 14 March 2022

ATC box - The Ace of Spades - by Kim

 A box, playing card size, no lid, no door. What shall I do with it?

Well before we stick it together let's cut a hole in one of the big sides, a jagged, random shaped hole. I used a very sharp Xacto knife and was very careful not to damage myself.

On the other flat side I painted a dramatic starburst shape with orange and a couple of reds. 

Next, I glued the box together, using PVA, with the starburst on the inside and visible through the hole.

I pulled the Ace, King Queen, and Jack of Spades from a pack of mini playing cards from a Christmas cracker. I tore the edge around the Ace, edged it with black and stuck it inside the box. KQJ were trimmed to fit and stuck to the front of the box, as shown.

The front of the box was textured with DecoArt Modelling Paste, avoiding the KQJ, and allowed to dry thoroughly.

The outside of the box was painted black, avoiding the cards and the edge of the hole. When dry the edge of the hole was painted with the deepest red from the starburst, and the texture was dry brushed lightly with it, too.

A little Champagne Ice Metallic Lustre was rubbed lightly over the very tops of the texture.

As a little cheeky element to finish I tore the corner from the Joker card and glued it inside the front panel with the word 'Joker' on show.

A fun gift for a cardsharp, or perhaps a prize for the best poker face of the evening.


Products:

Tando ATC Art Box

DecoArt Media Modelling Paste

DecoArt colours, various

Champagne Ice Metallic Lustre

Mini playing cards

Monday, 19 August 2019

ATC BOX

Hi people xxx

Did you catch Di's show a couple of weeks ago when she had those gorgeous ATC boxes?  Weren't they ingenious?  The lid folds right back and to close the front just tucks behind where I have put the book plate!  Plus they hold around 50 undecorated ATC's!!!!  Here is the one that I did.....


After daubing on paint with a sponge I added some *weathered wood* through a stencil.  When it was dry I added some white over the tops. 


To neaten the circles up which were a bit messy, I added dots with a brown Posca Pen.  At the front I added a *mini book plate* with the lettering inside.


I painted the insides plain.

Thank you for taking a looksee x