Hi everyone,
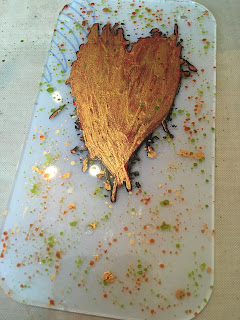
After a fab weekend at the Ministry of Mixology treat, I promised to share my 'Backwards Crackle' technique with you, and as it's anything goes week here at Tando it seemed a perfect time, so you can all see the process.
Step 1.
Peel back just ONE side of the plastic on your acrylic piece. This protects the front from any paint spills, or scratching, but mostly stops you peeking until the end reveal! (It's more fun that way).
Step 2.
Stamp your image in Carbon Black paint. Put a small amount on your craft mat and spread thinly, then 'ink' up your stamp as you would with an inkpad, and stamp.
Step 3.
Colour your image all over but without going out of the lines. I used Pyrrole red inside the heart.
Step 4.
Give another layer of colour inside the heart. Because the Media Line paints are slightly transparent, you will still see your second colour coming through. I put a layer of the new 'Extreme Sheen' metallic bronze here.
Step 5.
Water down a bit more of the bronze paint very slightly (or any colour you have chosen), and 'splatter' the whole of your piece. I repeated this process 4 times, in different colours, drying between each colour so they don't turn to mud.
Step 6.
Paint a complete layer of Americana Crackle medium over the painting done so far. This is a chalk crackle medium and only works with the chalk paints. It also won't crackle what you have painted already, only what is put on top. Wait until completely dry before the next step.
Step 7.
Take a chalk paint in a chosen colour, I used Timeless, and give a quick, even coat over the crackle. Don't rub the paintbrush up and down, or it takes the crackle off, it needs to be a swift, even coat, not going back over places already done. Wait while it crackles before your eyes. Leave to dry.
Step 8.
For a final coat and to see through the crackle, choose a contrasting colour of paint. For this layer it doesn't have to be a chalk paint, it can be any, but I used Treasure in the chalk paints.
Step 9.
When dry, peel back the front cover on your acrylic to reveal!
Step 10.
Working on the front of your piece now, take some embossing ink, I used Versafine Dazzle here, as you can see where you stamp it as it has a shimmer, and works really well on acrylic. Emboss in a fine powder, I used a faded gold colour.
Add some wire and beads of your choice (mine are skulls of course).
Here are a couple more versions I was playing with :) You can use any paints, as long as the chalk crackle has a chalk paint as it's next layer, the rest of the paints can be anything.
Hope you like it and have fun playing.
Best Wishes,
Nikki K. xx
www.nikkikart.blogspot.co.uk
www.facebook.com/NikkiKArtist
Products Used:
Tando Creative Acrylic Media Boards (holes added by drilling)
DecoArt Media Line Acrylic paints: Pyrrole Red, Green Gold, Metallic Gold, Carbon Black.
DecoArt Chalk paints: Timeless, Treasure
DecoArt Americana Crackle Medium
Versafine Dazzle Embossing Ink
All of the above apart from embossing ink are available from http://www.tando-creative.co.uk/


10 comments:
Thanks for posting this Nikki! I was only trying to remember how to do this the other day :) xx
I totally love this technique thank you for sharing
Was unable to do your take and make so thank you muchly for sharing xx
fabulous - going to have to try this xx
Fab technique!
Totally in love with this technique! Awesome Nikki!! Can't wait to do another, in fact what am I waiting for? Thanks for sharing your awesomeness 😊
Brilliant Nikki xxx
Thank you all, just glad you like it! xx
Love this. Totally awesome! xXx
awesome tutorial Nikki, will give it a try soon !!
Post a Comment