Friday, 30 September 2022

Puzzled? - by Kim

 I had plans for Tando's Jigsaw Puzzle kit - I was going to use photographs and ephemera and antiquing techniques ... but it didn't happen as I hoped, so I did this instead.

First, I wanted to have some 3D effects in the jigsaw for added interest. I put the puzzle together then separated it in to four sections of five pieces. I glued the sections to thick cardboard to get varying thicknesses. One had no extra cardboard, the next 1 layer, the next 2 layers, and the last 3 layers.


The backboard would normally frame the puzzle, but I spread the sections out to the corners leaving a space in the middle. I marked this space on the backboard. 

My idea was to be looking through the puzzle to a dark forest scene behind, so I painted the visible area (no point painting the rest) with Lamp Black, Burnt Orange, and White in a scumbled, blended manner. Then I painted on the bare tree branches in Lamp Black, highlighted with Zinc grey where the light catches them.

The puzzle sections are painted to look like falling autumnal leaves. I set out Lamp Black, Burnt Orange, Tangerine, and Primary Yellow on my pallet and used a slip-slop technique to create the effect. I started with the lighter colours near the centre, getting darker towards the corners.

Before I stuck the sections to the backboard I painted the edges black, and accentuated the joins in the puzzle pieces with black, too.

As a super contrast I used a set of Tando's Leaf Branch, Cut Out Leaves. I cut each leaf from the branch with a craft knife (very carefully!). 

I painted the front with Indian Turquoise, and the edges with black. I arranged them on the project and when I was pleased with the layout I stuck them on.


A great autumnal and Halloween picture to get you started on spooky season. I hope you enjoyed the project. Let us know how you get on.

Thanks for dropping by!

Products:

Tando Creative Jigsaw Puzzle Kit

Tando Creative Cut Out Leaves

DecoArt Americana various colours

Wednesday, 14 September 2022

Specimen File - Automobile Selection by Kim

 This neat ring file was designed for Tando by Fiona Randall - what a clever idea! A great way to display your favourite things. Of course, mine are cars …


I started with the cover. I cut sections from an old map and stuck them on the both outside and in. I cut them too big and used a sanding block to trim them to size. I covered the backs of the solid inserts with maps, too. I antiqued the edges with Distress Ink in sepia colour.


To make a nice contrast with the maps I covered the frames with kitchen foil - shiny side out. Lay the foil on the table, shiny side down, making sure there are no wrinkles. Apply a layer of PVA to the frames and lay them on the foil, press down to make sure of a good bond. (Like James Bond but smoother). Once the glue has set trim off the excess foil.


I used Alcohol Inks in random colours to jazz-up the foil. Let it dry.


I found some black and white photos of some super classic cars and glued them on the backs of the frames, making sure the picture was central. I also glued a piece of paper over the small window to write on later. Next I glued the assembled frame to the front of an insert page, and put them in the file in the desired order.


Once the pictures are in I glued a description on its facing page. I tore out a cloud shape in ordinary office paper, edged the tear with Distress Ink and wrote the description. In the small window I wrote the year for the car.


Inside front and back covers are sections from drawings I’ve done, again edged with Distress Ink.


I painted the outside spine with Lamp Black, avoiding the flexible hinges.


I added a title to the front cover and made an old-school steering wheel from a large cog wheel left over from Tando’s Industrial Elements pack. Painted with Burnt Umber for the wooden rim, Silver for the spokes, and black and silver for the screws and rivets. The centre is decorated with a T - for Tando, or … what car names begin with T?


Triumph, Tata, Talbot, Toyota, Tesla, TVR, Tatra, Trabant …


Thanks for visiting, I hope you enjoy making your specimen file.


Products:

Tando Creative Specimen File

Alcohol Inks

Distress Inks

Kitchen foil

Any old map

DecoArt Colours

Tuesday, 6 September 2022

A5 Art Box - A Handbag! by Kim

This is Tando's latest, super useful, A5 Art Box. Carry all you need for sketching 'en plein air', and use the surface as a great clip board to support your work, as seen on Create and Craft TV. 

The easiest way I found to put the A5 Art Box together is to start with the internal partition. Glue this into the narrow base, then add the narrow sides with the curves at the top. Make sure both sides are facing the same direction - one edge has three tabs, the other, two.

The hinged section can be used with the spring clip either inside or outside - I chose outside as I wanted mine to be used as a portable A5 drawing board, with all your arty supplies inside. Glue this section on to the others, using the side with three tabs. The final panel will glue to the side with two tabs. 


Once I had put the A5 Art Box together I saw it as a designer handbag, I visited Google to see what the latest trends were … 


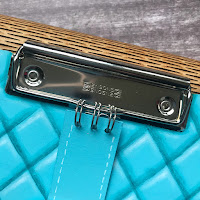
So, first a base coat of DecoArt Americana Indian Turquoise over everything except the living hinge and the spring clip. Next I marked out the diamond quilting pattern using a fine pencil line. Choose an appropriate size and make sure the design is centred (same number of diamonds both sides). By doing the diamonds first both top and bottom panels will match.


Next I divided the flaps. The top one comes to a shallow point, the next two are straight. Use an eraser to remove the pencil lines from the centre section. 


To get the ‘faux quilt’ look I first shaded with a thin wash of DecoArt Media Fluid Acrylic Cobalt Turquoise Hue to the bottom of the diamonds. Do all the diamonds in one sitting.


To the top left side, point, and a little to the top right side I added highlights of Americana Whispering Turquoise with a dry brush technique.


The gold edging is Venetian Gold applied with a liner brush. When dry Americana Lamp Black stitching is added.


To separate the flaps, shadows of the Cobalt Turquoise Hue wash were added, intensified close to the edge with Media Paynes Grey.


I needed to add a strap and fastening, but without obstructing the flat drawing surface. I cut a strip of card and base coated it with Indian Turquoise, added stitching in Whispering Turquoise. I snipped the last three coils from a wire bound notebook, punched holes, and attached it to the bar on the spring clip. 


As all the big fashion houses have their initials on the buckle I added a big T (for Tando) and stuck on gaudy glitter. I cut an oval from card, painted it to match and glued it to the strap. I used half a Velcro dot as a fastener at the bottom, this left enough room for A5 paper to be used on the flat surface.


Inside the flap I painted some appropriate words, but any other decoration could go there. I found the chain on Amazon because I couldn’t find a suitable strap in my stash!


I used two Velcro dots to hold the bag closed.


Thanks for visiting, I hope you enjoyed this fun project.


Products:


Tando Creative A5 Art Box (New)

DecoArt Colours