Showing posts with label DOMSTRAIGHT. Show all posts

Monday, 9 July 2018

Domino Week!

Hellooooo, I am kicking off this *Domino* week with an altered photograph frame.  One of those cheapy 5x7inch wooden frames!  With the greyboard domino's being so reasonable priced at 10 for £1.40 you could afford to do this with lots of frames as gifts.


The wooden frame was painted in a matching colour before I glued the domino's to various matching papers.  They were cut out and glued around the frame.  You could leave it at this point and pop a photograph in :-D  But I decided to make it into a picture so I disgarded the glass into the recycle bin.
The card that was behind the glass was painted in blues and greens before adding *weathered wood* then white acrylic to form the lovely crackly finish.  The stamp has been paper pieced and painted before attaching.  I then added the word *Reflect* which is one of the many words that Tando cut.

Thank you for looking today and do leave a comment as we do love to see them, take care, Karen xxx

Friday, 29 August 2014

Domino's on your tree.

haha is it too early to be thinking about making decorations for your Christmas Tree????  nah...never too early for me :D  I have used the fabulously sturdy Tando Domino's as a base for each of the little hanging plaques.
  Shame that the 'bling' doesn't show up in the photos though, sorry about that.


Tando produce 2 types of domino's - WAVY and STRAIGHT and they come in packs of 10 at a very good price.  I have painted & stamped onto two of them and covered the other 3 with patterned paper.  The little embellishments have been painted & glittered (except the stocking which has some paper on it) and are from our MINI RANGE, which are all suitable for card making as they are thinner.  You get lots in a pack making them great value!  Here are the products I used...


Thank you for calling by :D, take care, Karen xxx

Sunday, 29 September 2013

A large banner in Stampotique Originals !

Helloooo everybody! It’s the last day of the week where we can show some of the larger pieces in the range of Tando’s products. At first I wanted to decorate a wonderful 3 panel wall art I have in my stash, but I didn't manage to do it (i.e. not yet tee hee, as of course it’s only a matter of time !)… So instead I share with you a project that might become the next banner of my blog if, like me, you enjoy it ! :)
I used some Tando chippies to do it and some of my favourite Stampotique stamps, starting from one plain A4 Chipboard Sheet. All the sheets are cut out in very sturdy 2250 micron greyboard, which supports many layers of paint or inks, and spritz of water over it too. I love these sheets !! I used a largest size A4 (210mm x297mm) one and cut it in half so that I get the perfect size for a blog's banner. I will use the other half side for another future banner I think, or anything else !


I made the background playing with my Fresco Finish Paints, Grunge Paste, and three Tando's masks I really LOVE : Dotted Star, Sequin Waste and Burning Rubber.
I put over it 5 dominos from the straight dominos bag (I've kept the five remaining ones for another project). At first I stamped my dominos in Black Stazon to create a little scenery using a selection of Stampotique stamps (you can guess that I'm a big FAN of these rubber stamps !!!), next I used my palette of various Distress inks to colour them. I also introduced a bit of Snowflake paint and used a white roll pen and fine black marker to highlight some areas. All the edges of both the dominos and the banner were heat embossed using a mix of powders (Metallic detail copper from Stampendous, and Cricket Zing from American Crafts). I also largely sprayed some satin varnish at the end on top of all the elements to protect the whole banner.

If you want to know more about my process of creation, and if my first intention was to make the background or rather the dominos, the answer is.... dominos LOL ! Here are some close-ups:


You can admire above two new (soooo cute !!) mini Brush Shake Trees. I just covered them with two shades of glitters, to highlight the little star in shrink plastic that shines above them...


Well, hope you like my funny banner as much as I do !
Here are the Tando products I used:

Brush Stroke Trees

Dominoes - Straight

Mask - Dotted Star

Sequin Waste Mask 15cm x 15cm

A Skinner Stencil/Mask - Burning Rubber

Have a great and possibly sunny Sunday, Coco xxx

Sunday, 30 September 2012

Dominoes Mini Book

All this week some of the Design Team members have been sharing their creative ideas with you and hoping to inspire you into making mini books.

Here is mine.. the covers are acutally made from a couple of chipboard Dominoes!


 Front and back covers


 Both the dominoes were covered with Washi tape and embellished as desired..


 Twine was added to keep the little book closed..

.. and inside the book..


And there's my simple little book!

Hope you like it! Thank you for calling and leaving a comment if you get the chance. Next week is set to be a super exciting week on the various Tando blogs with hops, tutorials and mega prizes to be won as Tando Creative celebrates it's 3rd Birthday! Hope you can join in the celebrations. Gez

Wednesday, 4 April 2012

Inspired by Klimt

I made this pendant for a challenge to take inspiration from a modern (fairly abstract) painter and alter something. I've only altered a domino shape but I hope that counts!

The chipboard domino was triple embossed with UTEE and then coated with two colours of Perfect Pearls. I heated again and pressed my stamp into the soft coating.

Full details of colours, materials etc {here} on my blog if anyone would like them!

TFL!

Wednesday, 13 April 2011

Masquerade!

Hello, Joanne and Carol here again with the next of our technique pieces. We decided to play with masking this week.

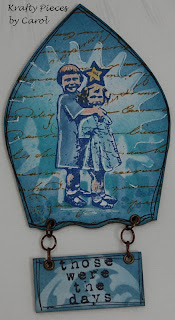
Carol has used two sorts of masking on her fab piece and taken advantage of the fact that the white lined board means there's no prep to do if you want to use something like Distress inks straight on to the piece.


The girls were stamped and then masked with a hand cut mask. Some Tim Holtz masks have been laid over the top and then Carol has built up the effect with different shades of blue and some stamped text.

Carol used Distress inks to colour the girls and then stamped the sentiment on a domino shape that has also been masked and inked and then added it to the arch with with jump rings - doesn't that look fab?

Check out {Carol's blog} for more information.

I chose one of the journaling block shapes to play with.

I spray painted my piece black, then used some Tim Holtz masks (we didn't have a confab, honest - we just happened to both choose the big pointy cog!) and sequin waste and sponged silver acrylic paint on there. A stamped and heat embossed sentiment and a collection of random bits and pieces finish it off.

More details {here} on my personal blog if anyone would like them.

Thanks for joining us today, I hope you'll pop by again next Wednesday for the next in the series!