Showing posts with label GOTHARCHWAVY. Show all posts

Wednesday, 27 April 2011

Hot stuff

We thought we'd go along with the weather this week and turn up the heat for some embossing on our pieces.

Carol used an arch for her first piece. The images have been stamped and embossed with clear and then the arch is coloured with Distress inks. The embossing resists the ink to reveal the images still showing the white of the board.

The Grungepaper butterfly at the top is coloured using Distress Stains and she's finished the piece off with a beaded pin and some steampunk cut outs.


Carol's second piece today cleverly uses a wavy twinche as a focal point on a card. The twinche was coloured with Distress Stains and then stamped and embossed with gold powder.

The twinchie is lined up over the same image stamped onto the base, making a fab textural contrast for the card.

Please pop over to {Carol's blog} if you'd like more details.


I chose an ATC to work with and also used emboss resist. The sentiment and flowers were embossed with white powder. I flooded each petal area with watercolour and then used a drop of reinker to colour the background before sponging over some sequin waste with a second shade of green. I also "stamped" a couple of leaves by pressing an inked-up skeleton leaf on there.

Full details of supplies {here} on my blog if you would like them.

The beauty of the white lined board for projects like these is that you get a really solid base that doesn't warp at all when you apply heat for the embossing and your colours go on true to form with no preparation needed - gotta love something that lets you stamp and go!

Thanks for joining us again this week!

Monday, 18 April 2011

Wavy bottom arch

When someone proposed a tag not in a traditional tag shape I knew just where to turn, my good and trusty stash of Tando Chippie. Frankly these day's I be in a right fix without it. This then is my non traditional shape tag.

Coloured the basic shape with distress inks, another essential, and stamped it. Stamped image coloured with Promarkers, butterfly both on vellum and on the chippie coloured with Dorso colours (its a kind of wax pastel but softer than the usual kind) the colour is spread and smoothed with Lavender oil. Another first for me on this Chippie the surface of which if not roughened or damaged in any way the colour is smoothly spread and settles on the surface like any other pigment, nice smell as well.


The arches come in pairs

Wednesday, 13 April 2011

Masquerade!

Hello, Joanne and Carol here again with the next of our technique pieces. We decided to play with masking this week.

Carol has used two sorts of masking on her fab piece and taken advantage of the fact that the white lined board means there's no prep to do if you want to use something like Distress inks straight on to the piece.


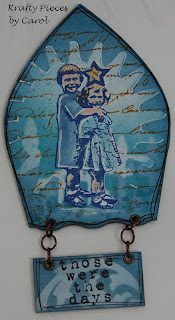
The girls were stamped and then masked with a hand cut mask. Some Tim Holtz masks have been laid over the top and then Carol has built up the effect with different shades of blue and some stamped text.

Carol used Distress inks to colour the girls and then stamped the sentiment on a domino shape that has also been masked and inked and then added it to the arch with with jump rings - doesn't that look fab?

Check out {Carol's blog} for more information.

I chose one of the journaling block shapes to play with.

I spray painted my piece black, then used some Tim Holtz masks (we didn't have a confab, honest - we just happened to both choose the big pointy cog!) and sequin waste and sponged silver acrylic paint on there. A stamped and heat embossed sentiment and a collection of random bits and pieces finish it off.

More details {here} on my personal blog if anyone would like them.

Thanks for joining us today, I hope you'll pop by again next Wednesday for the next in the series!

Friday, 7 May 2010

Caroline's "Change" Gothic Arch Wavy

Caroline has made this gorgeous Gothic Arch entitled "Change".  It uses 2 pieces of Tando Creative chippie, the Gothic arch and the flourish.

You can find all the details with instructions HERE.


Tuesday, 23 March 2010

Colour crazed

Carol and I thought it would be a shame to put the white board through its paces and not do something that specifically took advantage of the white surface! Although our earlier experiments with Distress Inks and spritzed colour took us in that direction, we set ourselves the explicit target of adding colour to the white surface rather than covering it in gunk this time!

Carol chose one of the arch shapes and combined with a wavy domino to make this lovely piece. Being an inky kind of gal, Carol coloured the arch by using a Versamagic pad direct to the surface before overstamping various images in black. She wrapped a beaded wire around the arch and topped it off with a wavy domino covered using versafine and stamped then embossed with clear powder and matted onto some brown card.

I love the arty collage effect and the combination of the different chippie shapes looks great! Visit Carol's blog if you would like more details.

I also chose an arch but I seem to have a thing about turning them upside down! This wavy arch made me think of a tulip (or perhaps I'm just hankering after spring!) so I combined with a tulip girl stamp and knowing that Carol wouldn't use Copics, I decided to go down that route so we got maximum variety!

I'm happy to report that the board performed well - it took a nice impression of a stamp that has lots of fine detail and the surface took the Copic ink nicely - it blended and it didn't bleed out of the stamped lines. I even tried a little airbrushing to get a soft fade of blue around her having masked her first - worked fine!

Here's a closer look at her face and hair so you can see how the ink took to the board. Details of stamps and supplies are here if anyone would like them.

Would you believe this is already week four of our experiments with the white board? That means we only have one project left to share with you so I hope you'll be able to join us on Thursday when Carol will be here.

Thanks for stopping by!

Tuesday, 16 March 2010

Spritz blitz

Hello, Joanne here again with another couple of projects from me and Carol with the white board. We decided to use spritzed inks today.

Carol likes to subject her pieces to the full treatment so she had several goes at this one with her Glimmer Mists before getting a result she liked - the board seemed happy enough, despite the abuse!

This wavy edged arch is such a sophisticated shape and Carol's chosen the perfect stamps here. The rich colours and shimmer make me think of an expensive silk brocade fabric - gorgeous!

Carol's blogged a bit about the trials and tribulations of creating this piece here if you want more low down on what she subjected the board to!

I also chose one of the larger pieces today - the wavy tag. I turned it upside down and used the waves as a guide to punch a couple of hanging holes with a Crop-a-Dile though. I made "glimmer mist" with reinkers and Perfect Pearls in a mini mister and gave the board a good soaking. The fact that you're starting with a white surface means you get great colour vibrancy and depth.

Details of stamps and supplies are on my blog if anyone would like them.

Thanks for stopping by, hope you can join us again on Thursday when Carol will be here to show you some more white board projects.