Good Morning Everyone!
Following on from the tag I posted in the Facebook TCZ a few days ago, I decided to do something similar using a Tando matchbox. As the tag was feminine, I decided to go with a more masculine feel for this project.
I chose a medium deep matchbox https://www.tando-creative.co.uk/matchbox-medium-with-inserts-deep.html and assembled the box and outer sleeve using PVA glue.
I wanted to use a technique I'd already tried which had been shown by Paula Cheney on her blog. Also, I wanted and really needed to start using my Tim Holtz ephemera. I think if I live and craft until I am 100 I won't use up my collection!!
I also wanted to use some of the DecoArt Patina Green antiquing cream I bought from Tando. https://www.tando-creative.co.uk/CLDADMM152.html I can't even remember why I actually bought it; I think I must have seen it used in a demo and thought I needed it. I've had it for about 6 months, and it has been sitting happily unopened with my paints. I used it for this project, not really knowing what I was meant to do with it, I just followed the instructions on the bottle. I'm not even sure it looks like it is meant to, or I have used it in the right way for the right type of project, but I like how it looks anyway.
I started by painting the matchbox and sleeve in a midnight blue colour.
I then added some of the antiquing cream. At first I put on far too much and wasted it, so after that I started with less and added more if I needed it. I found that about 3 drops was enough for the side panels. It's very fluid, it comes out fast and you don't need to squeeze the bottle, as I soon found out! I smoothed it on with a paint brush so it covered the panel, then took some away with a baby wipe to give it a more distressed look. I would imagine that if you used a contrasting acrylic paint and worked quickly you would probably get the same sort of look.


For the outer sleeve of the matchbox, I decided to use some papers from my stash, only covering the front and sides of the sleeve. I cut the papers to size, making sure I left a small border between the paper and the edge of the matchbox surface. I didn't measure anything, I just rested the paper onto each surface, marked it with pencil then cut it using a paper trimmer. I inked all the edges of the papers with brushed corduroy distress ink using a blending tool then attached them to the front and sides of the matchbox sleeve using PVA glue.
I then used the stencilling technique I had read about on Paula Cheney's blog. I took a Tim Holtz stencil and stencilled through parts of the stencil on the top and sides of the matchbox sleeve using distress translucent grit paste then let it dry fully. In the photos below, the texture paste is still wet so that you can see how I have stencilled. Once the paste I used had dried, it was clear.


Once the grit paste was completely dry, I added some speckled egg distress paint with a foam pad on a blending tool one panel at a time over the whole surface. If you haven't got distress paint, you could try another light coloured acrylic paint. Either way, you need to work quickly so that you can take away some of the paint you have blended over the paper. This leaves an almost misty look over the whole surface. If you prefer to leave your papers as they are, you can miss this paint step completely. The first of the 2 photos below shows one of the panels immediately after applying some distress paint, the second photo is another panel once some of the paint has been removed.


I chose 3 distress crayons to colour my textured letters. I picked stormy sky, gathered twigs and wild honey and rubbed them each in turn over the raised letters blending with a little bit of water on my finger. Having used the paint first, I liked the effect of the misty, distressed look once the deeper crayon colours were added.
With this matchbox, you get 5 inserts. I used 4. I decided to use a brown paint to see what the antiquing cream looked like over brown and I liked it.
I then used a spongy sanding pad and lightly sanded around the edge of each panel.
I added some left over patterned paper with PVA glue to the other side of each panel.
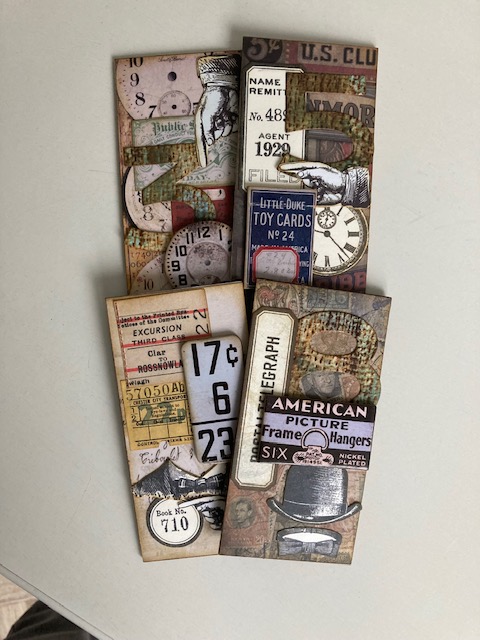
Then for the best bit (for me anyway) adding the ephemera. Decisions, decisions!! What could I bring myself to use and what do I still need to keep stashed in a box in a cupboard :) ???
I used a mixture of bought ephemera, and some I had made myself by stamping and cutting out and by diecutting. I used a mixture of paper and chipboard ephemera and 1 precious paper doll. I knew he was the one I wanted to use and it took me ages to find him!! He has pride of place on a greyboard circle from the Tando grab bag
https://www.tando-creative.co.uk/GRBBGCIRCS.html which I covered with patterned paper and added to the top of the matchbox sleeve.
I've added lots of photos below for ideas. On the backs of the inserts I added some quote chips I found in my stash. I thought these could be used either to record funny sayings a loved one uses or to add gift promises for Father's Day, like washing the car, having a film night where dad chooses the film and snacks.
I hope I have explained this in a way that is easy to follow. If you have any questions, please feel free to ask. I would love to see what you make if you decide to give it a go.
Bye for now,
Bernadette xxx


.jpg)


.jpg)