Tuesday, 31 March 2020

April Colours

Hello, Carol with you today and I hope you are all keeping safe and healthy.

Today I'm sharing my April Colour Project with you:-

Firstly the colours:-


Those yellows are so bright and cheery aren't they? just what we need at the moment!

This year I'm using the colour weeks for my 366 project - have you joined in yet? if not, its not too late you can still join us, and for those that are in… lol, are you keeping up to date? I'll let you into a little secret, I'm way behind…. all my covers and files are done tho… lol


The challenges can be found here.

TFL today and stay safe xx

Wednesday, 25 March 2020

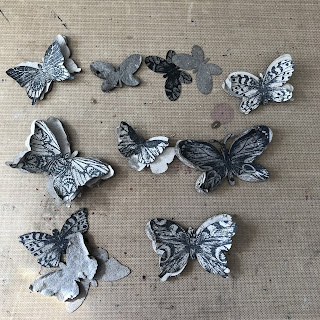
Distressed Greyboard - Shabby Butterflies

Hi there! Celia here, with a tag for distressed greyboard week.

I made one of these butterflies for my printer tray, ages ago, and I thought it would be good for this week’s theme.
To make the shabby butterflies I used some of the tando minis from either the long tags or the minis. You could also do this with the larger grab bags. I stamped the butterflies first, using some Tim Holtz and Chocolate Baroque stamps. I used Versafine Clair ink in Nocturne, but you could also use Archival. It’s best to ink the stamp and place the butterfly over it, so you can line it up. It doesn’t matter if the stamp is bigger than the greyboard.

When the ink is dry, you can start to distress the greyboard. You need to spray the edges, then wait a minute or two before you start to tease the layers apart, either with your fingernail or a craft knife. Re-spray as it dries and as you expose more of the insides. The thinner greyboard tends to come apart, so the outside layers come off, but it’s easy to stick them back and gives you the opportunity to crumple the edges and bend the wings into shape. Leave the butterflies to dry and start on the tag.

I used a long tag, which I primed first with Violet Americana. Then I randomly applied Decoart Modelling paste, Crackle Paste and Andy’s Strata Paste.

When this was dry, I randomly blobbed on some bright Americana colours, then went over with similar DecoArt fluid acrylics.

Finally I dry brushed with Titanium White to bring out the texture, and stuck on my butterflies.


I hope you like my shabby butterflies! Of course, you could colour them or paint in the distressed board to get all sorts of different effects.

Thanks for stopping by,

Celia x


Sunday, 22 March 2020

Anything Goes Week - Binder with templates.


Morning everyone,

I am sure a lot of you are home and turning to craft to keep occupied, I hope everyone is safe and well.

Today I wanted to share the fab folder design Di came up with, and the fun you can have with the stencils she created to go with it.

As with all Tando products, you can paint them, or add papers, which is what I decided to do here.  I had some old bright papers that I love, and thought they would be perfect for this project.  They are just from my stash, so you could use any.

The cover was really easy to glue and form the papers to, I just trimmed the edges, and did this on both the inside and out.  I painted the spine gold.  The binder is a really great A6 size, perfect for making mini journals or notebooks, or scrap albums of course.

The templates are the fun part, you can mix and match what you make from them however you want.


This little folder has a concertina edge, and holes to put laces through, so you can add your own pages inside.

You can make as many pages as you like, the same or different, and put all the elements in different places, the templates are so easy to use.  There are tags, envelopes, pockets, the combinations are endless.


Here is a little walk through video I made in time lapse, so you can see all the cute detail.


Hope you like it, links are below to the kits so you can grab your own, and don't forget, the templates will fit any A6 size book, so you can alter any!

Happy Crafting.

Nikki
xx

Products Used:

Tando Creative:
A6 Binder & Cover Pack. 
A6 Insert Template Pack

DecoArt Media Line Metallic Gold Paint.
Seawhite PVA Adhesive


Tuesday, 17 March 2020

Jigsaw Frame

Hi everyone, me again....twice in 2 weeks!!

This time I have used our new Jigsaw pieces to create this little frame.  I used some minus leaves and flowers to fill the centre but this would look great with a photograph.

I will be doing a facebook live to show you how to do this, I’ll post up a list of ingredients needed and the live date in due course.


Monday, 16 March 2020

Anything Goes Week- Layered Tag Plaque-Fiona Randall


Morning all it's the start of another week here on the Tando Blog and this weeks theme is Anything Goes.
 
 
For my project this week I decided to create a layered plaque using Tando Grey Board Sheets and one of my Layered Tags from Set 3. Two Grey board panels were cut to size and given a coat of DecoArt Chalky Finish in Carbon. The base was then stamped with a flourish stamp using Platinum Brilliance Ink. Both panels were then edged with DecoArt Metallic Lustre in Silver Spark. Next up the layered Tag. The base was given a coat of DecoArt Chalky finish in Carbon. The top tag was run through an embossing folder given a coat of DecoArt Media Fluid Acrylic in metallic Silver and then A coat of DecoArt Black Antiquing Cream applied and wiped back to give an aged finish, before adhering together. A Butterfly and sentiment were then stamped onto white cardstock, Fussy cut and then adhered to the tag as shown. Finally all pieces were layered up using off cuts of Grey Board to give depth and Dimension.
 
Do check back this week to see what the other team members have in store for you.
we really appreciate you stopping by.
 
Fiona
 
Products Used.
 
Products used.


Tando Grey Board Sheets


Other Supplies
 
Tsukineko Brilliance Inkpad- Platinum Planet
 
Paper Artsy Stamps- Tracey Scott Eclectica 26


Saturday, 14 March 2020

Stencils on fabric!

Hello!  Have you ever thought to use Tando's wonderful *stencils* on fabric?  They can make wonderful backgrounds! Or how about using them as a template for embroidery?  I wish I had thought about that sooner hahaha!  I have used one of the *long stencils* to make a background on a plain pencil case.  I sponged the permanent ink through and then went round with a fineliner, adding some doodles.


For the squares and heart fabric pieces I drew around a *twinchie* and a *heart* before stitching on with a basic running stitch.  A bead, some bobble trim and colourful lining finished the bag.

Thank you for popping by, take care xxx

Wednesday, 11 March 2020

Stencilled cover

Well get me....I’ve actually done a bit of crafting!!

This is one of the book covers that we had on Hochanda last week. I’ve used a variety of DecoArt paints and Ive added some mini cogs and clock from the minis tags range.

The moth stamp is an Andy Skinner stamp...we have these in stock but I’ve not uploaded them yet to the website....just not enough hours.

The stencil is our long numbers stencil.


Tuesday, 10 March 2020

Stencilled Card

This week we are using stencils and I've made a quick card:


I've used a gel print as a background and used an older stencil on that (yet again I've used one not in the store!). I tore the edges and stuck it onto the black card that comes in the packaging.

I then used the Rings Stencil on the card base adding more rings to increase the height.

I've added a stamped image, some washiest tape and a stamped greeting.

Monday, 9 March 2020

stencil Week - Tag Tryptic by Fiona Randall

 
Morning all it's the start of another week here on the Tando Blog and this weeks theme is stencils.


I decided to create a Tag Tryptic Using Tando Size 7 tags and a Tando Mini Stencil- Flourish.
Painty Background created on the gelli plate. Stenciling with gold crackle paste through the flourish stencil and stamping to finish off before assembling together.
 
Do check back this week to see what the other team members have in store for you.
we really appreciate you stopping by.
 
Fiona.
 
Products used.


Other Supplies
 
Stamperia- Gold Crackle Paste.
Archival Ink Pad- Black
Paper Artsy Stamps by Tracy Scott- Eclectica 31 and Eclectica 35.
Posca Pen- White.


Saturday, 7 March 2020

Colour Week

Hello, Carol with you today closing this weeks colour theme.

Here is our colour palette for March:-


This year I am using the monthly colour themes to colour my folders and files for the 366 Challenge.
So, here is March's folder and files:-


The folder and files were given a coating of black acryllic.  A couple of files were stencilled (guess which ones lol) the rest I hand drew on and doodled.  The images were then painted with acrylic paint and doodled with paint pens.

Products:-
Books, files, inner and storage can be found here

Join our 366 Challenge here

TFL xx

Tuesday, 3 March 2020

March Colour Theme Twinchie

Here is the colour theme for this month:


I've made another Twinchie:


I glued a piece of the Harlequin Extra Thin to the  Twinchie the gave it a coat of White Gesso.

I then used watercolours to get a background I liked. It took a few layers to get there, then stamped on the harlequin.

I finished off with a stamp, doodles and a phrase from a book.

Monday, 2 March 2020

New Templates for Pages

Hi,  have you been watching Di's show on Hochanda today?  She has a fantastic selection of templates to enable you to make some amazing pages for journaling and scrapbooking!!!!  Not having done much papercraft for such a long time these are a real treat and there are so many ways to use them!  I used double sided papers (after a loooong hunt through my stash hahaha).  They aren't quite on the website as I type but they will be very soon!!! 

Here is the cover of my A6 book, bound using a Bind-it-All


Here are the different pages made up from using the templates....


This one opens up to house several blank pages like a book within a book...


Lots of flaps to tuck the tags in...


There are templates for different types of pockets and envelopes...


There are even index pages...


I had so much fun revisiting double sided papers :D  What will you do with your templates?

Take Care, Karen xxx

Sunday, 1 March 2020

Winging to a close….

Hello, Carol with you today bring this week to a close…..

Here is my tag project:-


The base is a large tando tag which has been painted with acrylic paint, stencilled, using the bubbles stencils and doodling added.


Don't forget to watch Hochanda tomorrow when Di will be showcasing some new Tando goodies.

TFL xx