Showing posts with label banners. Show all posts

Wednesday, 5 July 2017

July's Colour Theme

Welcome to the start of this months colour theme week!  I am, of course, adding to my banner and have decorated another pennant. Because last months was quite bold I have used the softer tones of the range this time...


Just look at these lovely summery colours....


I attached some bits and pieces to my pennant before painting it using a light touch.  I added some painted stars for a bit of detail.

Thank you for taking a look today, take care, Karen xxx

Tuesday, 2 May 2017

Colour theme week

Hello, its Karen here with another piece for my banner.  My plan is to make a banner section for each monthly colour theme.  The colours this month remind me of sunflowers...


Here is what I have done...


Thank you for taking a look today, Karen xxx

Tuesday, 27 December 2016

Holidays banner with Irit

Hello my dear crafty friends and welcome to my last minute Holidays banner tutorial.

I made with tutorial with some of favorite Tando chipboard banners. 
So here is a banner and below you can see a full step by step tutorial:


Product list

Cardstock- Canvas Corp, Chipboards- Tando Creative, Paints, mists- Canvas Corp, Stamps- 
Two Paper Divas, Die- Die Versions, Cord- Canvas Corp, Ink- Ranger, sequins


Step by step: 1. Paint the  3 outer banner parts with Tattered Angels light blue paint and  add a bit of teal paint on the edges. Paint two other banner parts with Tattered Angels teal paint..


2. Cover the inner parts of the banner with Canvas Corp patterned cardstock as shown and ink the edges with teal paint.


 Cover the painted parts with inner triangles and glue them.


3. Cut two Santa images and one sentiment from Canvas Corp cardstock and add on three inner banner parts.4. Stamp two more images with Two Paper Divas stamps over Kraft cardstock, hand cut the images .5. Die cut two stitched circles with Die Versions dies and glue the stamped images over the circles as shown. Paint the stamped images with teal TA mist. 6. Add sequins over the piece. 7. Tie the cord to connect the pieces


Tando products used:
Scalloped Banner Single

Friday, 28 August 2015

Banners with Irit

 Hello my dear crafty friends and welcome to my Banners week. This time I made a card- but it's a totally Mixed Media one, made with my own mono print background cardstock and then stamped over  and Tando banners are the only embellishment over this art piece.
I stamped over them too and heat embossed the stamped words and inked them around.


Tando product used:
Small scalloped banners

Bunting Small Scalloped

Friday, 12 June 2015

Forever family : Heat it up with Irit


Hello my dear crafty friends and welcome to my  today  project.
This time I am back to scrapbooking and I used quite a lot of Tando chipboards to make this classic (not Mixed Media) scrapbooking page.
The Paper House Productions products (papers, stickers) were arranged to this layout about my son's young family. Then I made the sentiment using Tando letters that were painted with light blue ink and heat embossed with clear embossing powder.
 As a main embellishment element I used Tando  Scalloped banners that was stamped and heat embossed with 6 different stamps; one for each banner flag piece.
The circles grid was also inked in the same red ink and heat embossed with clear powder and then added under the title cluster. The best thing in those chipboards are those circled leftovers that made the perfect red dots randomly added all over the page.


Hope you are scrapbookers too and will use our gorgeous Tando products for your own family pages!
 Products from Tando used:
Grid- Round

Grid - Round

Bunting large scalloped
Bunting Large Scalloped
Alphabet sheet

Alphas Sheet style Block Serif


Thursday, 8 May 2014

Black and Green - can be for a wedding too!

Hello my dear crafty friends! 
Irit is here today with a fancy and easy to make wedding banner.
All you need are those gorgeous Tando banners, painted to this non traditional lime green colour and PHP wedding papers and stickers.
As you can see it's easy to make and looks fabulous.


And here are those Tando banners I used for this project


Tuesday, 10 December 2013

Birthday Party !!!

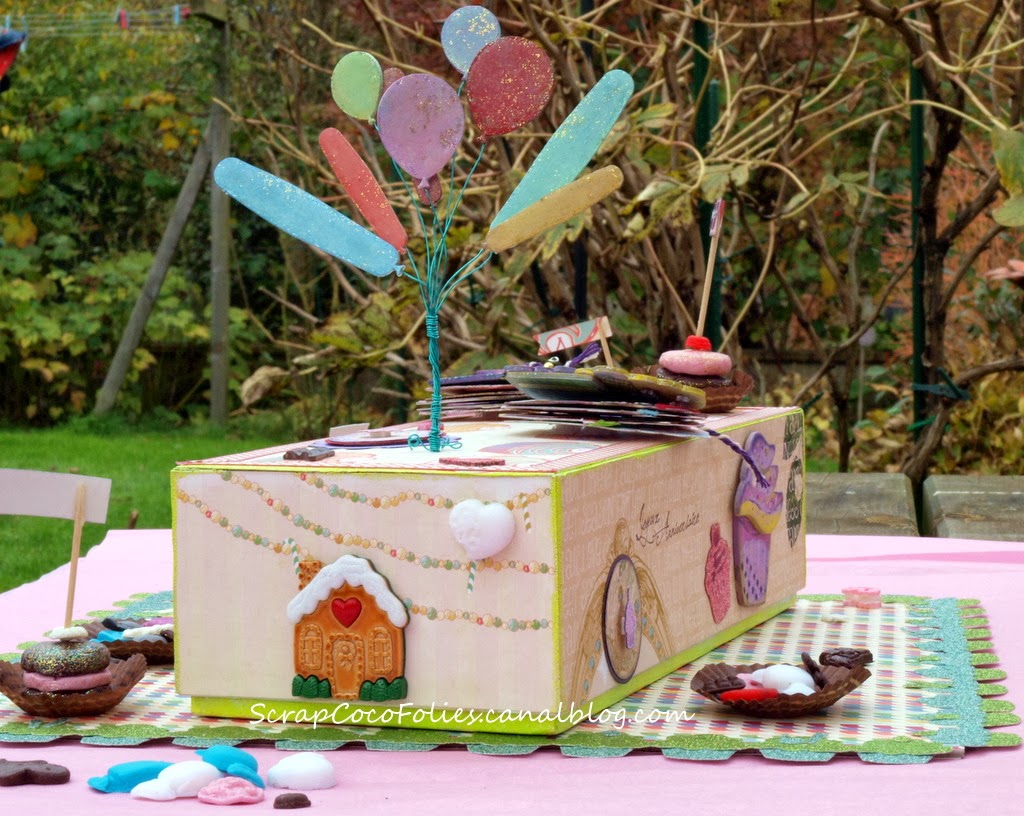
Hellooo, Coco here with a big party project, and a lot of decorations!!! I made this to celebrate the 6 years of my twins with her mates... As you will see, it includes the two mini Cupcakes albums I showed you a couple of weeks ago, for the Celebrate week!


Do you want to know the start of my creative process?... Yes??... Well, an old box with cards to learn to read belonging to my children!


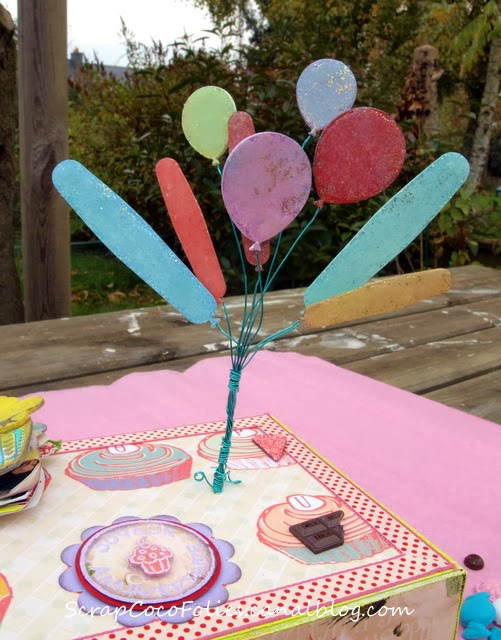
I kept the cards inside for another usage maybe later, and gessoed the box on the edges only as I wanted to cover it with papers. I also put a light coat of Gesso on my balloons which are from the small grab bag of balloons. Next I coloured them with several trio Brilliance inks... also added glitter!... :-) I used a mix of gold and silver glitter dusts. I don't remember if I applied them before the ink was dry, or if I used my glue pad to better fix them! You will have to experience that by yourself if you do the same! 


Don't hesitate to pop on over to my blog here to know how I created my beautiful bunch of balloons in the air. I have prepared step by step instructions if you wish to do again something like that for your kids or grandchildren one day. I don't put them here because of the number of photos that come with them!!


I heat embossed with Frantage aged rose embossing enamel two mini hearts and my small banner, also by Tando. I glued on each flag a tiny reproduction of an extra-large banner of flags also created for the occasion... you can also see it on my blog. That was a perfect combination as I had exactly 7 scalloped flags in both banners! :) 
By the way.... Did you notice on the top the two Cupcake albums I showed you a couple of weeks ago?... I put on their back and on the lid of the box a few bits of velcro. Thanks to that I can easily withdraw or affix them as desired! 


I used the remaining Tando's Cupcakes from the grab bag to decorate the sides of the box, combined to a few stamped images. I used different colours of paints to embellish them.


My box is lying on a tray done from a board square of dimensions 30.5x30.5 cm (12-inch). I cut it in thick greyboard, and glued on each of the two sides a scrap paper from an old festive collection by Webster's Page. The tip of gluing on the reverse side another sheet of paper allows to absorb the distortions of cardboard under the effect of glue! I also edged the tray with four strips of cupcakes cut out from glittered papers using a Sizzix strip die and assembled.

Here is a top-view of my final project with all the elements... I also created small gourmet mini cakes and sweets in Polymer (Wepam & Fimo) to fulfill the tray.


At the end..... all can be stored in the box haha! :-)  Even the balloons can be withdraw if needed.


I really hope you like this funny project, even if is not a Christmas one... But I think it can easily be adapted to do a beautiful Christmas table, don't you think so?...  

Supplies from Tando Creative:  

Cupcake Set Small

Tando Mini's - Balloons

Tando Mini's - Hearts

 Bunting Small Scalloped

Thanks for stopping by and have a great day! Hugs Coco xx

Saturday, 28 September 2013

Love banner:Larger than life

Hello my dear crafty friends!
Irit is here again and this time with my Larger  then Life  project and actually it means to use Big Tando pieces and this banner is sure BIG!
You know that Love is bigger the life and Tando Creative banners are sure Big: big fun to make and big pleasure to give as a present.
So here they are: my Love banners


Each piece was  inked and heat embossed around, then I glued dotted Bo Bunny papers over each single piece and added the very old heat embossed  letters.
I stamped one single butterfly for the first piece.

Added some embellishments over the other ones.
 This Tando book plate was a must over the central piece.Small book plate heat embossed in red  on the middle.

Some more pieces of this project


I hope you like this project as much as I do (I Love those  Tando banners so  much that I ask for a new pieces for my every DT box to be sent)
Here are Tando products I used for this piece


See you in a few days with more Tando inspiration!

Saturday, 11 May 2013

Spring Banner: Spring colors

Hello my dear crafty friends and Happy Spring to all of us!
Actually here in Israel  it's already mid- summer, but this is still what we call Spring and here is  my Spring colours project for this post: Altered Banners I love so much!


All background Tando shapes were misted and then inked around. The inner parts were  stamped with white  ink, heat embossed with white and I used resist technique to colour them just a bit .
Here are the close ups for the parts of this banner


And the middle one

And the last flag of this project
Want to make a similar project? Just go  and grab yourself Tando Creative banners and make your own wall deco for Spring!