Showing posts with label Mini hearts. Show all posts

Monday, 4 February 2019

Mixed Media board - mini hearts

Hi, it's Brenda here with you today to share a mixed media project and start our new colour theme.

The colour palette attracted me and I had no idea what I was going to make when I started.
But this is what appeared.


These colours and the image reminded me that Spring is on it's way, they are fresh and bright without being too vivid and one thing I did know was that I needed to mix and blend some of the DecoArt acrylic paints to get the range and effects I wanted. If you look closely although my board is not an exact representation of the photo there are some similarities. The greens are all in the background and I have some darker areas that are similar in colour to those behind and under the flowers and I also have some blooms represented but that's where any similarities end.


I chose (in order from left to right) paynes grey, dark grey & viridian mixed, titan buff, napthol red & titan buff, napthol red acrylic paints and picked up a Tando media board to work on.


Process steps

Begin by sealing the media board with white gesso and squidge it on your craft mat to get the textures started. Dry.
Mix white modeling paste with paynes grey media fluid acrylic and apply through a stencil. Dry.


Mix dark grey and viridian and create some watery wash and drip areas. Dry.


Paint the little hearts with paynes grey, napthol red and titan buff, blending the colours together on the hearts as you paint them.


Brayer a light layer of titan buff, dry and spritz with water and splatter some paynes grey watery wash. Dry.


Use a very small text stamp to create some random writing; sand and ink the edges with brown distress ink.. Create your own word tile - I use computer generated sayings and mount them on a strip of greyboard. Add some pinky red flowers and the heart then you're finished.


I really fell in love with the finished piece. Each layer worked well and the pops of red really pull my eyes in.


Please pop back during the week to see what some of the other fabulous members of the team have created. The range of ideas and designs never cease to amaze me.

Thanks for stopping by.

hugs Brenda xxx


Supplies
DecoArt Media Fluid ACrylic - Paynes Grey, Viridian, Dark Grey Value 6, Titan Buff, Napthol Red.
DecoArt mediums - White Gesso, White Modeling Paste
Stencil - France Papillon Rusted Rivets Small (from Tando Creative)
Tando Creative media board, mini hearts
Archival Ink - Peat Moss.
Distress ink - Ground Espresso.


Friday, 19 January 2018

Layered Butterfly Card

For this week's Anything Goes theme, I'm sharing a card I made for my mum's birthday:


I soaked one of the {Butterflies} for about an hour in water, then very carefully separated it into thin pieces and left them to dry completely. This was a whiteboard piece so I had the white layer as well.

I painted the greyboard parts with gesso and when dried, sprayed one of these and the white layer with the inks I'd sprayed onto the card base.

The other gessoed layer was stamped on using one stamp from the {Mish Mesh Stamp Set}.

I stamped and embossed onto the top layer and then stuck the layers together making sure every layer could still be seen.

I took a heart from the {Mini Hearts Set} and painted it then sprayed with spray ink. Once dry, this had a thick coat of {Liquid Glass}.


Everything was then stuck onto a card. The feathers are actually post it notes!


Kaz xxx

Monday, 20 March 2017

Mother's Day

It's Mother's Day in the UK this Sunday so we're celebrating all this week.


I started off by cutting part of the {Grid - Round} to the size I wanted and then soaked it in water for about half hour. After that, I carefully peeled it into 2 pieces. I left it to dry and then sprayed with ink.

Meanwhile, I selected 3 hearts from the {Mini Hearts} and experimented with pouring paint onto them. I mixed blue, white and pink acrylic paints with water to thin them a bit and them poured them all into a cup. Without mixing them, I poured them onto the hearts and kept everything crossed that the hearts didn't buckle  or the paint slide off. Here's a close up once I'd poured them and they'd settled:


They took a day to completely dry and then I gave them a thick coat of {Clear Liquid Glass}  to bring back the shine.

I finished off the card with a die cut panel and a computer generated greeting.

Kaz xxx

Saturday, 20 August 2016

Anything Goes on a Saturday!

Hi Gez here, I am delighted to be sharing a journal page with you this week for the 'anything goes' challenge using a heart from the [Mini - Hearts] pack along with some of the gorgeous white embossing powders and enamels from [Stampendous]


My page was created using acrylic paints, rubber stamps and washi tape. 

The heart was treated to a generous layer of clear crackle glaze, embossing enamels, powders and glitter so much fun!


Products used:


these are just the coolest embossing powders and elements on the planet!!


Thank you for calling and leaving a comment if you get the chance.

  Happy creating, Gez ♥

Friday, 29 July 2016

Butterfly Card

For our butterfly theme, I've made a card using another of the soon to be released card packs:


I've inked through the {Mini Flourish Stencil} onto the card blank and used {DecoArt White Modelling Paste} through it onto a tag.

I've painted the {Mini Butterflies} and {Mini Heart} with acrylic paint.

Once dry, I used spray ink and water to colour the tags, making sure that the colour got deep into the grooves of the texture paste. I also splatted the card blank with spray ink.

I've used #Stampendous Frantage packs to decorate the butterflies and heart.
I've stamped and heat embossed the butterflies with Sky Blue Embossing Powder and stamped and embossed the heart with Detail Capri Embossing Powder, both from the {Teal Frantage Jewel Kit}.

I've finished everything off with some doodles and used the black card from the stencil pack to surround the tag.

Kaz xxx

Monday, 11 January 2016

Book Plate Birthday Card

It's make a card week. I made this one for my mum's birthday:


Firstly, I used DecoArt's ~{White Modelling Paste}~ through the circles part of the ~{Tree and Leaves 3 Part Mask}~ onto card.

I painted one of the ~{Small Book Plates}~, a heart from the ~{Mini Hearts Pack}~, a flower from the ~{Mini Flowers Pack}~ and a butterfly from the ~{Mini Butterfly Pack}~ using a variety of ~{DecoArt Fluid Acrylics}~ mixed with DecoArt's white chalk paint.

I've then used DecoArt's ~{Clear Liquid Glass}~ to glaze and stick everything. I then assembled the card and did a bit of doodling.

Keep checking the ~{Tando Blog}~ this week for more cards from the design team.

Kaz xxx

Friday, 15 May 2015

Peel It Back - ATC Notebook


Hi Tando fans! Dana here today sharing an ATC size notebook for the Peel It Back Challenge this week. I soaked a white lined Artist Trading Card in water until it was saturated and then carefully pulled the layers apart.


Once the chipboard was dry I used the thicker piece for the back cover of the notebook. I covered the thinner piece of chipboard with patterned paper. I painted a Mini Heart with red glitter paint and a Mini Star with yellow acrylic paint to create a layered embellishment for the cover.


I cut pieces of graph paper to fit between the covers. I used a hole punch on the covers and pages and attached all the parts together with a jump ring. I love that Tando chipboard keeps its integrity even after being soaked in water!

You can find this chipboard and more in the Tando Creative Retail Store! We'd love to have you join the Peel It Back Challenge! To be in with a chance of winning some great Tando goodies of your choice, please make a piece based on our weekly themes and link your project, not just your blog, using the inlinkz tool located at the top of the Tando Blog. You don't have to use any Tando product, but, if you do, you will be entered into the draw twice! There are no limits to how many times you enter, however, we do request that you only enter your piece for 5 challenges. We look forward to seeing your creations!

Wednesday, 6 May 2015

May Color Challenge - Floral Card by Dana


Hi Tando fans! Dana here today sharing a card that I created for the Color Challenge this week. I embossed a piece of white cardstock and then added flock before piling on some flowers. I colored a pair of leaves from the Leaf Branch with 3 Loose Leaves Set with yellow, blue, green and purple ink to mimic the beautiful peacock feathers from the color inspiration piece. I tucked a Mini Heart, that I covered with dimension paint, to the flower cluster and finished the card with some sentiment stickers.


You can find this chipboard and more in the Tando Creative Retail Store! We'd love to have you join the Color Challenge! To be in with a chance of winning some great Tando goodies of your choice, please make a piece based on our weekly themes and link your project, not just your blog, using the inlinkz tool located at the top of the Tando Blog. You don't have to use any Tando product, but, if you do, you will be entered into the draw twice! There are no limits to how many times you enter, however, we do request that you only enter your piece for 5 challenges. We look forward to seeing your creations!

Thanks for stopping by today!

Wednesday, 15 April 2015

Same But Different - Owls.

Hi all,

Dawn here today with an owl ATC for you. I love these guys, so cute, and they are available in 2 sizes to provide endless project options.

I opted for the mini owls........


I started by covering an ATC in text printed tissue paper. Once dry a thin layer of green acrylic was applied. The owls were painted with acrylic too and more detail was added with gold ink and a crackle stamp. A heart from the mini hearts bag was covered in gold ink and the owls are sitting on a painted cutting from one of the lace effect borders.

Here is what I used.........

Artist Trading Cards

Tando Mini's - Owls 2

Tando Mini's - Hearts

Lace effect borders

If you fancy joining in with any of this months themes please add your work through the link at the top of the page to be in with a chance of winning a prize in the April Challenge.

Many thanks for popping by and leaving a comment if you feel you would like to.

Hugs

Dawn x 

Friday, 3 April 2015

Colour Scheme Card

I'm finishing the pretty colour scheme theme with this card:


I've inked through the ~{Circles Grid Mask}~ as a background and then painted one of the ~{Small Bookplates}~ with acrylic paint. I also painted one of the ~{Mini Hearts}~. I used the ~{DecoArt Liquid Glass}~ onto the bookplate and stuck the heart in place with that.

I've filled the centre of the bookplate with flowers and added a greeting.


Don't forget you can join in with us to be in with the chance of winning some Tando goodies at the end of the month.

Kaz xxx

Sunday, 22 February 2015

Anniversary card by Kaz

I'm rounding off this week's theme of Anything Goes with an anniversary card:


I began by running one of the ~{Mini Hearts}~ through an embossing folder and then painting it with acrylic paint. Once that was dry, I painted a thin layer of acrylic paint onto an acrylic block and 'stamped' the paint onto the heart. This way only the raised part gets coloured.

Next I took a ~{Butterfly Mini}~ and cut it in half then cut the body parts off. This has been painted with acrylic paint and then doodled on.

I dipped the card blank into some watery in and when this was dry, ink through random hearts from the ~{Heart Background Mask}~.

Kaz xxx

Thursday, 31 July 2014

Art ATC

For my ATC I've done one a bit differently to how I usually do them.


I started off sticking some plasterers tape, book pages and texture paste through the ~{Dotted Star Mask}~ randomly on the ~{ATC}~ then gave everything a good thick coat of gesso. The best thing about the ATC's is that you can load them up and they don't curl up like card does.

I then added little hints of colour over the base using the Pitt Big Brush Markers, my newest love.

I've painted 2 leaves from ~{Mini Leaves 2}~ and ~{Mini Leaves 3}~ and a heart from  ~{Mini Hearts}~, then dabbed white acrylic paint over the top to make them paler.

I then stuck flowers onto the ATC with gem middles and added lots of white paint over them. Once everything was dry (and it took a while as I'd really put it on thick) I added a couple of drops of spray ink using the stem of the spray and added a tiny bit of water to spread the colour out a bit.

Finally I added a little bit more pen and blended it out and some lettering.

Kaz xxx

Tuesday, 11 February 2014

Love Card by Kaz

I made a card for our love and kisses week:


I've used the ~{Hearts Background Mask}~ to make the border along the bottom, just rearranging it to fit the tiniest hearts in the gaps.

Then I've painted, inked and glossy accented a selection of ~{Mini Hearts}~ and a ~{Mini Key}~ for accents with the stamped image. Adding some gems for detail.

Kaz xxx

Tuesday, 10 December 2013

Birthday Party !!!

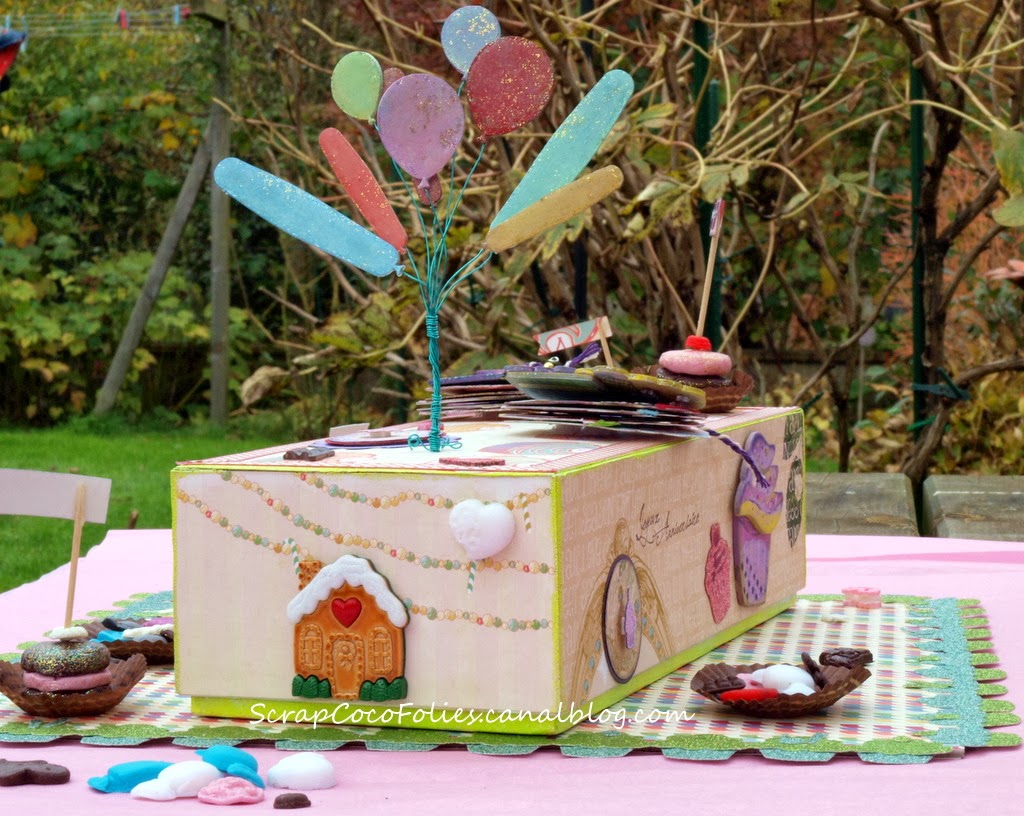
Hellooo, Coco here with a big party project, and a lot of decorations!!! I made this to celebrate the 6 years of my twins with her mates... As you will see, it includes the two mini Cupcakes albums I showed you a couple of weeks ago, for the Celebrate week!


Do you want to know the start of my creative process?... Yes??... Well, an old box with cards to learn to read belonging to my children!


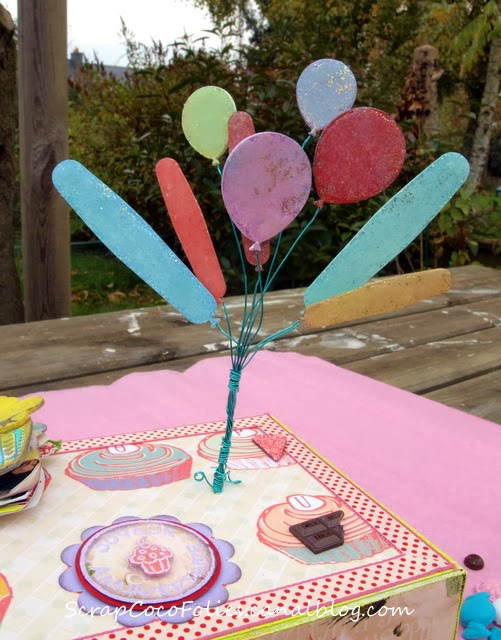
I kept the cards inside for another usage maybe later, and gessoed the box on the edges only as I wanted to cover it with papers. I also put a light coat of Gesso on my balloons which are from the small grab bag of balloons. Next I coloured them with several trio Brilliance inks... also added glitter!... :-) I used a mix of gold and silver glitter dusts. I don't remember if I applied them before the ink was dry, or if I used my glue pad to better fix them! You will have to experience that by yourself if you do the same! 


Don't hesitate to pop on over to my blog here to know how I created my beautiful bunch of balloons in the air. I have prepared step by step instructions if you wish to do again something like that for your kids or grandchildren one day. I don't put them here because of the number of photos that come with them!!


I heat embossed with Frantage aged rose embossing enamel two mini hearts and my small banner, also by Tando. I glued on each flag a tiny reproduction of an extra-large banner of flags also created for the occasion... you can also see it on my blog. That was a perfect combination as I had exactly 7 scalloped flags in both banners! :) 
By the way.... Did you notice on the top the two Cupcake albums I showed you a couple of weeks ago?... I put on their back and on the lid of the box a few bits of velcro. Thanks to that I can easily withdraw or affix them as desired! 


I used the remaining Tando's Cupcakes from the grab bag to decorate the sides of the box, combined to a few stamped images. I used different colours of paints to embellish them.


My box is lying on a tray done from a board square of dimensions 30.5x30.5 cm (12-inch). I cut it in thick greyboard, and glued on each of the two sides a scrap paper from an old festive collection by Webster's Page. The tip of gluing on the reverse side another sheet of paper allows to absorb the distortions of cardboard under the effect of glue! I also edged the tray with four strips of cupcakes cut out from glittered papers using a Sizzix strip die and assembled.

Here is a top-view of my final project with all the elements... I also created small gourmet mini cakes and sweets in Polymer (Wepam & Fimo) to fulfill the tray.


At the end..... all can be stored in the box haha! :-)  Even the balloons can be withdraw if needed.


I really hope you like this funny project, even if is not a Christmas one... But I think it can easily be adapted to do a beautiful Christmas table, don't you think so?...  

Supplies from Tando Creative:  

Cupcake Set Small

Tando Mini's - Balloons

Tando Mini's - Hearts

 Bunting Small Scalloped

Thanks for stopping by and have a great day! Hugs Coco xx