Showing posts with label DecoArt Clear Liquid Glass. Show all posts

Monday, 11 October 2021

Woo! Halloween - by Kim


 Well, what a time to be creating my first piece for Tando Creative! Halloween!


The Gothic Arch with all its natural spookiness was an ideal place to start. I removed all the cut out panels and set them aside. To enhance its 3D-ness I staggered the layers to give it that down-in-the-dungeons look. Each layer was about 5mm higher than the one before. (My first idea was to make stones around the arch - hence the lines - they were not used)

I decided that every decent dungeon has a door, so I used one of the cutouts. To make the planks of the door I started from the centre line and measured 10mm spaces and marked pencil lines. Using the edge of a ruler I ran a small embossing stylus along the pencil line until I was happy with the line.


This was the time that I marked and cut out the coffin shaped window using a sharp craft knife - BE CAREFUL if you intend to do a window as the greyboard is tough and not easy to cut and craft knives are very sharp - this bit is not important and can be left out if you are not confident.


Next, I painted everything black and let it dry while I prepared the bits for inside.

From the Minis Halloween Mix pack I used the eyes from the pumpkins. while they were still in the frame (because they are easier to hold) I painted them with yellow then added a little Scarlet red to make them a little fierce. 

From the same pack I took the spider webs and painted them white. One I cut to fit the curve of the arch and the other was glued across the window in the door.


One of the small bats was painted black and lightly edged in white, with dotty eyes in Scarlet.


From Tando Creative Spiders Grab Bag I took the small spider, base coated in black, a little Burnt Orange over the top and some dots to make her pretty. 


 Before I glued the pieces in I painted the inside of the arches by lightly dry brushing, first Burnt Umber, then Burnt Orange.


The spooky mist is from a cotton face pad.


I then turned my attention to the outside. I needed to add a hinge to the door, this had to be done before the finishings. I used a strip of brown packing tape, but painters masking tape would work.


To hide the tape I applied Texture Sand Paste to the door frame (which is why I didn’t need the lines from earlier). This made a super, rocky surround. Make sure it is thoroughly dry before you carry on.


I re-basecoated the frame and hinge on the door with black before lightly brushing the frame texture with Burnt Umber, Burnt Orange, then very lightly with True Ochre.


I added nails to the door with Liquid Glass - these take quite a while to dry, too. But make sure they are properly cured before you continue.


I found a small key in my ephemera stash, drilled a tiny hole and glued it in. Then using True Ochre and Black Plum lightly dry brushed to texture the door, allowing the True Ochre to highlight the nails. 


I used a pumpkin from the Halloween Mix, painted in Tangerine with Scarlet stripes to finish the door.


Note: Before you glue on the door hinge, make sure the door fits the hole and opens easily because after it has been painted it might need adjusting! And don’t get bogged down with colours - whichever you have that is similar will do.)


I hope you are inspired to be spooky for Halloween!


I used these products:

Tando Creative:

    Gothic Arch

    Minis Halloween Mix

    Spiders Grab Bag


DecoArt Media:

    Texture Sand Paste

    Liquid Glass


DecoArt Colours as in the text


Friday, 8 February 2019

February Colour Theme


 For this month's colour theme I've started with gesso on the {Artists Trading Coin} and then loads of layers of coloured acrylic paints as I couldn't get anything I was happy with. The best thing about Tando Greyboard is that it's so strong and can take a good battering. Once I was happy, I used the {Bubbles Stencil}around the edge and used a text stamp randomly.


I then used the small heart from the {Scribbles} sheet and sprayed it with ink. Once dry it had a thick covering of {Clear Liquid Glass}, finishing off with dots in Posca White pen and some words cut from a book.

Friday, 19 January 2018

Layered Butterfly Card

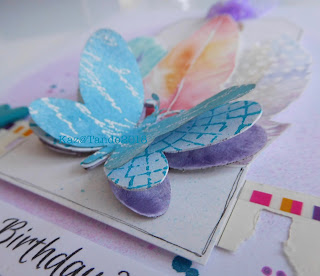
For this week's Anything Goes theme, I'm sharing a card I made for my mum's birthday:


I soaked one of the {Butterflies} for about an hour in water, then very carefully separated it into thin pieces and left them to dry completely. This was a whiteboard piece so I had the white layer as well.

I painted the greyboard parts with gesso and when dried, sprayed one of these and the white layer with the inks I'd sprayed onto the card base.

The other gessoed layer was stamped on using one stamp from the {Mish Mesh Stamp Set}.

I stamped and embossed onto the top layer and then stuck the layers together making sure every layer could still be seen.

I took a heart from the {Mini Hearts Set} and painted it then sprayed with spray ink. Once dry, this had a thick coat of {Liquid Glass}.


Everything was then stuck onto a card. The feathers are actually post it notes!


Kaz xxx

Friday, 1 December 2017

Sparkle cards

For my sparkle project I have made all of my cards I'm sending this year, yes, just the 2! Bah Humbug and all that!

I started off with 2 snowflakes from the {Pack of 5 Snowflakes} and painted them with white acrylic paints.

The first one I used a generous coating of DecoArt {Clear Liquid Glass} and then sprinkled glitter onto it:


The second one I gave a coat of glitter glue:


Both snowflakes have been stuck onto a background of alcohol ink and had gems attached to the middles before finishing off with doodling and a stamped greeting.

Kaz xxx

Tuesday, 21 November 2017

Modelling Paste Week - by Nikki K


Morning all,

This week our task is to use Modelling Paste in our makes. 

I have taken a Tando Mixed Media board, as I love these for little hangers or technique boards, they are so easy to use and are brilliant for when you want to 'art' but can't tackle a big project.  They make nice gifts when done too, as they fit in an envelope nicely. 

First, Gesso the board all over, then take the 'All Seeing Eye' stamp, and stamp slightly above centre.  Give a wash of Cobalt teal hue and primary magenta over the eye.  When dry, use Liquid Glass to give a clear raised coating over the eye area.


Around the eye and over the rest of the board, spread a layer of crackle paint. When dry, give a wash of Cobalt Teal Hue. Highlight areas with Metallic wax in Copper.

Over the top of this, I layered a Tando Brick wall stencil, and used modelling paste through it.  This was given a wash of Red Iron Oxide, and then some Patina Antiquing Cream in places.


You could add holes to the top of the board and some wire to make a little hanging, or a centre hole to make a tag.  A cropodile works well on the board, no problems.

Hope you like it,

Have a good week,

Nikki K.

www.nikkikart.blogspot.co.uk
www.facebook.com/nikkikartist

Products Used: 
Tando Creative Mixed Media Board
Tando Creative Mini Mask - Brick
DecoArt Media Line paints
DecoArt Media Antiquing Cream - Patina
DecoArt Media Crackle Paint
DecoArt Media Modelling Paste
Andy Skinner Stamp - Curiosity

Monday, 15 May 2017

May - Anything Goes

I'm kicking off this month's anything goes with a trio of quick and easy cards for if you're in a rush.


I've used the {Tangled Yarn Stencil} over a masked off section of the card blank. For the first, I went for a low stripe and the the second a high one. The large butterfly is from the {Butterfly Grab Bag}. The rest of the butterflies come from the {Mini Butterflies}.


For the last card I used one of the stamps from the {Mish Mesh} set.


For all of the butterflies, I've used acrylic paint that has been watered down until it's the consistency of cream. Purple, turquoise and white paint has all been put into one pot, but not stirred and then poured on the first big butterfly. 

The other butterflies have been dipped into the paint that has run off from the sides creating swirls.

The single butterflies had a coat of {Decoart Clear Liquid Glass} and white paint pen added when dry.

The trio of butterflies just had the white paint pen added. You can see the detail of the dipped paint effect here:


Kaz xxx

Monday, 20 March 2017

Mother's Day

It's Mother's Day in the UK this Sunday so we're celebrating all this week.


I started off by cutting part of the {Grid - Round} to the size I wanted and then soaked it in water for about half hour. After that, I carefully peeled it into 2 pieces. I left it to dry and then sprayed with ink.

Meanwhile, I selected 3 hearts from the {Mini Hearts} and experimented with pouring paint onto them. I mixed blue, white and pink acrylic paints with water to thin them a bit and them poured them all into a cup. Without mixing them, I poured them onto the hearts and kept everything crossed that the hearts didn't buckle  or the paint slide off. Here's a close up once I'd poured them and they'd settled:


They took a day to completely dry and then I gave them a thick coat of {Clear Liquid Glass}  to bring back the shine.

I finished off the card with a die cut panel and a computer generated greeting.

Kaz xxx

Wednesday, 23 November 2016

Embossed Christmas ATC


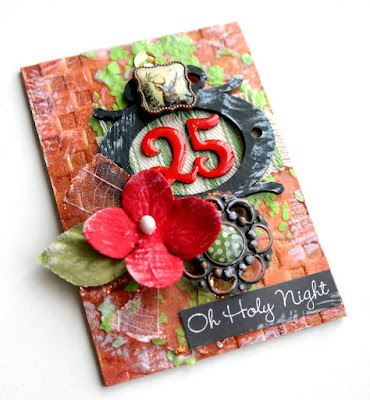
Hi friends! Dana here today sharing an Artist Trading Card I created for the Embossing theme this week. I pressed an ATC in a checkered embossing folder for a fun textured base and then primed the card with a coat of DecoArt White Gesso. I then added color, with a distressed layer of DecoArt English Red Oxide Antiquing Cream and a layer of DecoArt Gold Interference for a subtle shimmer. I added a pop of bright green to the card by mixing Stampendous Hot Lime Fragments into DecoArt Matte Medium and spreading it on with a spatula. Before the medium dried I pressed in several gold sequins.


To embellish the top of the card, I painted a Mini Book Plate with DecoArt Carbon Black Fluid Acrylic, then backed the book plate with a scrap of green stripe ticking, and added the number "25," from the Arthur Number Set, which I painted with DecoArt Cadmium Red Fluid Acrylic and a top coat of DecoArt Liquid Glass. I added leaves, a flower, a pair of decorative brads, and a sticker sentiment to fill in the design. I finished this card with a dry brushing of DecoArt Titanium White Fluid Acrylic.

You can find the chipboard I used for this project, and a wonderful selection of DecoArt and Stampendous products, in the Tando Creative Retail Store.

Wednesday, 5 October 2016

Color Theme - Nevermore Arch


Hi! Dana here today sharing the arch I created for the Color Theme this week. Once the calendar year reaches October, I begin to think about all of my favorite creepy and crawly things. Edgar Allen Poe is always at the top of the list. I printed a digital paper onto a piece of vellum for the focal point of this arch. I used the Letters Mask to stencil the word "Nevermore" onto the background of the image. I then colored in the letters and covered them with a layer of DecoArt Clear Liquid Glass. Once the image was dry, I backed it with a piece of patterned paper and then glued one outer cut from the Arabian Style Layered Arch Frame over the top. I painted the frame with acrylic paint to bring in more colors for the challenge palette.


You can find the chipboard I used for this project, and a wonderful selection of DecoArt products, in the Tando Creative Retail Store.

Friday, 23 September 2016

Fly Solo Mixed Media Board


Hi friends! Dana here today sharing a mixed media board for the Anything Goes theme this week. I had a lot of fun with the Nathalie Kalbach Fashion Dame Stamp Set, the Nathalie Kalbach Bird Stamp Set, the Deco Art Media Line, and Stampendous Spoonful of Silver.

I started this piece by coloring the edge of a Mixed Media Board with a black paint pen and the top of the board with a layer of DecoArt White Gesso. I then sprayed the board with a DecoArt Turquoise Shimmer Mister. I painted solid areas of color using DecoArt Primary Magenta, Primary Yellow, and then a mix of White Gesso, Primary Yellow, and Cadmium Red Hue to create the peach paint. I added a small oval of turquoise acrylic paint. Once the paint was dry, I stamped the foam bird image onto the board using black pigment ink.

To brighten the design I added splatters of Primay Yellow and some doodles with a white paint pen. To dress up the background I used the trouser stamp from the Fashion Dame Stamp Set with purple pigment ink to add a lined design around the bird. I then sprinkled on Spoonful of Silver over the ink and applied heat to set. I highlighted the small ovals on the wing and the eye of the bird with DecoArt Liquid Glass. I finished this board with a Dymo tape quote.

You can find the chipboard I used for this project, and a wonderful selection of DecoArt and Stampendous products, in the Tando Creative Retail Store.

Tuesday, 8 March 2016

Texture paste week

Hello, its Karen playing with *Texture Paste* today :p.  I have decorated an address book....


I used  *Gio's masks (Eighties)* to spread the paste through in the centre of the book cover.  Then I painted over all of the cover with *Quinacridone Magenta*.  When that was dry I added some *Quinacridone Gold* over some of the stencilled parts and also dabbed some *Dioxazine Purple* here and there to add more depth.  When dry I added *Crackle Glaze* around the outside of the mask and on the circles and 'square' shapes.  *Antiquing cream in white* was added into the crackles.  *Liquid Glass* was added to other areas.


Thank you for taking a look today!  If you fancy paying along then take a look at the tab at the top of the page!  Hugs, Karen xxx

Tuesday, 3 November 2015

November Colour Theme

Hello, its Karen here with a tag that I have made using this months pretty colour scheme.


I used a lovely *Ice-Skate* from a pack of 6 as the centre piece.  The 'spots' were made using the new *Mini Mask - Sequins*  These mini masks are fabulous for areas!  The spots were then covered with *DecoArt Liquid Glass*  which is fabulous stuff!  The skate was mounted onto some painted corrugated card then onto some glittery card.  Some wide organza ribbon, wire and a bead finished my tag off.  I will be adding a sentiment at a later date.  Here is the colour theme...

 
Thank you for taking a look today.  If you would like to play along with us then please take a look at Novembers tab at the top of the page.  There are prizes to be won ;-D

Hugs, Karen x

Tuesday, 22 September 2015

Book Covers with Dee


Hi everyone I hope you are well and getting time to be crafty.
Our topic for the week is book covers.
I started with painting the main part with Deco media paints.
I used blue colour washes over the first layer which had been 
lightly stamped with Andy Skinners industrial stamps.
I used a compass stamp from my stash to place in the 
circular hole.
This was glued on to a Tando circle prior to being glued into place.
I tried to capture the old gold gleam that comes off the aged metal
the photo's don't quite capture it.
I used a metal compass that I had in my stash to go in the area
underneath the main focal point.
I had put crackle paste around the edges and painted them
I highlighted these with treasure gold. I did do the back
 but will show you that in a different post one thing I 
learnt is if you are doing a book always paint
 the base on both front and back at the 
same time.As they are slightly different 
colours.
PRODUCTS USED
  1. Tando Creative products used for the front cover Neil Walkers Book plate  NWMCHNCAL
  2. Deco Art's Media paint's:-  Primary Magenta, Quinacridone Red,Vermillion, Cobalt Turquoise, Gold Metallic, Quinacridone Gold & Paynes Grey.
  3. Deco Art's Antiquing cream Carbon Black.
  4. Deco Art Crackle paste and liquid glass. 


Monday, 20 April 2015

Anything Goes in April

I'm kicking off this week's Anything Goes for ~{Tando}~:


I've used DecoArt's ~{White Modelling Paste}~ through part of the ~{Letters Mask}~. While that was drying, I've painted ~{Karen's Frame Gothic Arch}~ with a blend of DecoArt White Chalky Finish paint and  ~{Cobalt Teal Fluid Acrylic}~. When that was dry I stamped a crackle stamp onto it and inked the edges.

I stuck a stamped image behind the frame, then added some colour inside the heart and filled the gap with ~{Clear Liquid Glass}~.

I've finished off with some doodling and a greeting.

Keep coming back this week to see what the rest of the team creates. If you join in with our themes, you can win some Tando goodies.

Kaz xxx