Showing posts with label Deco art fluid paints. Show all posts

Thursday, 16 December 2021

Product Focus- Steampunk Journal Cover- Fiona Randall


Morning all Fiona here with a Product Focus project.

The DT will focus on the vast array of products available on the Tando website and hopefully give you some ideas and inspiration to try something new.

For my project I have focused on the Tando A6 Binder and Cover Pack. I t comes with two A6 Binders and 4 pairs of covers. I used a pair of the covers to create a steampunk themed journal cover.


 Air drying clay was pressed into a mould and once dry glued to the front cover.
I also used for decoration the Tando Steampunk Parts Small and also the medium sized Bee from the Tando Bee panel. The covers were given a rusty and patina treatment using DecoArt Media Fluid Acrylics. The embelishments were given an aged brass effect with hints of patina also. Am quite pleased how this turned out. 
A spine was created from a piece of Tando Grey Board cut to size and attached to the journal covers using book binding tape.
To finish elastic was added to the spine so little notebooks can be slotted in.
Thanks for taking the time to stop by and read.
 Do stop by the rest of the week to see more inspiration from the DT.
Fiona xx

PRODUCTS USED.


OTHER PRODUCTS.

Stamperia Soft Mould A5 - Time Machine.


Tuesday, 25 February 2020

Flight- Weekly Theme- Fiona Randall

 
Morning all.
This weeks theme on the blog is FLIGHT.
Meaning:-
"the action or process of flying through the air."
 
 
I have created this Tando tag using layers of DecoArt Media Fluid Acrylics in Qunacrodone Gold Burnt Umber and Cobalt Turquiose Hue for the base of the tag and a Tando Grey Board Circle.  I then gave an aged metal effect to the Tando Cogs and Wings,die cut circle element and a die cut 3d star using DecoArt Media Fluid Acrylic in metallic Gold then aged with DecoArt Media Black Antiquing Cream. I then layered all the elements up on the tag base and finished by adding a butterfly which was printed and then fussy cut out. To finish I added the sentiment to the base of the tag. So there you have it my Interpretation of this weeks theme of Flight.
Do check back throughout the week to see what the Team Members have in store for you.
As Always we appreciate you stopping by.
Fiona x
 
Products Used.


Quinacrodone Gold, Cobalt Turquoise Hue, Raw Umber, Metalic Gold
 
 
Other supplies.
 
Sizzix 3d Impresslits Embossing Folder by Tim Holtz- Radiant
 
Spellbinders die- Celtic Medallion.
Printed Butterfly- My own Stash


Sunday, 3 December 2017

Sparked easy Christmas ornament with Irit

Hello my dear crafty friends and welcome to our Sparkle week  on Tando blog.
I made this Christmas/Winter ornament tag using just two of Tando products and a lot of DecoArt Media line products with Stampendous glitters over.


The MDF base of one of Shadow box frames was covered with a thick layer of white acrylic paint and DecoArt crackle white paint all together.
When it was dry the blue shades  were added using acrylic liquid paints.
Then the thick layer of glitter was added over the tag.
The reindeer was painted with white acrylic and a very generous layer of delicate glitter was added into the wet paint.'
This is easy to make project for all levels of crafters and you can do dozens of them in no time with similar Tando products.


 Products used from Tando:

Shadow frames
Shadow Frames

Reindeer Small running 
Reindeer Small Running

DecoArt Media line


Thursday, 9 November 2017

Beautiful Dreams door hanger with Irit


Hello my dear crafty friends and welcome to my new Tando post.
This week the design team members were challenged to make projects with embossing powders.
So here is my door hanger made with Tando stencils, chipboards, door hanger and lots of DecoArt media line products.


First I made the background with 3 different Tando mini stencils and texture paste.
Then I heat embossed the background and front chipboard pieces with gold embossing powder  and then it was misted over with acrylic paint with added water.
 Then the piece was covered with DecoArt Crackle glaze and the result is just gorgeous!

 Tando products used:
Mini mask Clock
Mini Mask - Clock

Mini mask  Splatters
Mini Mask - Splatters

Mini mask Post mark
Mini Mask - Post Mark

 Door hangers Style A
Door Hangers style A

Grid Square
Grid - Square

Scribbles
Scribbles

Textured Hearts

Textured Hearts

DecoArt Media line


Tuesday, 8 March 2016

Texture paste week

Hello, its Karen playing with *Texture Paste* today :p.  I have decorated an address book....


I used  *Gio's masks (Eighties)* to spread the paste through in the centre of the book cover.  Then I painted over all of the cover with *Quinacridone Magenta*.  When that was dry I added some *Quinacridone Gold* over some of the stencilled parts and also dabbed some *Dioxazine Purple* here and there to add more depth.  When dry I added *Crackle Glaze* around the outside of the mask and on the circles and 'square' shapes.  *Antiquing cream in white* was added into the crackles.  *Liquid Glass* was added to other areas.


Thank you for taking a look today!  If you fancy paying along then take a look at the tab at the top of the page!  Hugs, Karen xxx

Thursday, 7 January 2016

Time to Celebrate

Hi guys, Liz here today for my first post this year, I have used the Champagne mask to make a Champagne bottle effect which can be used for the New Year or a special Birthday etc,
It is the colour theme week this time so i have kept my bottle to those colours though of course others could be used too,
I traced around the outside of the separate bottle mask on water colour paper then went over the whole thing with a light covering of modeling paste, I kept this quite smooth too, 

I mixed some tinting base with a little Prussian Blue Hue fluid acrylic paint and painted the bottle base,
when dry I added another layer of the water colour paper as a rim for around the top, then I added some stenciling with modeling paste through the distressed sequin mask,
Next i added some crackle paste here and there along the edges, at this point I also slightly shaped the bottle by bending it slightly in the centre to give a rounded shape like a true bottle,

When all this was dry I took some Prussian Blue Hue onto a wet wipe and swiped the colour mainly over the modeling paste working slightly into the middle,

I then made a label using my computer and when I had cut it out, I coloured it with some distress ink, then a mini star coloured with silver metallic fluid paint finishes that off,
I then took some gilding flakes and stuck them onto the top of the bottle shape with  more on one side to look like the gold foil which has been left after the cork was popped!!
I then added some more of the stars to some craft wire, as well as cork I had made from tracing round the top of the bottle stencil and painting it first with yellow oxide then when dry some more gilding  flakes,

I hope you all had a lovely Christmas and New Year, if you fancy joining us in this or any of our challenges just click on the link above,


Happy Crafting!!
Hugs Liz xx

Thursday, 22 October 2015

Halloween, the book of the dead

Hi guys, Liz  here today to show you my take on this weeks challenge
Spookilicious,
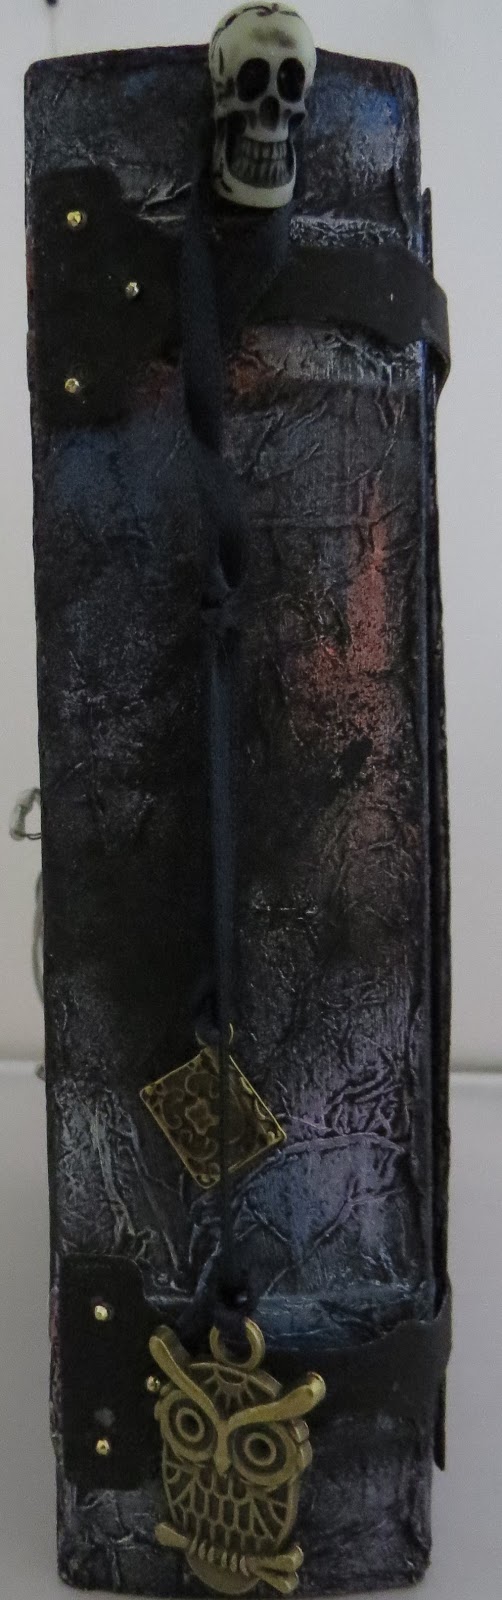
I altered a paper mache book from my stash and covered it with scrunched up tissue paper strips, then painted it Deco Art white Gesso, to firm the tissue paper up, then i added a few colours of Inka Gold waxes on the top,

I took a skeleton from the skeleton pair pack and painted it with gesso, then when dry added a hint of pumice stone distress ink here and there for shadow, doesn't really show up on here though,
I painted the Tando Creative Key latch embellishment with Deco Art carbon black paint as well as the die cut hinges I had in my stash,
I finished the side of in a similar way too just adding a few charms etc,

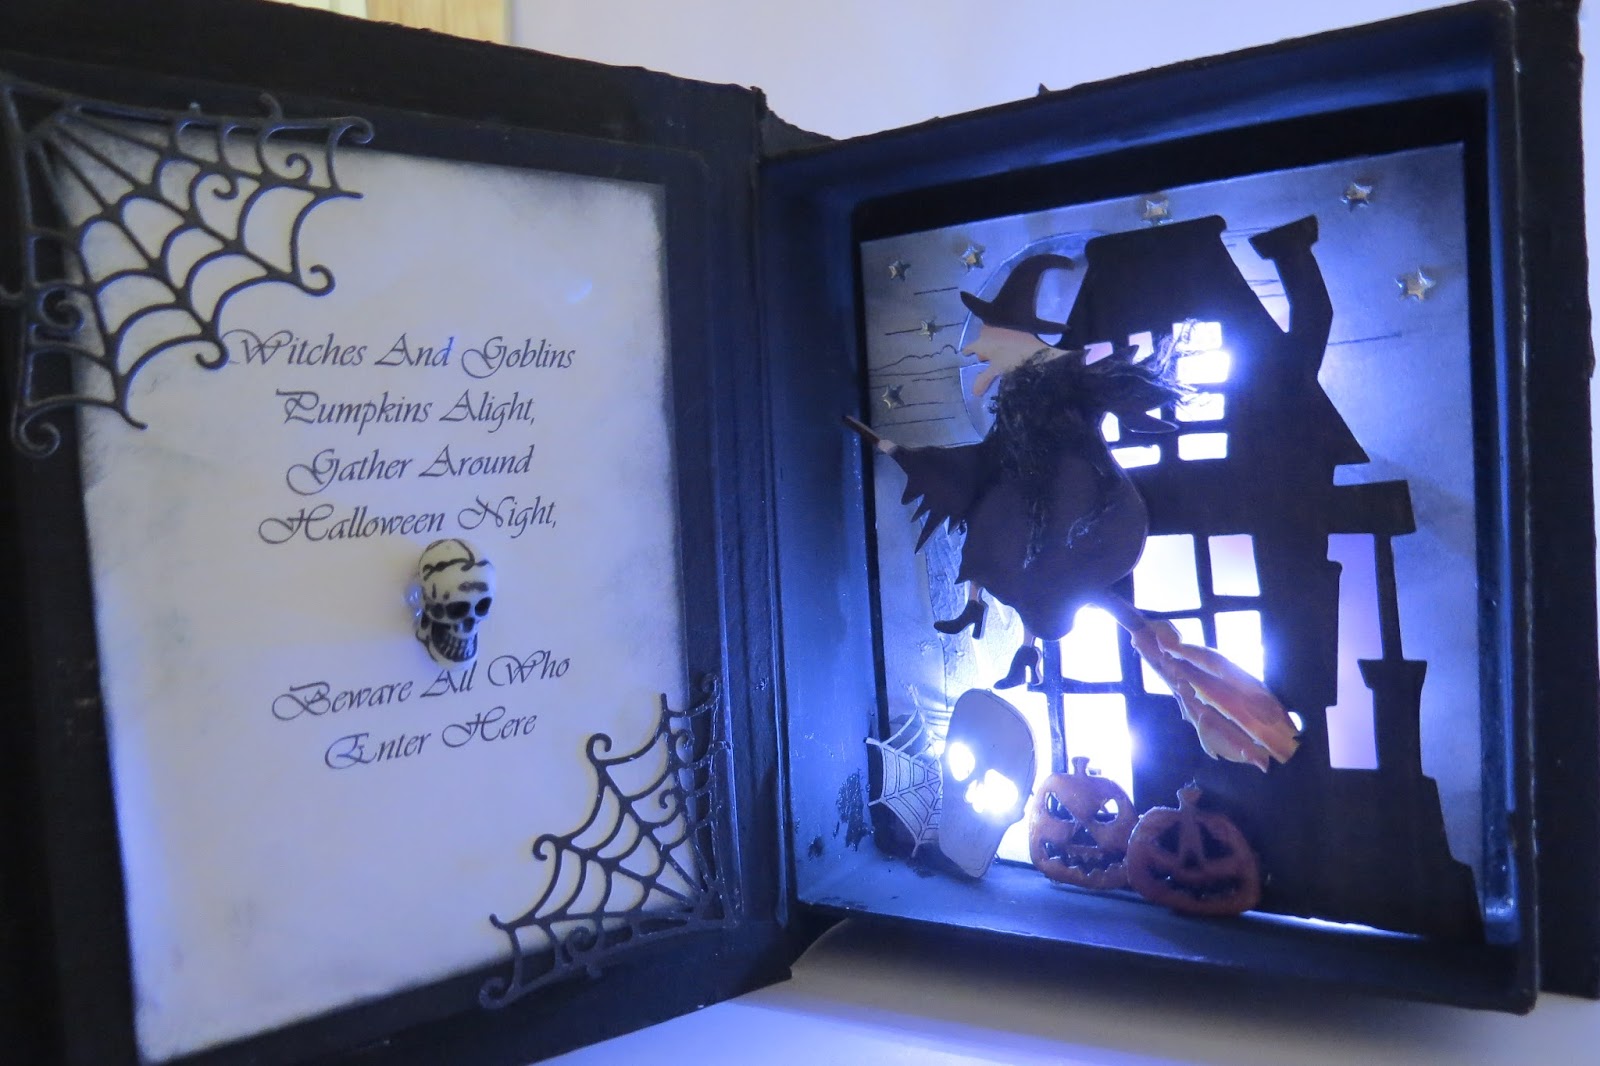
This is the inside area on the right, I made a scene on watercolour paper, cut out the moon, adding some vellum on the back of the cut out, I also added a die cut tree, which you can just make out at the side of the house, I know you may need to squint, lol, I then layered up a rickety house die, cut out with corrugated card then painted with Deco Art Paynes grey fluid acrylic paint, and again added vellum behind for the windows,
The witch is coloured with my distress markers, the broom handle and hat has a layer of texture paste first before colouring, then the twigs on the broom has texture paste which i added lines too for depth and design, then coloured, I added a little watered down gess on her face for a ghostly look too, 
At the base are items from the mixed mini Halloween set, the skull painted with gesso and shaped slightly by hand, the pumpkins were coloured with distress ink too then i used ultra thick embossing crystals and heat set the layers a couple of times,

This is on the left hand side, I got the verse of the internet,


trouble was it wasn't quite what i wanted so I added a few crystal stars and  string of  lights behind too,

Hope you like it, and don't forget to join us in any of the themes this month for a chance to win some Tando Creative goodies,
Hugs liz xx