Showing posts with label jewellery. Show all posts

Saturday, 11 October 2014

Black and Orange with Irit


Hello my dear crafty friends!
Irit is here again and this is my third- not the last- black with another color jewelry  piece.
I already made one with pink and another one with purple using Tando gorgeous chipboards. This is another one made in the very same stamped way.
As you can see you can  make a lot of easy and not expensive jewelry to fit your outfits.
Just stamp the background, heat emboss it, add the inked and heat embossed chipboard top and embellish with some blings. Easy way to be very creative with Tadno chipboard!


Tando product used
Jewelry circled pendant stright

Saturday, 4 October 2014

Inchies to Wear by Katy


For inchies week I created a pair of earrings, made with inexpensive Christmas gifts in mind! These Tando inchies are fab value and you can make a stylish pair of earrings or a necklace for a few pence.

More details on my blog :)

I used these inchies which cost just £1.90 a pack.


Katy x

Friday, 3 October 2014

Inchies - Wrist Wrap

Hi there, Caroline here with my take on this weeks theme of Inchies!

I used some stenciled canvas left over from the Love Canvas I made for the dominoes theme, to create the inchies which I then made into a Wrist Wrap!


To create the design on the canvas I used the Harlequin mask with fabric ink.  The harlequin design was enhanced then with beads and buttons and bits!

Harlequin mask
Pop on over to my blog to see more pics and info on the wrist wrap!


Tuesday, 2 September 2014

Black and Purple week with Irit

Hello my dear crafty friends! Irit is here again and this time I am going to show you my second in row jewelry project made for Tando Black and (some other colour) week.
This is our Black with Purple week and I decided to skip the Halloween colours and to make another piece of gorgeous Tando  jewelry with Ann Butler 's Unity Faux Quilting stamps, some inks and a lot of embossing powders and paints.
Her is a final result!


 This a totally wearable piece of art- I added some  glaze over the back of this piece to make it waterproof and I am on my way to make more of those beauties for the next colour weeks.
See you soon again!


 Tando products used

Jewelry oval/teardrop design


Jewelry pendant/leaf design

Tuesday, 19 August 2014

Free For All - Bracelet

Hi!  Its Caroline here with my project for this weeks Free For All theme.


To make this bracelet I used some Tando Creative Leaves as a template.  I drew around them onto shrink plastic!

Leaf Branch with Loose Leaves currently on sale!


I then used a stamp to create the dotted design, punched a hole, and then heated.

They then end up x7 times smaller than before and ideal for jewellery use!

Before and After!

I had such fun with this.  Shrink plastic is one of those things I forget to use but when I do its just wonderful how the shape changes and quite delightful to use.  I am easily pleased. :)

Caroline ♥


Monday, 11 August 2014

Pretty in pink with Irit

Hello my dear crafty friends!
 Irit us here again and this time with my Pretty in Pink project.
 It's sure pink and it's pretty and it's wearable piece of art and I like it as is: to wear and enjoy.
I inked the inner part background with pink ink , stamped a few backgrounds with black ink ,  heat embossed the outer part with light pink powder and added some pearls and the ribbon.


For the stamping I used Ann Butler's made in Unity Faux Quilting stamp sets  and Ann Butler's Crafters Ink from Clearsnap in Berry color.


And this is Tando piece used for this project


Sunday, 21 April 2013

Jewelry - Art Pendant

Hello, it's Caro here. For this weeks inspiration I have used the straight pendant, some stamps and UTEE. Hope you like the outcome!


Monday, 15 April 2013

Altered jewelry

Hello, my dear Tando Friends ! Irit is here with more Tando inspiration.
This is Jewelry Tando week and my project  is an altered wearable jewellery piece made with Tando Creative chipboard element and a lot of Prima flowers, blings and even Prima stamp stamped  on the inner chipboard piece. This is a real wearable art and  you can do it too using our perfect jewellery chipboard pieces.


 And as I am totally in love with those Tando Creative Jewelry pieces, I made much much more.
So here is the second Jewelry piece, totally different colours and combination of chipboards.


See your next time for more Tando inspiration!

Saturday, 6 October 2012

Take three - "Weathered Metal" inchies

We're approaching the end of our week of celebrations for Tando Creative's third birthday! In case you're only just joining us, here's a summary of the week so far: 
  • To take part in a our fabulous Retailer blog hop just click HERE. 
  • Gez and Caro started our tutorial series with THESE fantastic projects.
  • Carol added her great take on the printer's tray HERE.
  • Karen showed us a fabulous Key Holder project HERE
  • Dana entered into the party mood with some cupcake toppers and Kaz encouraged some quiet contemplation with a bookmark HERE
When Di asked us to work with three of something to celebrate this week, I thought small. Tando Creative inchies are a lovely weight to work with and make a great base for jewellery.

I've used three inchies with an embossing folder and some VerDay paint to create a weathered copper finish for a pendant base.

If you'd like to have a go, hop over to the Classes Blog for a short video tutorial. While you're there, you could check out the other classes that have been added this week if you haven't already seen them. Don't forget that if you show us your take on any of the class projects you'll be in with the chance of a prize!

Thanks for stopping by!

Saturday, 4 August 2012

Metallic inchies necklace

Continuing the metallics theme at Tando Creative this week, I've use three inchies to make a pendant using UTEE, Perfect Pearls, acrylic paint, a stamp and some jump rings. The surfaces are quie shiny so it was a bit of a nightmare to photograph but I hope you get the idea!

Full details of materials etc are in this post on my blog if anyone would like them.

Thanks for stopping by today!

Tuesday, 24 July 2012

In a roundabout way!

Some of the design team have been going round and round this week as we've chosen the theme of circles for our inspiration - lots of scope here!

I've used the fused circles of one of the jewellery shapes and married up with a theme that continues to be popular for a steampunk style pendant.

Complete list of supplies etc is in this post on my blog if anyone would like it.

Pop back later this week for more inspiration in the round from some of my talented design team buddies.

Thanks for stopping by!

Friday, 4 May 2012

Brooches with fabric!

Helloooo, I am always surprised at just how versatile chipboard can be if you set your mind to it :-D  I had a delve in my Tando goody bag and found a couple of odd leaves and butterflies.  I covered them with fabric and made 2 'shabby' brooches.


There are 2 chippie elements on each which were fabric covered and allowed to fray.

Thank you for taking a looksee!  HUGS, Karen x

Thursday, 20 May 2010

Dragonfly dreams

I love dragonflies, if I spot one when I'm out on a walk I can happily stand and watch it for as long as it stays in sight! I thought the new large dragonfly shape would make a lovely brooch.

To mimic a little bit of the iridescence of the wings on the real deal, I melted three coats of clear UTEE onto the wings and when almost cool, I rubbed several different Perfect Pearls colours on there. I remelted and added more Perfect Pearls to build up the colour depth and finally remelted and pressed a stamp into the molten UTEE to create some texture. I wiped a tiny bit of pearlescent acrylic paint over the high spots of the textured wings.

The body was coloured with a black marker and then I added Glossy Accents and a row of Dew Drops to finish it off before gluing on a brooch back.

Full details of supplies etc are in {this post} on my blog if anyone would like them. Thanks for stopping by!

Monday, 29 March 2010

Catchin' a wave

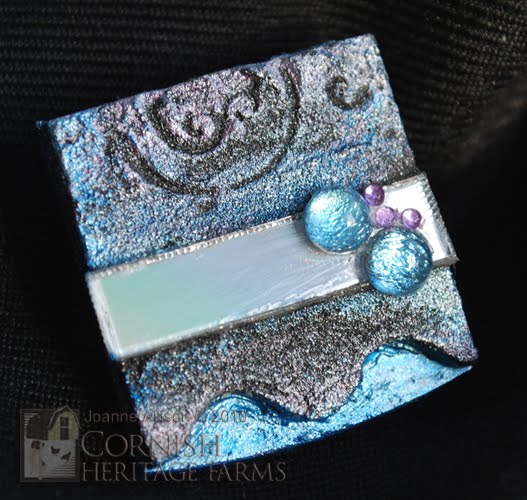
Hello, Joanne here - very excited to be joining the talented ladies on the Design Team and continuing the journey that Carol and I started with testing the white board shapes!

I have another piece of inchie jewellery to share with you today - a brooch made with the wavy inchie and an old CD (you know, the freebies that come with magazines etc).

I coated the inchie in Ferro paste, stuck on a strip of CD, stamped into the paste and then sponged on some Precious Metal paints once it had dried. I cut another piece of CD to make the base and took advantage of the edge of the circle to get a gentle curve on the base of the brooch. A couple of flat back gems and some teeny tiny nail art gems finish it off.

I've added details of the stamps and products used to my blog {here} if anyone would like them.

Thanks for stopping by for my first "proper" post!