Sunday, 6 February 2022

February Kit of the Month - Tando Twirly Whirly Art Stand No 1 by Art Angel


When I first saw the Tando Twirly Whirly in its naked form I thought Wow! Just wow!! What a brilliant idea!! Think of it as a shadow box or a printers tray except you have four spacious cubby holes to fill to your hearts content, five if you include decorating the top. your options for using this are only as limited as your imagination. As an added bonus the whole thing is rotating, so all sides are very easily visubly, put it on a motorised lazy susan and you dont even have to turn it for a magnifucant display!

Putting the piece together is easy and Di has put together a detailed video for you to show how simple is it which i’ll include here I have made a slight adaptation in order to accommodate lights so check out the following steps, its all very straight forward i have just swapped the order of spacers so i have more clearance at the bottom so that the lights don't cause an obstruction when spinning


First of all go through your pieces , make sure everything is present and correct and lay your pieces out so you know which order you are going to put them together in


I chose to give mine a coat of Deco Art carbon black chalk paint, you do not need to gesso first


Assemble your “H” pieces paying attention to where you position you tabs and notches as per Di’s video, tabs sit towards the centre, with notches towards the outside edge so that your cross piece fits securely 

 I used a big bite hole punch from we r memory keepers to punch a total of twenty holes to house my led rice lights, but you could poke through with an awl into some blue tack


I inserted the rice lights into the holes and secured the wiring on the back with red liner tape, you need to use a good strong tape that will stay stuck as you don’t want the wire to obstruct spinning

This is what the under side looked like

To begin assembly, i glued the three rings together and clamped them until dry, i then mounted these onto the large full circle. I inserted the bolt through the circle that has the larger hole in the centre  and then glued this to the ring base


This is the bit where my construction differs slightly as i used the two smaller circles, that Di used on the top of her piece, here to provide the extra clearance to accommodate my lights wiring


I then attached the base circle with the lights in followed by all four H pieces, making sure the notches and tabs were aligned correctly with notches at the top and nearest the outer edge. I found it much easier to build up by placing the base over the bolt, the adding H pieces and then the cross piece rather than building this middle section as one unit and trying to align the bolt with the hole. If you do build the middle section as one piece then try to put the whole section over the bolt i would suggest using your pokey took through the hole in the cross piece to hold your bolt still then sliding it on


Use pva on cross piece to glue top circle in place, avoiding the centre square


I used Dark Arts Backing papers from Magik Graphics to cover my top two circles. I placed the grey board onto the back of the papers and drew round in pencil, cut them out and adhered with Deco Art Matte Medium, then gently sanded the edges for a more professional finish


I also cut 8 panels from the same papers to adhere to the inside walls, again i used matte medium to adhere to each side of the H pieces


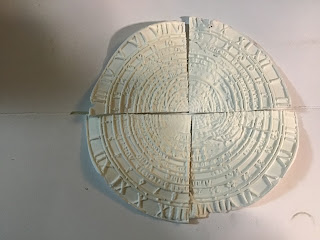
I had previously used Hearty Soft clay in some of the Stamperia Alchemy moulds to create various pieces that could  be used to decorate my piece, this piece i cut into four as i wanted one piece in each section


These were painted black, and decoart metallic lustre was used to bring out all that texture, i adhered these to my art stand using a hot blue gun

I used a mixture of Tim Holtz pieces,  Stamperia Alchemy papers and clay casts, Dr Hoggarts Medicinal Madness Papers from Magik Graphics on brown glass potion bottles and bits from my stash to decorate insides and top, a glue gun was used to create lots of dribbles spilling from the potion bottles which was then painted with gold paint


Hope you love the finished product as much as i do. I loved creating this so much i’ve done a second one!!! Look out for the blog post on that x x

Items used 


Stamperia alchemy moulds and papers
Magik Graphics Dark Arts Backing papers
Dr Foggarts Medicinal Madness Topper Sheets from Magik Graphics
Pva glue
Led rice lights
Glue gun


Saturday, 5 February 2022

February Kit - Twirly Whirly by Zoƫ Sanderson

Hello, it is my turn today to share my take on this great kit.  At first this one really had me none plussed so before getting started I really had to think about it.  There are 4 sections to the wheel so what comes in 4s?

The 4 Horsemen? 

The 4 Seasons

The Cardinal points on a Compass

The Suites in a pack of cards.

When the kit arrived the first thing I did was dry assemble it.  There were a couple of reasons for this the main one being to get an understanding of how it will all fit together as there are couple of things you need to be aware of.


There is a base (not in the picture above) that come in 4 parts plus the turntable the large circle above. then there are the compartments and the top divider that helps secure them from above.  With the compartment ends, in each section there is a narrow piece with tabs top and bottom that is the inner end.  the outer end has a tab and a slot the 4 arm piece fits into that slot on the outer but takes a tab on the inner.  When you start gluing them all together it is important that you make sure each section piece has one of each kind of narrow piece attached.


In the picture above you see the top and bottom sections.  The bottom is a solid circle with 3 rings on top this makes space for the long bolt head that everything else fits over.  The top is in 3 pieces each smaller in diameter and with a central hole for the end of the long bolt.  When assembled there is a butterfly screw to hold everything in place on the bolt.

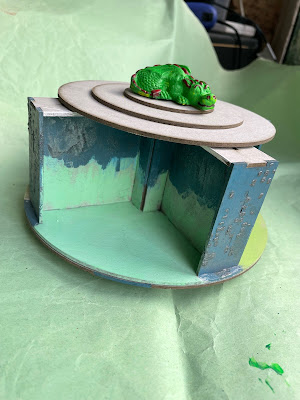
First of all then the 3 main elements were stuck together, ready to be painted.  I did take a photo of this stage but my iPhone camera decided to make it a 1 second movie which will not upload here, sorry.  The stage was with all the compartments completed but before the top arms were added, made it easier to paint.  Anyway when I looked at it like that a fort came to mind and for a while I considered not putting any of the top on.

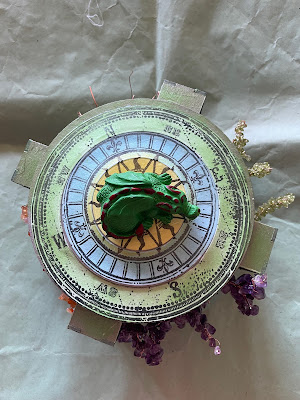
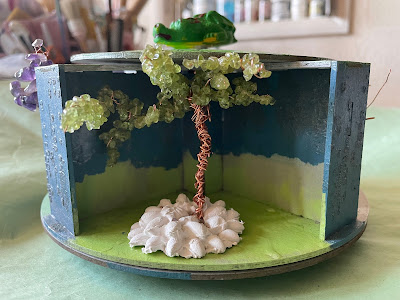
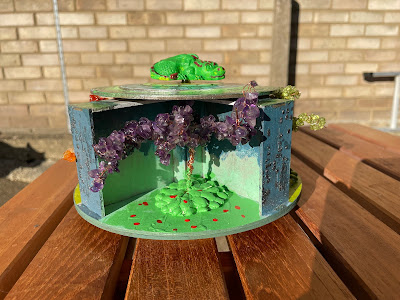
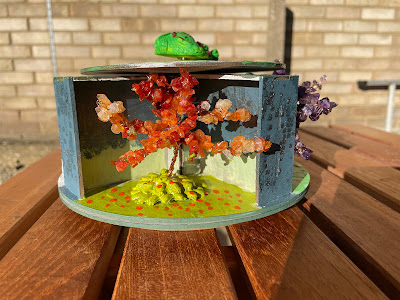
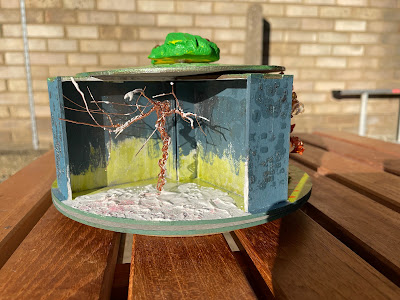
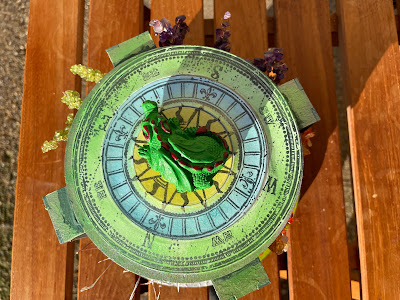
The fort idea also solved a couple of other issues the paint work became fort walls with plant life at the bottom and the theme became the 4 seasons.   After fiddling around with air dry clay models and things the idea of making a wire tree for each section presented itself.  With that an old compass stamp suggested itself for the very top and the dragon as a weather vane.


Main body painted, a stencil used on the ends with an embossing paste and mica powder.


The compass stamp die cut into 3 sections slightly smaller than the top circles so the larger 2 are attached to the one above and then "their own" part.  This helped blend the top into one piece.   clay dragon hollowed out to sit on top of the bolt.  Butterfly screw not needed in this case.


First tree Spring with Peridot and then I needed to make it stand up.  Air dry clay moulded in a broach mould and while wet the tree pushed into it.  That works so just 2 more moulded pieces needed.  Winter is a bare tree that was attached with heavy body gel medium.


Summer with Amathyst


Autumn 


Winter, Structure paste


North is Winter, East is Spring, South is Summer and West, Autumn.

Although it was January it was a lovely sunny day so the back garden was the perfect spot to take the finished piece pictures.

For me this was a little more challenging than most but that made the final result even more of a pleasure.  

Products used.


Various Gels and Pastes

 Gem stone chips, copper wire, air dry clay and other elements from my personal stash.


Friday, 4 February 2022

Tando Advent box by Art Angel


These advent boxes make such lovely quick projects that can be used for a whole variety of things as well making a full advent calendar for yourself or to gift


Firstly lay out all your pieces and arrange them ready to glue, you will have a box back, two sides, a top and a bottom as well as a drawer back, a base, two sides and a front
When you are confident that you have identified all your pieces and have them in the right place, glue together using a good pva glue.

One should slot easily inside the other


Next i base coated my boxes using decoart lace chalk paint


I wanted to decorate my box using rice paper, so took a sheet of A4 and split the design to work with my project


It is best to wet rice paper with a clean brush and pull apart gently where you want it to tear, this leaves a feathered edge with is much easier to blend into the background of your piece rather than having blunt cut lines


i wanted to use the top and bottom of the page to decorate the sides and top of my box as well as the sides and inside back panel of my drawer, so needed six pieces in total


I split both the top and bottom sections into three pieces each so that the design was cohesive throughout, as the bottom centre panel was the only one to incorporate a pine branch i chose this piece for the inside back panel of my drawer


I adhered the panels by applying matte medium to the surface of the box and to the reverse side of the rice paper, by coating both surfaces you have the ability to slide the paper slightly to get it in the right position, smooth out any air bubbles or creases by using a soft brush, brush from the centre to the outside edges applying even pressure


I applied the main focal image in the same way, to the drawer front


I then applied crackle paste randomly to the sides and top of the box and front panel of the drawer and left to dry, when dry i rubbed decoart metallic lustre in silver into the crackles to highlight all the cracks and along all edges.


I love the effect the finished box has and can’t wait to make another!

I have used


Rice paper and pva glue


Thursday, 3 February 2022

Valentine Heart Tag by Bernadette


Good Morning!!

My post today is a Valentine Heart Tag.  I have used a size 10 Tando greyboard tag https://www.tando-creative.co.uk/TAGS120X60.html and some hearts from the grab bag of hearts https://www.tando-creative.co.uk/GRBBGHEARTS.html  

This project could easily be adapted to make a card front instead of a tag.  I'm just a bit of a tagaholic, so any excuse to get the tags out and I'm there!  The photos aren't the best.  I was working in my craft room at night so the colour isn't great.  Check out the Tando's Creative Zone on Facebook and the #tandocreative on Instagram for more pics.

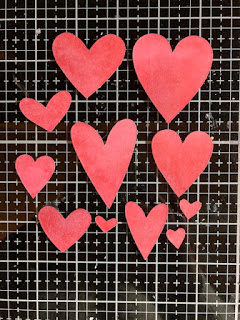
The first thing I did was to spray a piece of card with some distress ink and oxide sprays.  I wanted the depth of colour to vary which is why I used ink and oxide.  The colours I chose were kitsch flamingo, picked raspberry and a bit of fired brick. I then die cut some hearts in different shapes and sizes.  I used a Tim Holtz die, buy any different size heart dies will do the same job.


I then selected some of the die cut hearts and did some stamping on a few of them using a script stamp and black ink.  I used an ink blending tool to edge the hearts in black.


Next, I painted the tag with white gesso, then covered it with bits of paper cut from an old book and dictionary.  I sprayed it with the same ink and oxide sprays I had used for the hearts, stamped randomly all over with the same script stamp and black ink, then highlighted the edges with black ink and a blending tool. I dabbed the blending tool with the black in a couple of areas on the tag to break up the pink a little bit and to add a bit more of a grungy look.


The hearts I chose from the grab bag were all painted red.  I wanted different textures so on one I added some glossy accents then sprinkled a bit of glitter into it before it set.  On another, I just stamped with the script and edged it in black and on the last one I added some translucent grit paste then dabbed some red paint over the top when it was dried.  


For the 3 die cut hearts in the photo below I decided to add a bit of shine.  I used embossing glaze on the top one, a translucent crackle paste on the middle one and glossy accents on bottom one (photo below).


I edged all the hearts using black ink and a blending tool then placed them randomly on the tag before I decided where I wanted each one.  I used PVA glue for the card hearts and matte gel for the greyboard hearts.  I then just added a simple sentiment at the bottom.


I would love to see any Valentine makes using Tando goodies - cards or tags.  Please be sure to post your projects in Tando's Creative Zone on Facebook or on Instagram using #tandocreative

Bye for now!  I'll be back next week with another Tando heart project


Bernadette xxx