Thursday, 3 March 2022

Tando on Create & Craft tomorrow 4th March 2022 - by Zoë Sanderson

Good morning, don't know if you have heard but tomorrow at 9am Di, Mrs Tando herself will be live on the newly combine Craft Shopping channel.  She is taking some absolutely brilliant samples from the team to show what can be done with the products and will of course be demoing herself.   Hope you can tune in or catch up later Di's presentations are always popular.


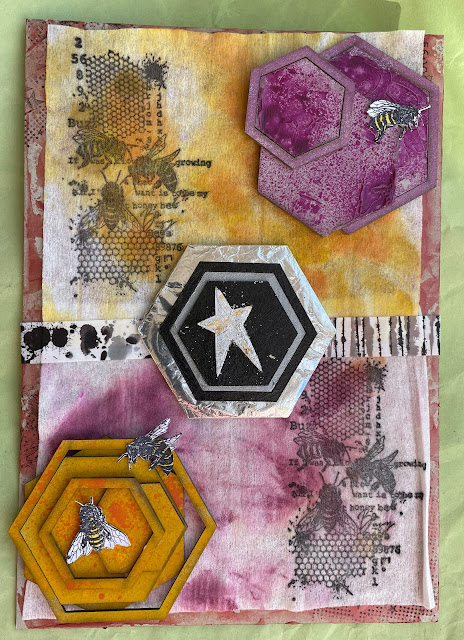
Thought I'd share a step by step with you by way of a teaser, using just 1/2 of the Tando Hexagon kit.  This is a 3D mixed media wall hanging.   The starting point an A4 size sheet of Tando Grey Board.


This is the humble board that all the wonderful shapes, designs and kit parts are cut from.  You can also buy just these bare sheets.  Believe me this stuff will take a battering, what ever you throw at it this board will take it.  


First Layer in this case a mix of Modelling paste and some Mica Powder.


Before you spread it, it looks quite yucky but once applied the textures and tones in the mix can be seen and are interesting.  While it was still wet some Brushos were sprinkled over for added interest.  Sadly as the project progressed this background did not fit in and was covered.  Thought I'd show you the process as it is something you want want to try for yourself.


Back to the elements that I did use and which can be seen on the finished project.   As mentioned I've only used 1/2 of a Hexagon set, that in turn was split into 3 groups.

1st group
 

 These were sprayed first with DecoArt Media Shimmer Mister in Yellow.  Then again with the just their Mister in Orange.
The glass work surface was first mopped up with a couple of journal pages for future use.  There was still paint there so a baby wipe cleaned up the rest, more about this later.

For the next set the frames are reversed and it is the middle hexagon that has a frame.  The base one has been covered with kitchen foil.   The middle one painted with Silver Modelling Paste, a black fluid/paste used on the frame.  The top hexagon has a star attached, it was also going to be covered with foil but the pre-used foil (not used for cooking but hair colouring) was to fragile and later on that idea was abandoned.


For the third set it was back to the shimmer spray, this time in Violet.  First the Hexagons were covered in part with the modelling paste to give more texture and an uneven spray finish.


Once again the over spray was mopped up with both journal pages and baby wipe.

Hexagons will put you in mind of bees and their honey combs, for this project the inclusion of bees felt right.  An AALL and Create stamp provided just the right sort of image and fussy cut details I wanted.  First the entire image was stamped once onto each of the now dry baby wipes.


It was also stamped onto a scrap of white card and the 3 main bees fussy cut from that.  Time to start finishing.  Everything laid out on the A4 board, the baby wipes glued in place with gel medium and a piece of AALL and Create tape placed across the middle.  the tape is in fact torn so that the two pattens show each side of the middle Hexagon set, without the next patten on the roll creeping in.  I just love the almost jarring effect this use of the tape gives.


I needed to find another way to decorate the middle hexagon and decided to cover the star with a silver and gold gilding flake mix.  The actual hexagon was painted in with the same medium as the frame.

All finished the various pieces were glued into place.  On the reverse is a hook, it came with a bra from a well known high street store that sells cloths for all genders and ages along side some rather tasty food.  Fixed it in place with Silicon glue.


Now don't forget tomorrow 4th March 2022 at 9am our Di is on the telly with among other things lots of the teams different Hexagon samples.  Enjoy.

Products Used


Stamp, Baby wipes, Mica Powder and anything else from my personal stash.

Tuesday, 1 March 2022


Hexagon Tuesday - Matchbox with Hexagons by Bernadette


Happy Tuesday Everyone!  Today I am showing a large matchbox using the hexagons as my main embellishments.


I started by constructing the matchbox outer and inner parts.  https://www.tando-creative.co.uk/matchbox-large-with-inserts.html


I then selected some of the greyboard hexagons - some solids and some frames. https://www.tando-creative.co.uk/HXGNS2022.html I used one of the solid shapes to draw around a bit of cardboard packaging and die cut some card with a hexagon die.  The photo shows some hexagon die cuts (bottom right) but in the end I didn't use those.


I painted the outer and inner matchbox pieces with a thin coat of white gesso and glued on the die cuts.


I then painted the matchbox and solid shapes with a vintage pinky/cream paint. For the largest hexagon I added some crackle paste through a hexagon stencil. I then laid everything onto the matchbox cover and decided which pieces would go where before gluing anything down.


I decided to paint the hexagon frames black to make them stand out, then using some Tim Holtz stamps I stamped randomly with black ink.  I took a distress ink blending tool and gently added some black soot distress ink to highlight some of the raised areas and edges of the solid hexagons and the matchbox itself. I cut some butterflies from a paper pad in my stash and once I had glued the hexagons in place, I added them. 


I wanted the drawer of the matchbox to contrast the outer cover so painted it black all over.  I added a piece of decorative paper to the bottom and attached the paper with the butterflies and the sentiment with 3D foam pads.  


The matchboxes are ideal to give as a gift, to give with a gift inside for a special occasion, or "just because".  

Bye for now!

Bernadette xxx


Friday, 25 February 2022

Art Box by Bernadette


Good Morning Everyone,  Today I am showing you one of the new art boxes which will be showcased on the Craft Store during the Tando show on 4.3.22 at 9.00am.

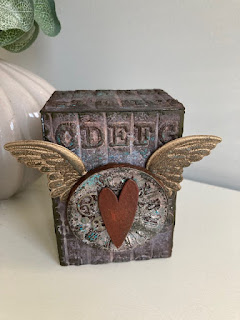
When my art boxes arrived, I decided to put them all together first before I decided what to make with them.  They are really easy to put together with a good PVA glue. The boxes come in 2 widths and 3 sizes, this is the smallest of the boxes.

After gluing the box together, I measured the sides I was going to cover with cardstock and cut the card to those sizes.  

I used a mixture of distress oxide inks and sprays to colour the card: vintage photo, frayed burlap and walnut stain then ran the pieces of card through my die cutting machine in a Tim Holtz 3D embossing folder.


I then took some salvaged patina distress paint and dabbed it over bits of the embossed card using my finger.  Once the paint was dry, I lightly ran a clear embossing ink pad over the embossed letters and heat embossed some walnut stain embossing glaze.


When I came to stick the pieces of card to the box, I found that they were slightly smaller than the surfaces of the box because of the embossing so I painted the box with black gesso.  I chose black gesso so that when I glued the pieces of card to the box, there wouldn't be any gaps showing bare greyboard. Once the glue was dry, I ran a walnut stain distress crayon along the edges where the gaps were between the pieces of card to fill in the space.


I then stuck the pieces of card to the sides of the box and decided to use the die cut wings, a Tando heart and a clock face mould as my embellishments.  I painted the heart black mixed with some red to make it really dark but with just a hint of red.  I used my fingers to add some cream, brown and turquoise paint to the clock face which I had moulded using air dry clay.  I die cut the wings with a matte gold card then rubbed a distress crayon over the raised areas to give them an aged look.


I then attached the wings, clock face and heart to the front of the box using PVA glue.


I can't wait to get working on more of these boxes - they are so versatile!

Take care and have fun crafting.


Bernadette xxx


Thursday, 24 February 2022

Using up some left overs - By Zoë Sanderson

This is not so much a project as a play with Tando bits and pieces.   Casting around for something, anything, to get inky and messy with my box of Tando provided some food for thought!   The end result is this journal page.   Which makes me smile every time I look at it, the bright bold colours and the naive style is very appealing.  Added to which it was a lot of fun!  If precise, neat and tidy is your thing then this is not for you.  But if you enjoy just messing around with no finale plan in place and prefer a more playful organic approach then you might find a few ideas here.


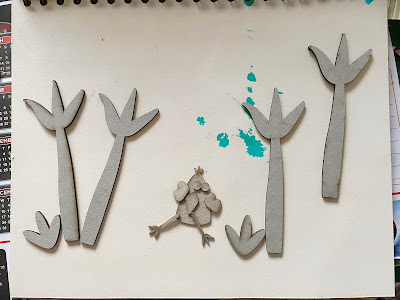
Having discovered the parts left in the Large Whimsical Birds kit (to be seen on TV 9am 4th March 2022) it occurred to me that they do not have to be legs and feet or cockerel combs but could also be plants/weeds/growing things.   So I laid them onto a blank journal page and added another Whimsical Bird to start my layout.


Pieces removed out came the watercolours and sprays to start a background.  Different shades of blue applied with a water brush and randomly brushed across the page.   Then the "plants" were put in place and strayed with yellow and white.


Then I started choosing colours to work with, in the end I used every single on in the picture below.   Strong Bright Bold Cheerful colours an antidote to the overcast wet and windy weather we have been subjected to recently.


By now some other Tando pieces had been pulled out, another Whimsical Bird Some Butterflies and a couple of Flowers.   Everything given a coat or two of acrylics right out of the pot.  It is not clear in the picture(s) but both of the Whimsical Birds and both flowers were given a top coat of the Interference paints.  These paints add a second tone that shows up as the page moves in the light.


When the "plants" were moved after spraying the masked areas of the page stood out bright and so I decided to offset the Tando pieces to allow the unsprayed parts of the page to peep through.  Everything attached with normal adhesive except for the now purple bird at the bottom of the page, on this one a glass gel was used on the main body which enhances the Interference further and gives the bird a very glass like finish.


To me there is something of an underwater world about this page but you might see it very differently.  Thats all part of the fun of an organic page like this.

Products Used

DecoArt Media Acrylics in Various colours
DecoArt Media Interference in Various colours

Watercolours, Sprays, Adhesives and Glass Gel all from my stash.
Tuesday, 22 February 2022

Fly free Hexagon Wall Hanging


Fly Free Hexagon Wall Hanging


Materials

Embossing folders, swirly and honeycomb

Copper Sheet

Wallpaper

Distress oxide spray in Burlap and speckled egg

Creative Expressions metallic gilding polish in gun metal & copper or metallic Lustre's

Decorative image, Peacock

Strong Glue

Metal embossing tools

Vintage 12 x 12 scrapbook paper


Instructions


I began by adding Gesso to a selection of hexagons. I set aside over night to dry.


Once dry I split the hexagons into 4 piles as I had 4 techniques to do on them


Technique 1

I used a strong glue and stuck my hexagons to a sheet of copper metal. Once dry o carefully cut them out with a craft knife. I gently ran a paper stump around the edge to remove any sharp bits.


Next I put each hexagon into a embossing folder and put it thru my bigshot machine. I rubbed metallic gilding paste over the embossed part to take the shine of it and give it a aged look. I also took a metal embossing tool and ran it around the edge to give a border pattern.


Technique 2

Next, I covered a selection of hexagons in a lovely art deco wallpaper that was spare from my living room. I doodled around the edges and inked in black


Technique 3

I again covered some hexagons in wallpaper but this time I painted them with Gesso. Once dry I used gun metal gilding paste to give it a metallic feel. I rubbed copper gilding paste over the embossed pattern on the wallpaper to highlight it.


Technique 4

For the last technique I sprayed hexagons and frames with distress oxides. I layered the colours up and sprayed with water to give a variety of colours and speckled look.


Once I had all my hex’s decorated I added top frames that had been sprayed or covered in copper.


I also added frames underneath to give height to some of the hex’s


Next I cover a 12 x 12 board in patterned paper


I added a peacock image to the corner to match my living room theme. I ran copper gilding paste around the edges


Next I took a selection of Hexagons and started to add them to the base board. I played around with them, seeing what looked good next to what etc. Once happy with the layout, do take a picture as you will never remember what goes where, talking from experience here! I glued them on with a strong glue. I also used foam pads to add more depth and layers.


I added tiny painted hexagons and hearts into any gaps that looked bare


And there you go, a lovely bright hexagon themed wall hanging


Thanks for looking


Sarah