Good morning, its Karen here for you today! I have been in sewing mode for this project and LOVED it hahaha! I have been working with a fantastic new set called 'Sew Simple' and made up a picture/canvas for you with the large set.
You can really go to town on this lot or you can just colour them up. They would be brilliant for scrapbooking as they are a good size for 12x12 papers. I turned my canvas round and after painting the edges gold I rummaged through my pattern stock & covered it with old pattern instructions. Then I sprayed over with Cosmic shimmer mists. A bit of lace & an old tape measure completed the canvas ready for the bits to go on top! I have so many bits of fabric (and got a bit confused) that in the end I used my Fiskarette scissors for inspiration on colour combos hahahahaha!
The Dress Form - I attacked the base with various mediums till I got the look I wanted...couldn't tell you what I used if I tried hahaha. Then I padded out the top to make hips & boobs and covered the lot with fabric, pulling it taught as I went. Couldn't quite get the waist in though, sorry! I had a paper measure from a cracker in my stash so cut it in half lengthways & hung it round the neck!
The sewing machine - I made a table out of lolly sticks and treated it the same as the dressform base before sticking it inside the frame. The machine was painted with gesso then Distress Ink's (old paper) added. I used my own machine for inspiration for the decoration of this piece and am pretty pleased with how it turned out!
The scissors - I basically copied my Fiskarette scissors for these and then hung them on a little hook!
The cotton reel - this was 'battered' as before and embroidery thread wrapped round. I added a needle & thread to it before sticking it on.
A banner & sign was added to finish it all off. Hope you like what I have done as I had soo much fun with this. Thank you for looking today, HUGS XXX
Wednesday, 31 March 2010
Tuesday, 30 March 2010
6 x 6 Ring Binder
Hi it's Kaz again, finally with another project to show! I've been working for the last few weeks on one of the Ring Binders. I opted for the 6 x 6 inch folder which comes with a whiteboard cover and 8 chipboard pages.

I wanted to make a folder for my sister and her family that showed the early weeks of their puppy's life, using photos from the breeder and ones I have taken.
The front cover had a really good bashing from me as I took a while to get what I was happy with and, as Carol and Joanne discovered, it can take it!! To start with I put Distress Inkpads onto a board and sprayed water on them, then dunked the cover in. It didn't get the coverage I was after as I think it's a bit too big for this to work. Next I applied the DI's using foam, but again, it wasn't quite what I was after - I think I must be very fussy! I then applied gesso over the cover and once dry, gave it a bit of a rub with fine sandpaper to get rid of some obvious brushmarks. I then put a circular mask over the front and sprayed using Glimmer Mists, then did a bit of doodling. You really wouldn't know the battering the folder went through to get to where it is as it still looks in great condition!

I've added a photo, grungeboard letters and die-cut flowers to the front and decorated the whole book with MME Pretty Please papers and Bazzill card.
For the inside covers, I simply painted a couple of coats of gesso and sprayed Glimmer Mists over a circle mask before doodling and adding photos.

As I used dimensional decorations inside, I used just 6 of the chipboard pages which leaves 2 for any other project. They are already hole punched so you could make wall hangings from them along the same lines.

I glued the patterned papers onto the pages and filed the edges to neaten them, then doodled and added photos and decorations.

I'm not a scrapbooker at all, so I used the same LO for all of the pages as it gives it uniformity.

I love this photo of Jess as she had just come back from a walk in the woods where she met some of her other puppy friends and they had a great time! She is a very good girl and knows to sit to have her paws wiped. On this occasion, she needed just a little bit more than paws! I thought this was a good last page as it shows how she's settled in with her new family, where she it totally adored.

Kaz xxx

I wanted to make a folder for my sister and her family that showed the early weeks of their puppy's life, using photos from the breeder and ones I have taken.
The front cover had a really good bashing from me as I took a while to get what I was happy with and, as Carol and Joanne discovered, it can take it!! To start with I put Distress Inkpads onto a board and sprayed water on them, then dunked the cover in. It didn't get the coverage I was after as I think it's a bit too big for this to work. Next I applied the DI's using foam, but again, it wasn't quite what I was after - I think I must be very fussy! I then applied gesso over the cover and once dry, gave it a bit of a rub with fine sandpaper to get rid of some obvious brushmarks. I then put a circular mask over the front and sprayed using Glimmer Mists, then did a bit of doodling. You really wouldn't know the battering the folder went through to get to where it is as it still looks in great condition!
I've added a photo, grungeboard letters and die-cut flowers to the front and decorated the whole book with MME Pretty Please papers and Bazzill card.
For the inside covers, I simply painted a couple of coats of gesso and sprayed Glimmer Mists over a circle mask before doodling and adding photos.
As I used dimensional decorations inside, I used just 6 of the chipboard pages which leaves 2 for any other project. They are already hole punched so you could make wall hangings from them along the same lines.
I glued the patterned papers onto the pages and filed the edges to neaten them, then doodled and added photos and decorations.
I'm not a scrapbooker at all, so I used the same LO for all of the pages as it gives it uniformity.
I love this photo of Jess as she had just come back from a walk in the woods where she met some of her other puppy friends and they had a great time! She is a very good girl and knows to sit to have her paws wiped. On this occasion, she needed just a little bit more than paws! I thought this was a good last page as it shows how she's settled in with her new family, where she it totally adored.
Kaz xxx
Monday, 29 March 2010
Catchin' a wave
Hello, Joanne here - very excited to be joining the talented ladies on the Design Team and continuing the journey that Carol and I started with testing the white board shapes!
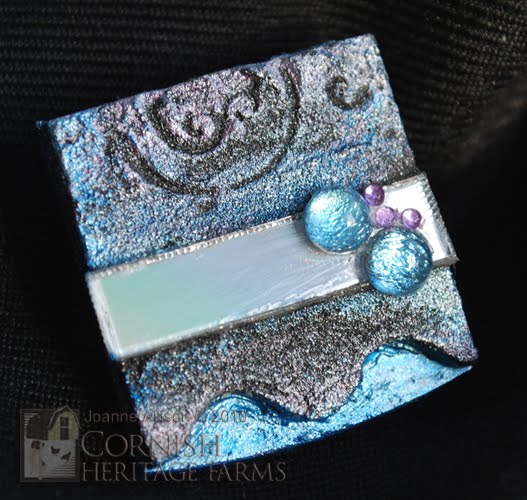
I have another piece of inchie jewellery to share
with you today - a brooch made with the wavy inchie and an old CD (you know, the freebies that come with magazines etc).
I coated the inchie in Ferro paste, stuck on a strip of CD, stamped into the paste and then sponged on some Precious Metal paints once it had dried. I cut another piece of CD to make the base and took advantage of the edge of the circle to get a gentle curve on the base of the brooch. A couple of flat back gems and some teeny tiny nail art gems finish it off.
I've added details of the stamps and products used to my blog {here} if anyone would like them.
Thanks for stopping by for my first "proper" post!
I have another piece of inchie jewellery to share
with you today - a brooch made with the wavy inchie and an old CD (you know, the freebies that come with magazines etc).I coated the inchie in Ferro paste, stuck on a strip of CD, stamped into the paste and then sponged on some Precious Metal paints once it had dried. I cut another piece of CD to make the base and took advantage of the edge of the circle to get a gentle curve on the base of the brooch. A couple of flat back gems and some teeny tiny nail art gems finish it off.
I've added details of the stamps and products used to my blog {here} if anyone would like them.
Thanks for stopping by for my first "proper" post!
Saturday, 27 March 2010
Only 5 days left...........
Just to remind you.....you only have 5 days left to enter our March competition.....look for the link on the left at the top.
At the moment you have a REALLY GOOD chance of winning as we only have 2 entries LOL so....go on.....have a go.
Friday, 26 March 2010
Exciting news................
I have some really exciting news to give you today.
As you know, Carol Plume and Joanne Allison have been doing some testing on our new white lined board as guest designers over the last few weeks.
I'm sure you'll agree that they have been producing some amazing pieces of art and, I for one, was so disappointed yesterday when it was their final blog post as I had really looked forward to their twice weekly creations. They have introduced me to the most amazing products and have been truely inspirational.
Well, I am delighted to tell you that they have both agreed to stay on permanently on the Tando Creative design team. They will be doing 1 or 2 projects each a month for us which is absolutely fabulous.
They will be joining our already incredibly talented team, Caroline Scattergood, Karen Gist, Kaz Boughton and Sharon Sim.
And if you're not getting enough of our amazing team here then why not pop on over to their blogs where you will find endless projects to admire and inspire.
Thursday, 25 March 2010
Our last Technique Thursday...
Today sees the last of Joanne and Carol's technique's on white board....we have both enjoyed using the different pieces and using different products to see how well it performs and we hope that we've encouraged you to try your own techniques on some too...
So, today its a "Free for All" session:-
Here's Carol's piece:-
The base is the wavy edged arch and distress inks were applied direct to the board using a blending tool...several colours were used, but, kept separate rather than merged together. The lady stamp was then stamped ontop of the inks.....and her skirt coloured in using watered down distress ink...she was then masked off and the foliage stamp stamped over.....this was hi-lighted using a glitter pen...the edges of the arch were then daubed with gold acryllic and the woman coated with glossy accents.
Joanne has created this gorgeous piece:-

The base was coloured using adirondack dye inks and the text stamp stamped with the same ink. Along the bottom a layer of terra was applied and then heated until it bubbled, acyrllic paint was then used to hi-light the area. Beads, wire and stems were added and a gorgeous dragonfly added to finish off the piece. Pop on over to Joannes blog here for more information.
Thank You all for visiting our technique posts - we hope that we've inspired you to try the different shapes and techniques.
Please leave a comment if you've used any techniques and we'll pop on over and see what you've created.
Happy Crafting....
So, today its a "Free for All" session:-
Here's Carol's piece:-
The base is the wavy edged arch and distress inks were applied direct to the board using a blending tool...several colours were used, but, kept separate rather than merged together. The lady stamp was then stamped ontop of the inks.....and her skirt coloured in using watered down distress ink...she was then masked off and the foliage stamp stamped over.....this was hi-lighted using a glitter pen...the edges of the arch were then daubed with gold acryllic and the woman coated with glossy accents.Joanne has created this gorgeous piece:-

The base was coloured using adirondack dye inks and the text stamp stamped with the same ink. Along the bottom a layer of terra was applied and then heated until it bubbled, acyrllic paint was then used to hi-light the area. Beads, wire and stems were added and a gorgeous dragonfly added to finish off the piece. Pop on over to Joannes blog here for more information.
Thank You all for visiting our technique posts - we hope that we've inspired you to try the different shapes and techniques.
Please leave a comment if you've used any techniques and we'll pop on over and see what you've created.
Happy Crafting....
Wednesday, 24 March 2010
KARENS FRAMES - PART 2
Hi, its Karen here with the 2nd lot of my frames! These are fabby liitle frames as you can use them on any project to add an accent! Here are the ones I used today...
For the Double Arch frame I just painted it with Distress Inks then spritzed with gold glimmer mists. Its been mounted on a little recycled chocolate box that was already covered in gorgeous papers! I added some leaves & roses and put the tiddly push out hearts onto wires. Though they do look a bit like antennae hahaa
I did the same treatment on the 5 Hearts frame too but this time used it on a card...
Lastly comes the little Arch frame...I think this is my favourite! I have embossed this one with gold and added it to a tealight holder, along with some white embossed stamped images...
If you would like more info on the stamps etc that I used then pop over to my blog soon!!! Thank you for looking today, HUGS XXX
For the Double Arch frame I just painted it with Distress Inks then spritzed with gold glimmer mists. Its been mounted on a little recycled chocolate box that was already covered in gorgeous papers! I added some leaves & roses and put the tiddly push out hearts onto wires. Though they do look a bit like antennae hahaa
I did the same treatment on the 5 Hearts frame too but this time used it on a card...
If you would like more info on the stamps etc that I used then pop over to my blog soon!!! Thank you for looking today, HUGS XXX
Subscribe to:
Posts (Atom)