Wednesday, 31 July 2013

Heart tray:Hearts and Swirls

Hello my dear crafty friends! IRIT is here again and this time with my Heart inspiration.
Not very hard. I am a vintage girl after all, so I made this pure vintage style Tando Creative Heart tray and filled it with all possible " like" Vintage products from Prima.


It's so easy to make a great vintage project with Tando Creative trays! Just pick one and make it your own piece of art!

And here is this wonderful tray

Hope I inspired you with my lovely heart project and see you soon again!

challenge blog - July

Hello Tandoettes,

Just a little reminder that there are still a couple of days left for you to take part in this months challenge blog....pop on over and join us....

Tuesday, 30 July 2013

More Hearts and Swirls!

Hello, its Karen here with another set of HEARTS and SWIRLS, this time used to decorate a little 3x3inch wooden box.  Tando have a massive variety of hearts and swirls for all tastes.  They are always useful for adding that finishing touch aren't they?  If you use them a lot why not go for one of our GRAB BAGS?  Or for dinkier versions try our MINI'S in a bag!  Onto my box...


A better view of the top....


I have used 2 hearts from our MINI pack range and one FLOURISH no8 and painted them the same as the box so that they give a relief rather than a contrast.  See how many hearts you get in the bag for a couple of pounds...
Tando Mini's - Hearts
 
Flourish 8 Small

I have also decorated the inside and used a larger heart...


More details can be found on *MY BLOG* .  Pop back tomorrow for another set of hearts and swirls, HUGS, Karen x

Monday, 29 July 2013

Hearts and Swirls: So chic !

Hearts and swirls is our theme on the Tando Creative blog for this week...And it's Coco already back today to start with it LOL ! I illustrate it at a slow pace as I don't have any chipboard heart yet, and used only one swirled lovely flourish... So I'm really looking forward to seeing what our DT come up with and I hope that you'll pop back and join us...

I couldn't pass my turn, that's a sooooo perfect theme for nice girls like my niece on the photo !! She is an adorable and very girly little person. I decided to make a very colorful scrapbook page for her with a beautiful Tando Flourish and a lot of little hearts stamped on a jarI'm planning to offer it for her birthday coming soon, I'm sure she will LOVE it !!!


I inked my large flourish it with Versamark and then covered it with small amounts of different embossing powders in shades close to the colours I fancied. I used Dusty Concord Distress powder, Zing Lavender (American Crafts) and "Bleu Layette" (Aladine). I heat embossed the mixed powders (don't forget the edges as this beautiful chipboard is rather thick). Then I took my Perfect Pearls Forever Blue and using my Versamark pen and a thin brush I applied it in subtle ways.

If you want more details on the material I used and more close-ups, pop on over to my blog

Have a wonderful sunny day ! Hugs, Coco xx

Sunday, 28 July 2013

Bzzz.... A wooden frame of bees in Summer !

Good morning all ! That's the end of week on Winged Things, and my turn (Coco) to illustrate this theme very inspirful. As soon as I read the theme, I knew exactly which products I wanted to use: BEES !
I was really excited, I love bees and had already beautiful Bees stamps on purpose... but now I can say that I love even more Tando's ones !!!
I had for a while a pack of Bee Set Large, but no precise idea of what to do with them. Then I received the Bee Set Small, and things became obvious. I chose altering a wooden frame bought for 1 Euro in a discount shop a couple of months ago... So happy with this recycling... cheap, trendy and soooo funny!!!   

Here are some step by step instructions if it can help. I will not give them all the times but I love sharing my experience and I think it's well worth doing it today ! Hope it will inspire you something similar with these wonderful bees and honey jars !! Maybe to decorate a kid bedroom for example... (or keep it for yourselves like me hahaha).
I first covered the plain frame with a light coat of Gesso at every place visible. Then I added a bit of texture using Grunge Paste on my Tando Leaves 2 Mask and another honeycomb mask. Once dry, I started to paint the background and all sides with opaque paints (I used Dabber Willow and a bit of Dabber Lettuce). I then added layers of translucent paints afterwards here and there, and also some Treasure Gold directly using my finger on the textured parts and on the edges. I played with several shades of green paints, especially my Fresco Finish Hey Pesto and Zesty Zinc colours that are translucent - nice effect guaranteed ! -. 
To add interest, I also covered some parts with a darker green colour (Espresso Dabber), and added a thin coat of Crackled Glaze over it before painting these parts again (but let's well dry before !..) in Willow + Zesty Zinc paints... You can see the light and nice crackling effects at the bottom near the jars in particular, I love this technique that I learned from Leandra Franich during a class she made in Paris. 
  

I used one small butterfly of my Butterfly Mask and I inked it with a cut'n dry and my Distress Peeled Paint ink (you can see it on the top left side), and I also stamped some Nature words using the same ink for a tone-on-tone effect. To highlight the edges and the textured parts, I put some Treasure Gold with my finger over them. At this stage, I naively considered my background as finished !! :)

 So... 
I could start painting my bees and the lovely combined elements. I chose one big and two small bees, and one large honeycomb and hive from my two Tando's Bees grab bags. I used lots of paints again (mainly Haystack, Smoked Paprika and Vanilla) + Distress Pumice Stone for the shades and the funny eyelids around the eyes (aren't they cute ?!..).  I drew the wings with a thin black marker and slightly painted them, then highlighted them using a white pen for a bit of transparency. I also added the word "Honey" on the two jars in Archival Coffee and small wooden alphabet stamps.  
My Stampotique flowers and small bees were stamped in Archival Jet Black on scraps of paper, and then painted (the bees) in Haystack and Smoked Paprika - a bit watered down -, with some extra stickles for the finishing touch !     

  Bee Set Large

I used the following Tando products:-


Please pop on over here for more photos and details, and the list of all supplies. You could also be surprised by the verso of my recycled frame LOL !! Hugs, Coco xxx

Saturday, 27 July 2013

Winged Things - Fly Away Card


Hi Tando fans! Dana here today sharing a card for the "Winged Things" Theme this week. The Tando Mini Range is perfect for small projects! I used a mini bird, one of three different designs in the set, from the Grab Bag of Mini Birds. I had a lot of fun dressing up a Bird Cage with some acrylic paint, flowers and ribbon.


Thanks for stopping by today!

Friday, 26 July 2013

Hope card : Wings

Hello my dear crafty friends! Irit is here again and this time with my Winged project.
This time a small one: my card made with gorgeous Tando Bird and Branch chipboards and it's so fancy and so much fit my stamped title. I used gold and black embossing powders to cover the bare chipboard and to make the colours fit my card.


Here is a set of those delicious birds I used for this project.
See you soon  with more Tando inspiration!

Thursday, 25 July 2013

Winged heart

Hi, Caro is here. Winged things is our theme this week and I'd like to show you my card with a winged heart which I took from the set Valentine Symbols. The winged heart is embossed with various embossing powders and embellished with a little rhinestone.


Wednesday, 24 July 2013

Challenge Day

There is a new post up on our challenge blog - why not pop along and join us - there is still time to enter for this month and it could be you that wins that lovely prize.... hope to see you there 

Tuesday, 23 July 2013

Winged Things - Birds from Balloons

This week  we are all about the winged things, so I made this card:


I took 2 balloons from the ~{Grab Bag of Balloons}~, which is not the Mini's, and cut the ties off, then painted them with Paperartsy Fresco paints, adding highlights and doodles once dry.

The wings are from the ~{Mini Butterflies Pack}~ cut in half and painted. I've stamped the wings and doodled on them.

I've doodled on the card for the beaks and legs and added googly eyes for them, before stamping the greeting.

Don't forget to keep coming back to see what the rest of the team have made.

Kaz xxx

Monday, 22 July 2013

Winged things

is our theme here on the Tando Creative blog for this week..... there are lots of Tando pieces with wings...and not just the wings and hearts pack....I'm looking forward to seeing what our DT come up with and I hope that you'll pop back and join us...

So, its Carol with you today to kick start the week and I've created these:-


I've used an owl from the grab bag and the Andy Skinner burning rubber mask...

then after making that card I decided to make this one:-


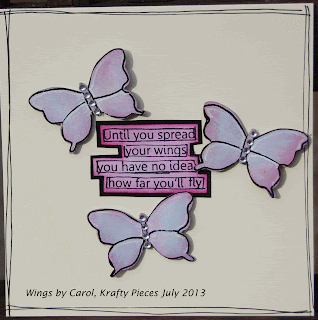
Butterflies this time....

If you'd like more details how I made these cards please pop on over to my blog...

TFL xx

Sunday, 21 July 2013

Free for All - My Book Cover

Hi, Caro is here. Due to computer problems I couldn't post last Sunday so I'd like to show you my book cover today. Here's the chipboard book cover:

Nuts and Bolts
And here's what I made with it - I used Prima Marketing PP, Distress Ink and Distress Stains for it.


Saturday, 20 July 2013

Happy fall: Free for all week

Hello my dear crafty friends and welcome to our Free for all week!
Irit is here again and this time it's a card. (I am not much a card maker, but sometimes I am in this " make a card" mood)
So also it's a mid summer here in Israel, I decided to make a Fall card. Just in case.
Also we don't have a real red and orange fall, but I love the feeling of it and this is my stamped and embellished card. made with this lovely Tando house and heat embossed with EP.
The flowers and the tree are stamped and I added some forgotten brads as my apples and then added Tando delicious and so much loved Book plate  for the title.

Mini houses and Fences

See you again soon!
Happy crafting!

Friday, 19 July 2013

Anything Goes Week - FISHING BOAT "ANNA"

Hi lovely fans ! I illustrate for the first time a "Free for All" week, and that's always a perfect theme as we can do everything that crosses our mind... For me, I fancied painting and decorating a Tando kit that I LOVE,  I find it so inspirful ! It's Layered Rowing Boat with OarsIf you like this small marine kit, please see also the versions created by Di and Karen recently on the Craft Barn's blog, they are totally different but so gorgeous both too !!!   

To do my boat, I started from a Manilla tag Size #8. I used Gesso and a Bingo mask to introduce very light texture at some parts only and I highlighted them with some blue paint sprayed with water. I also used my distress Barn Door in two ways: First I water colored a bit of red ink on my non-stick craft sheet and wiped my tag into it. Second at the last stage I also directly applied the pad in all senses on my tag.  Finally as I was satisfied with the result - it really make me think to ocean and boats ! -, I cut out the shapes of the oars and the background of my boat in it and covered the bottom and the oars by gluing the shaped pieces onto them.   
The top and sides of the boat were painted in Fresco Finish Sky and then in Baltic Blue mixed with a finger of Gloss Glaze. I dried off each layer with a heat tool. At the end I covered my boat with some translucent Inky Pool and added a coat of Gloss Glaze all over it for even more brilliance. But before that, I also stamped horizontally my large background stamp imitation "wood" in Versafine Deep Lagoon and also London bus at the top and outer sides of the boat. I also painted these latter alternately in red and blue before gluing them firmly together.

Here are some close-ups of my small fishing boat, I named it "Anna" and registered it for fun as "GV 3011", with GV standing for "Le Guilvinec". This is a nice small fishing port located in Finistère, Brittany !
I used a single fish stamp with fine details to create a lot of small fishes: red, blue... and even multicolored as you will see at the end ! :) This stamp comes from my new - very useful I find - "Tiny Things" plate by Stamper Anonymous. I stamped my fishes on some water colour paper and used my Distress inks and two Opalite reinkers I had for ages and never used yet to color them... They proved to be really perfect for fishes as they are slightly pearlised ! I all coated with Glossy Accents to do beautiful embellishments. I glued two of them on the top right side.
I also created a small jute bag with a piece of extra-large jute ribbon. I tied it up with small jute rope just stringed inside the big holes. I put some true tiny shellfishes and some remaining multicolored fishes in it for fun. I must confess that this little scene of grounded boat on the sand is not my idea, it has been made by my brother in-law and my twins in their sandbox LOL !!! :)
My small fishes hanged up to a metallic wire are done using the same tiny fish stamp but in shrink plastic this time (white or black). I'm very happy since I did them with my twins, it had been a true game for them! They have loved inking each fish and testing every Brilliance ink color, making a small hole into eye, and finally heating each one with the gun and looking at their incredible shrinking in a few seconds... Shrink plastic embellishments are a great fun with kids ! 
The little heart was done roughly following the lines of the Distress red pad (I used Barn Door). I drew it slowly, then inked it and/or painted it in London Bus and finally covered it first with a layer of Crackle Accents and next with more Glossy Accents for extra texture and brilliance. 
For my life-belt, I played with my embossing powders. I used Gold and Clear UTEE added to Distress powders (Black and Fired Red). With UTEE powders, several layers are needed to get a beautiful result... Patience is needed but it well worth doing it ! At the end I even more highlighted the red colour by inking the edges in red again before briefly heating it all again.    

And here is what I made with my leftovers of paint and fishes on a wooden tag !!!
I also realized 3 small tags just for fun freelyusing the wastes of paints and playing with two beautiful masks by Andy Skinner. I used ~{Owls}~, ~{Burning Rubbers}~ and ~{SunBurst}~Could be useful one day... :)
Et voila ! Sorry for this very looooong post... I'm used to explain my process of creation... but you can always skip some steps if it's too boring !!!  haha


Cogs Grab bag

Hope you like my project today... I had a great fun doing it, this small kit from Tando is so lovely and enjoyable to paint and assemble, I highly recommend it !!!  
Please pop over my blog for even more photos and design notes if you like this project !  Coco xxx

Thursday, 18 July 2013

WALL ART!

Hello lovely bloggers!  If you are a fan of Tando Creative chipboard kits then you are going to love this one :D   Its a large piece of wall art, measuring approx. 15x15inches when done!  It is in 3 sections and has a large tree which you attach and can decorate with the flowers & butterflies that are provided..
 

I have painted the 3 boards in blue and acrylic paints then gesso'd over to tone it down. The tree sections are painted white and the add-ons (butterflies, flowers and the birds)  have been painted in neutral colours.  NOTE:  the Tando birds do not come with the kit.  Using lids & stiff cards I added some more interest by dabbing them in paint and adding them randomly.  This kit has so many possibilities I think.  Would look fantastic turned into a family tree with photographs.
 
Thank you for popping by today, HUGS, Karen xxx

Wednesday, 17 July 2013

artist choice

hi tando fans. thank you for coming by for a visit.  it's roc here today.  it's a free-for-all week and i have had the pleasure of creating this piece for your viewing pleasure.  i used the straight edge arches large.  i painted the outer chipboard rim with ranger's red distress paint and left it to dry.  the inner arch i covered with a package insert left over from a used sheet of rub ons.  i used yellow distress paint to cover over it.  while that was drying i stamped a bird image on a scrap piece of paper and the layered it on black cardstock and some red and white striped paper.  i tied a piece of linen string and secured a feather charm in the knot.  i added an epoxy "b" sticker.
i used the music mask on the red outer edge and sprayed it with dylusions black spray.  next i sprayed dylusions yellow spray over the random circles mask on the inner arch and the used dylusions red spray with the sequin waste mask.
when all the pieces were dry i put covered the back with pattered paper to hold the arch together and then i layered the bird with pop dots to give it a three dimension.
i hope this inpsires to create an arch for yourself.
make sure you come back frequently to see what's new.  we always enjoy your visits.


As its Wednesday today we have a new post over on the Tando Creative Challenge blog - hope to see you there....

Tuesday, 16 July 2013

Tando Printers Tray


Morning everyone, I wanted to share with you a printers tray that I made for my husband for father's day.  It's the 1st printers tray I have ever made and it was great fun. 

 I started by covering the backing sheet of chipboard with some BoBunny Forever Fall papers.  I then went to work on the front tray section covering it in gesso (the printers tray comes in layers which you can build up, so you could make it flatter if you wanted and then use the spare sections to make other things too) - making some thick layers, then drying it with my heat gun so it bubbled a bit.  I then added lots of cosmic shimmer mist over the top, and drying all the layers - it was great fun.  I printed off a couple of photos of my kids, then decorated each of the windows.  I also used a couple of the grab bag butterflies which I covered in paper, then sanded and drew patterns on.


Katherine


Monday, 15 July 2013

Anything Goes Week by Kaz

We're having another free for all week so I'm showing a journal page that has used a few of the fab masks.


I'm experimenting with some pages with a lot of white space lately and this one is A4 size. It started with the remnants of inkpads on a ceramic tile used for watercolouring. I sprayed the tile with water and dabbed the tile randomly onto the paper.
I sprayed through the ~{Code Breaker}~ mask, then turned the mask over and used the spare ink. I dabbed ink through the ~{Sunburst}~ mask, but it seemed too heavy so I wiped some of it away with a baby wipe. I used the stripes from the ~{Usual Suspects}~ mask over the page and one row from the ~{Bubble Flourish}~ mask beneath the circles.
I wrote the quote I found on Pinterest or Facebook - in hindsight I should have stamped it, but there you go! I then finished off with stamps, some more washi tape and a bit of doodling.

Don't forget to come back to the blog this week to see what some of the rest of the team have made that doesn't fit into any of the themes coming up. It's always fun to see what they come up with.

Kaz xxx

Saturday, 13 July 2013

Book Cover Week - Admit One Album


Hi Tando fans! Dana here today sharing my "Admit One" album for the Book Covers theme this week. I started with a Neil Walker Geometric Book Cover Kit.


I added some fun texture to the base of my cover. I started by applying a layer of gesso, and once that was dry, crushed egg shells. If you'd like to try this technique I share my tutorial on a similar project HERE. I colored my cover with Radiant Rain Mist, Twinkling H2Os and Silks Acrylic Glaze.


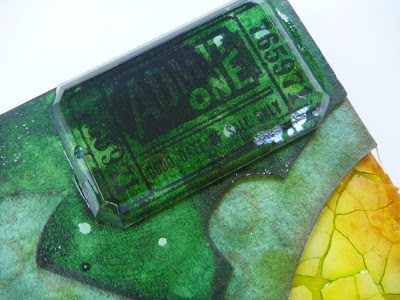
I covered a stamped ticket with a Tim Holtz facet. As this will be my journal, I thought "Admit One" was a nicer way of saying "Keep Out!"


I added a flower and some charms to finish the cover.


I added a mix of watercolor, kraft and cardstock papers to the inside of the album and bound it with a piece of ribbon. The back cover is "naked." I decided to save the other set of geometric pieces for the cover of another album!


Here's Neil's version of the same album. You can find more of his amazing work on his blog Neelz Expressionz.


Thanks for stopping by today!