Friday, 31 March 2017

April Color Theme - Mini Lion Canvas

The page this image was linked to was no longer available. I think I found the original source on Zazzle. No contact information was available for the artist, so I borrowed this image for personal use only.

Hi friends! Dana here today sharing a mini canvas for the Color Theme this week. I found this lion image online by accident while I was helping my daughter with her homework. This beautiful image popped up in a search that was totally unrelated to lions and I'm so glad it did. The geometric image caught my eye and it matches the color palette perfectly.


I cut the image out and glued it to a Square Button from the Buttons Grab Bag that I colored with Tattered Angles Turquoise Blue Glimmer Mist and Plain Jane Baseboard Leaf Mist.


I glued the button onto a 3x3 inch Canvas Corp canvas that I colored with Tattered Angels Fully Purple Glimmer Mist. I hand-dyed a piece of seam binding ribbon with the same colors of mist previously listed and tied it around the edge of the canvas. I finished this piece with a sticker sentiment.

You can find the chipboard I used for this project in the Tando Creative Retail Store. We'd love to see your creativity! Share your work with us in Tando's Creative Zone on Facebook.

Wednesday, 29 March 2017

Colour theme Banner

Hello, its Karen here with another section of my *banner* using this years colour themes.  For this one I have used one of the gorgeously quirky *whimsical houses* .  You get 6 in a pack, complete with rooves and windows!  The colour theme is pretty yet again...


Here is my 4th banner section...


Thank you for visiting, Hugs, Karen x

Sunday, 26 March 2017

April colour week

Hello and welcome to another colour week here at Tando Creative.

Carol with you today sharing this months ATC:-

Firstly, this months colour palette:-


and now for ATC 4/2017


Tando products used:-

Full details on my blog.

Please pop back to see what the other DT members have created.

TFL xx

Saturday, 25 March 2017

Mother's day week: we are not Fragile at all!


Hello my dear crafty friends!
This is Mother's day week here and I decided to make a project not just for all Mothers around, but for all strong women on the earth.
I began with a Fragile word stencil and finished with this " Who said that you are Fragile?" saying.
In between I used Tando stencils, chipboard and a lot of Media DecoArt products.
So here are some close ups to this project:


Tando products used:
DecoArt Media line
Fragile stencil
Mini Mask - Fragile

Stitches stencil
Mini Mask - Stitches

Giovanna- Eighties
Giovanna - Eighties

Grid Round chipboard

Grid - Round


Thursday, 23 March 2017

Mothers Day Week

Morning everyone,

It's Mother's Day all week here at Tando Creative, and I have a simple and quick tag make for those last minute gifts.

Take a Tando tag, add some modelling paste through a stencil and paint in Teal green.


Add metallic lustres in turquoise and rose gold randomly across the tag.


Highlight with Copper Kettle metallic lustre.


Take 3 flowers from the Tando Mini's wildflower set, and give them the same treatment, introducing further colours of metallic lustre, in enchanting emerald and cosmic blue. Layer the colours until you are happy.


Add a computer printed sentiment, given a wash of teal paint, and some turquoise lustre, with copper kettle to the edges.  A ribbon finishes the tag.


I hope this gives you some inspiration, and hope you can join us the rest of the week for more Mother's day makes from our fab team.

Best Wishes,

Nikki K. xx

Materials used:

Tando Tag
Tando Flowers Grab Bag
DecoArt Media Metallic Lustres: Rose Gold, Cosmic Blue, Copper Kettle, Enchanting Emerald,
DecoArt Americana Teal Green.
DecoArt Fleur Medallion stencil (from stash).


Wednesday, 22 March 2017

Mother's Day - Stamped Acrylic Mixed Media Board

Mother's Day Stamped Acrylic Card by Dana Tatar for Tando Creative

Hi friends! Dana here today sharing the stamped Acrylic Mixed Media Board I created for the Mother's Day theme this week. I absolutely love experimenting with different mediums on acrylic. I used the new ColorBox ColoriQue by Lisa Marie Jimenez line from Clearsnap to color the stamped images on this board.

How to Stamp on Acrylic with ColorBox Archival Dye Ink by Dana Tatar

Step 1: Stamp a flower pattern onto the acrylic board using black archival dye ink. Turn the stamp while working to create a more interesting design. Use a heat tool to help dry the ink. Note: I was able to use an unmounted rubber stamp for this project because of the clear acrylic base. I positioned the inked stamp on my work surface and then pressed the acrylic board onto the stamp. I avoided overlapping the stamped images easily because I could see through the board.

How to Paint Acrylic with ColorBox ColoriQue by Dana Tatar

Step 2: Apply several colors of ColoriQue to a craft mat. Use a paintbrush to apply ColoriQue in and around the stamped design. Note: Apply ColoriQue to the BACK of the acrylic board. You don't want to paint over the beautiful stamped design you added in the previous step.

Painted Stamped Acrylic Mixed Media Board by Dana Tatar

Here is what the back of my board looked like after painting, before embellishing. You can mix different shades of ColoriQue together on the craft mat or directly on the board to create a more life-like effect.

How To Dye Seam Binding Ribbon with ColorBox Dye Ink Spray by Dana Tatar

Step 3 (optional): Dye seam binding ribbon with dye ink spray. Insert the ribbon into a plastic bag, spray mist into the bag and scrunch to spread the color. Dry the ribbon with a heat tool. Note: If you have a nice bright piece of ribbon in an accent color that coordinates with your chosen paint palette, skip this step.

Dye Ink Stamped Happy Mother's Day Tag by Dana Tatar

Step 4: Stamp a sentiment onto a tag. Add the ribbon and tag to the board.

Stamped Daisy Mother's Day Acrylic Board with ColoriQue by Dana Tatar

I'm really happy with the way this piece turned out! You can find the acrylic board I used for this project in the Tando Creative Retail Store. If you'd like more information about ColoriQue, please visit Lisa Marie Jimenez Designs. We'd love to see your creativity! Share your work with us in Tando's Creative Zone on Facebook.

Happy Mother's Day Stamped Acrylic Mixed Media Board with ColorBox ColoriQue by Dana Tatar for Tando Creative

Monday, 20 March 2017

Mother's Day

It's Mother's Day in the UK this Sunday so we're celebrating all this week.


I started off by cutting part of the {Grid - Round} to the size I wanted and then soaked it in water for about half hour. After that, I carefully peeled it into 2 pieces. I left it to dry and then sprayed with ink.

Meanwhile, I selected 3 hearts from the {Mini Hearts} and experimented with pouring paint onto them. I mixed blue, white and pink acrylic paints with water to thin them a bit and them poured them all into a cup. Without mixing them, I poured them onto the hearts and kept everything crossed that the hearts didn't buckle  or the paint slide off. Here's a close up once I'd poured them and they'd settled:


They took a day to completely dry and then I gave them a thick coat of {Clear Liquid Glass}  to bring back the shine.

I finished off the card with a die cut panel and a computer generated greeting.

Kaz xxx

Saturday, 18 March 2017

Steampunk tag : Anything goes week


Hello my dear crafty friends and welcome to my Anything goes weekly post.
This time I am going to share a Mixed Media Steampunk tag made with Tando stencil and some bolts from Industrial set and a lot of DecoArt Media products that you can find in the shop.
I made this tag with new for me SinCity artistic stamps and this is a kind of my Steampunk tribute. Yes, I got Steampunk products and Tando has a lot of them and with those products you can do fun Steampunk creations.
So here are some clos up to that tag- I used my old and beloved Tando stencil with DecoArt Texture paste and I made a full tutorial for you  too:


Product list:
Chipboard tag, Stencil, Bolts and cogs- Tando Creative
 White gesso, Texture paste, Media Acrylic paints - DecoArt

Step by step instruction for this tag: 1. Cover the tall thick Tando  chipboard tag with a thin layer of white gesso.

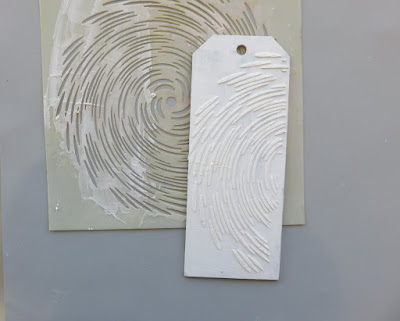
2. Add a thin layer of texture paste over stencil and let it dry.
3. Stamp  with 1923 stamp randomly using pigmented black ink and heat emboss with clear embossing powder.
4. Add some random stamping with Cogs and gear stamp in the same technique as the previous step. Paint with a mix of fluid acrylic paints.
5. Paint the edges with another acrylic paint and move some to the middle of  your tag.
6. Stamp the Hot air Balloon with black pigmented ink. You don't really need a fancy stamping tool  used here, but if you have it it makes your life easier.Heat emboss the stamped image with clear embossing powder.
7. Stamp the title, the vintage clock and the Steampunk definition in the same way and hand cut them both.
8. Hand cut the stamped Hot Air Balloon and color it with pencils. The pencils used here were Inktense, but any markers or pencils will do a job. Glue the colored image over the tag as shown.
9. Add Copper Metallic acrylic paint using baby wipe over the tag.
10. Paint the two other stamped pieces with copper paint and add some Antiquing teal cream. Let it partially dry and then wipe with  baby wipe.
11. Paint the bolt chipboards as shown with a mix of two acrylic paints.Glue the circle on the top of the tag and all 4 bolts over the definition stamped piece.
12.Arrange all stamped pieces over the tag as shown. Add a couple of metal cogs painted in the same way as bolts.Use Glossy Accents to glue all metal pieces. Add the cord on the top of the tag. Add the metal corner.
And now to some close- ups of the finished project:


Tando products used:


Set of 5 Long Tags

Industrial Elements
Andy Skinner Industrial Elements Bolts/Washers sheet

Tornado stencil
A Skinner Stencil - TORNADO

DecoArt Media line