Monday, 5 March 2018

Tando Creative Norwich Art Retreat

This time last week we were finishing out final day at the Tando Creative Art Retreat. Held at the Holiday Inn North, Norwich - our tutors for the weekend were Andy Skinner and Di Oliver.


We had a great time, learning techniques from both tutors, catching up with friends and making new ones too! Below we have shared some photos of the fun filled weekend!


The projects "Captured in Time" by Di and "Captains Log" by Andy featured a variety of techniques with the option to finish the design in your own colourways.


There was also time for lots of laughs, usually instigated by Mr Skinner, and even a conga line!


We hope all of you who attended enjoyed the retreat as much as we enjoyed hosting it and look forward to see you next time!


Faux Wood

Hi it's Brenda here with a project for faux wood week. I have created a faux weathered floorboards effect on card and then added it and some embellishments to one of my large media boards cut by Di.


Floorboards
Paint the card with the base colour of your choice. I mixed some cadmium red hue, sap green and paynes grey to create this rich burgundy colour.
Rub some candle wax in the direction of the boards you will finish with ie for me that's longways. 


Then paint over with titanium white, keep gently swiping the brush in the same direction and slowly some of the paint will be rubbed away by the brush and you can see where you laid down the heavy rubs of wax.


Gently heat and wipe with a dry paper towel (again in the same direction) to remove a little more of the paint.


Repeat the previous two steps using titan buff.


Mix a very small amount of your burgundy or chosen colour again and add some titanium white and a small spritz of water to create a pastel colour. Rub with the candle again and paint your mixed colour over it. You will start to see small patches showing through where the water and candle wax don't mix.

Repeat the drying process. You can see how you are building up the worn and weathered layers of paint. Each new layer exposes some of the individual layers underneath.


To make this look like shabby floorboards I dipped the card first in titanium white and dried it and then in some raw umber to give the top coat that grungy look.


To finish the effect, score lines to create the ‘boards’, distress the lines with a sanding block and rub in a brown distress ink. Adhere to the backing board and distress and ink the edges.


I have painted and altered each one of the embellishments using more of the DecoArt media fluid acrylics. The clock had a layer of dark paint, a layer of weathered wood crackle medium and then I finger painted some white crackle paste that has given me another weathered look.
The heart was painted, covered with clear crackle glaze with titan buff rubbed in when dry and the clock hand was painted with a mix of cadmium red and silver then rubbed in paynes grey and then had ground espresso distress ink blended over the whole piece,


The word label was a left over piece from a workshop. painted, distressed, a word added and sealed with decoupage.


Thanks for popping by to see my faux wooden floorboards.


hugs Brenda xxx

Supplies
This size isn't on the website yet but ask Di if you would like some this size.


Wednesday, 28 February 2018

Colour theme Twinchie #3

Hellooooo!  Its colour theme week again and it's Karen here with another *Twinchie* for you.


This time I have added a section of interlocking chipboard circles.  The insides were removed, painted and popped back in.  Here is the colour swatch I used.....


Thank you for popping by, take care, Karen xxx

Monday, 26 February 2018

March's colours

Hello Carol with you today, what a cold start to the week we are having, will the promise of heavy snow materialise tho? I hope not!!

Today starts the March Colour theme here on the Tando creative blog and its my turn to showcase my piece, here is the colour palette:-


As you will know this year for the colour weeks I am using the Tando Creative media boards - so here is mixed media board 3/18


This month I have used the 80 x 116mm board and sprayed it with water letting it soak into the base, when semi dry I then peeled back layers and rolled the corners…. I also applied this technique to my butterflies (the grab pack of butterflies) this time lifting the top layer off totally…. I left the pieces for several days to ensure that they were completely dry and then I added the purple colour tones to the base and doodled with matching paint, and then painted the butterflies, doodled and added some bling…. 

Do pop back this week for some more colour pieces.

TFL Carol xx

Saturday, 24 February 2018

Rust week

Hi it's Brenda here finishing off the RUST week and haven't we seen some fabulous projects showing how rust effects can be used for different projects?
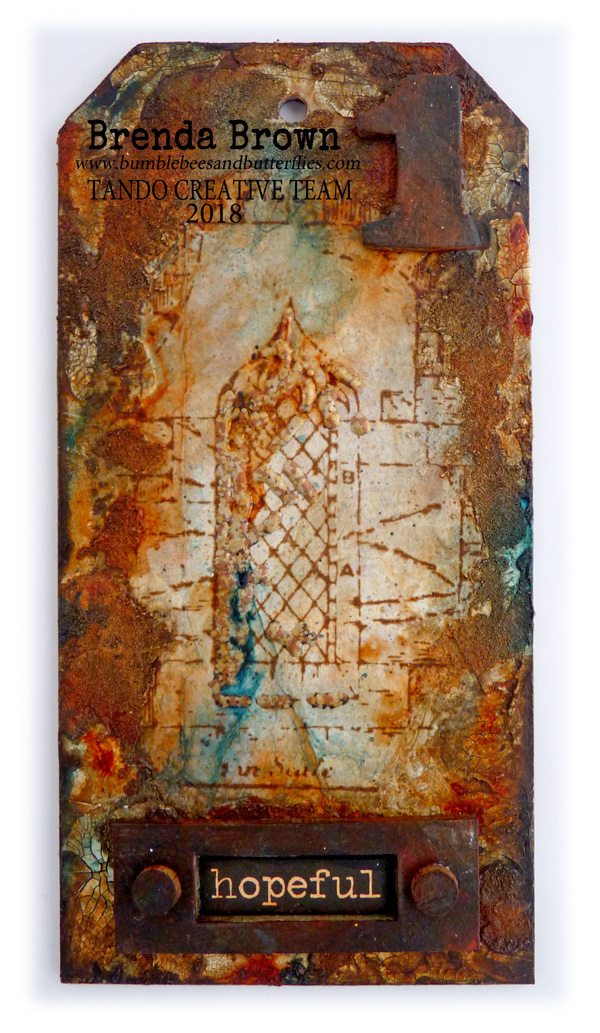
I have used a tag I started at Stitches last weekend and if you take a peek at the end you will see how different it looks rusted up.


I had been demoing layered backgrounds and finished off with some crackle paste and one of Andy's new stamps.


I used a little of the stampendous chunky metallic EP on the arch window and experimented with some sand texture paste between the crackle.


Next came the fun bit with rusting it. I sealed the arch and brickwork with matte medium so I could wipe off any paints I didn't want on this area and then set about dabbing over raw umber, paynes grey and yellow oxide media acrylics. It looks a bit messy .....


.... but with rust in a bottle aka quinacridone gold I started adding washes and spritzes of water and was quite happy when I got to this point.


But there's always a but isn't there? There wasn't enough contrast for me, so I just spent a little time dabbling small amounts of the colours and spritzing with water again. I introduced a little prussian blue hue and I darkened the edges more. I also ran a little of the colours over the window and through the embossing. Then and only then was I feeling even happier. As I say to my students 'beauty is in the detail'.


To finish I raided a drawer where I keep lots of left over 'rusted' elements and chose some simple pieces to pull it all together.


And there it is looking nothing like it did at the beginning.


Thanks for stopping by, I hope you have enjoyed looking at all the team's amazing rusty projects.

hugs Brenda xxx

Friday, 23 February 2018

Rust Week: Vintage Mini Book

Hi all, Hannah here with a rust inspired project!


The cute mini book has been created as a project for the Tando Creative Retreat in Norwich 24th and 25th February. At which I will be teaching this as an evening class.

The book has been aged using several layer techniques, incorporating DecoArt Chalky Finish Paints and Media Fluid Acrylics for the washes. While many of my projects contain rusted elements such as cogs and book plates, I wanted to create something to show rust stains can be used as an effective background too.

To add to the vintage vibe of this piece, I have included lace and old photographs. These give a more feminine feel to the design.

I am looking forward to sharing this workshop and the rusty background techniques!

Hannah x


List of products used;


Thursday, 22 February 2018

Rust

Hi everyone! Dee here with my rust post for this weeks challenge. Those of you who know my work will know this is one of my favourite effects to recreate. This time though I used Pentart rust effect powder and regents and I must say I am pretty happy with the results. I also made my home made tissue paper with Stamparama stamps and used that on tag 2 and 3.


Rust!


Tag 1
Firstly I painted the tag with Relic chalk paint next I used iron paste mixed with a few art stones at the base of a size 7 tag that had been cut and gouged with a craft knife. Next I used the iron powder over this and followed with the reagents liquids.


 I used a small amount of mica fragments to enhance the rust. Once developed I then used weather wood over the top part of the tag, once dry I then followed with Everlasting chalk paint and waited for it to crack. Using a small heart out of Tando's new heart collection I put dimensional paste on it then painted it and blinged it up with Treasure gold. Finally Hannah Oxberry's rusty wire wound in a circle around the heart.


Tag 2
The same as tag 1 but a sprinkling of sand glitter in the wet paint and a compass and another design of my handmade tissue paper.


Tag 3
Covered entirely with hand made tissue paper adhered to the tag with Matt medium if you look closely you can see flashed of gold and splashes of Raw Umber and Prussian Blue Hue.


I hope you all enjoyed my post thank you for taking the time to look through please feel free to leave a comment. A list of all the products used are below.


PRODUCTS USED
Tando Creative :- Hearts Mega Pack small distressed heart, Andy Skinners Tagtastic tag used as a template, Tags size 7,8,9.
Deco Art:-  Chalk finish paints Relic, and EverlastingWeather woodmatt medium, Raw umber and prussian blue hue fluid acrylics.
Stampendous:- Mica fragments bronze.
Hannah Oxberry:- Rusty wire 


From my stash:- Handmade tissue paper (can use shop bought i just like using my own).  Pentart iron paste and rusting kit. Treasure gold.