Tuesday, 26 September 2023

Halloween B and H Collection ATC Matchbox - by Kim

 You'll have plenty of time to get this done for Halloween!

Construction:

First, build your ATC matchbox and drawer (see previous posts for construction if necessary). 

We need to make a space for our skeleton, a hidden layer! For this I used leftover greyboard, about 85x105mm, and some coffee stirrers. 
I cut a coffin shaped hole in the main board and built up the edges with coffee stirrers, I used clothes pegs to hold it all in place until the glue had set. 

Paint everything black. When dry paint the skeleton onto the box top so that it will appear to be laying in the coffin. I used some pumpkins from the Minis - Mixed Halloween set to add extra scariness. After painting I glued them so they appear to be coming out of the coffin.

When it's done, glue the coffin layer on the box top so that the skeleton is revealed behind the pumpkins.

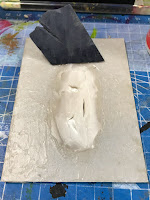
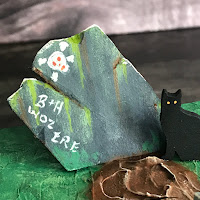
Next, I needed the graveyard scene to go on top. I used another piece of leftover greyboard for the ground, same size as the coffin layer, and a smaller piece for the gravestone. The 'freshly dug' mound is made of texture paste - this will take quite a while to cure properly as it is a thick layer. The spade is a piece if bamboo stick from one of those room smelly jars with a piece of greyboard for the blade. As the texture paste dried a crack appeared just the right size for the spade, but otherwise use a craft knife to cut a slot. The cat was leftover from a Casa Bonita project.

I used ribbon as a hinge for the graveyard scene.


Painting:

I used Forest Green and Foliage Green for the grass, the mound is Burnt Umber with a light beige dry brushed on to the raised detail. The gravestone was painted Zinc grey with random streaks of black, Green Gold and Quinacridone Gold Fluid acrylics, and light beige. The inscriptions are in light beige. 
The cat is black with Tangerine eyes,

Underneath, the coffin layer is Burnt Umber, Forest Green edging, and black surround to the hole - all drybrushed on to blend with each other.

The bat dangles from a piece of narrow ribbon and 'appears' from the coffin when the grave is opened. It is from the Minis - Mixed Halloween set.

The matchbox is black inside and out.

ATC cards and coins:


I just had to make the cards in to mini gravestones. Trim the top to a suitable shape, base coat in Zinc grey, add an inscription in light beige, then add colours as per the gravestone on the lid.

The coins are decorated to look like pumpkins. Basecoat in Burnt Orange, add dark stripes with Burnt Umber - use this colour to round-off the bottom of the segments to give it a pumpkin shape. Drybrush Burnt Umber as shadow around the bottom. Use light beige to add highlights to the tops. Finish with a green stalk.

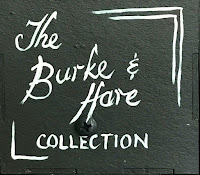
Add a suitable title for your collection of ATCs and ...

... that's it.

If you don't have large enough pieces of greyboard hanging around for the coffin and graveyard, heavy cardboard or art board will work. Paint colours are not too important, any greens, browns, beige, and orange will do.

I hope you enjoy putting this spooky project together for Halloween - post yours on the Tando Creative Zone on Facebook!

(Why Burke and Hare? - Link to their Wikipedia page)

Products:

ATC Matchbox with cards and coins
Tando Minis - Mixed Halloween
150g Greyboard Offcuts - useful for projects
Coffee stirrers or similar

DecoArt Americana Paints
I used Lamp Black, Forest Green, Foliage Green, Burnt Umber, Burnt Orange, Oyster Beige.
Green Gold and Quinacridone Gold are DecoArt Media Fluid Acrylics.

Tuesday, 19 September 2023

Art Angels Bauhaus box


These fun little boxes can be used in so many different ways and can be used to store a multitude of things if you want to swap or gift your ATC coins and cards
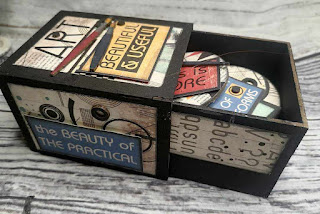
I have decorated this one quiet simply with Samperia Bauhaus papers as it is just so bright and colourful and suits these matchboxes to a tee
The whole Bauhaus movement embraced the idea of form following function, that is to say where fine art becomes functional and practical and that is just what these little match boxes are.
Decorate them  to your hearts content and they will still serve a  purpose that is, to store your mini pieces of  artwork


Treat each surface of your box sleeve and drawer  as a  blank canvas for your artwork, I have decorated each side with elements from the Bauhaus scrapbooking pad, layering up sentiments and focal images for a pleasing aesthetic and placed them onto a black gesso base.
I have glued my pieces in place with a matte finish pva that dries clear and top coated the  surface for added protection. The papers where cut to size and edges sanded for a  more  professional finish, I also inked around all the edges or the sanded paper to cover the white exposed core.


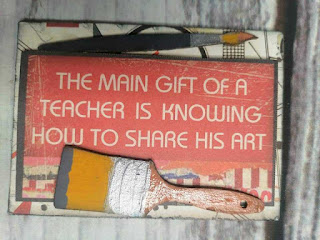
I coloured paintbrush elements from the Tando Mini calligraphy tags which can be found  here and adhered them to my pieces using gel medium,  along with elements taken from the steampunk parts.grey board kit. I used glossy  accents clear varnish to make the  paintbrushes  shiny


the brushes  work perfectly with one of the character elements from the paper pad


what an apt sentiment for all the pieces we share with you on this blog, we share all our pieces with you so that you can recreate your own


the mini  tag elements are so  useful and  perfectly sized for these mini projects, they finish off  atcs so well and  just like the cards and  coins themselves they take all sorts of  mediums and stand up well to a lot of moisture without distorting


i edged all my coins with black ink to frame them, this really  does make your colours pop


beautiful and useful


so  easy to decorate and even in its  simplest form,  just using papers and ink it is  so effective


use 3d  glue gel or foam pads to really build  dimension,  there is  more than  enough room in these deep matchboxes to store even the most textured cards


hope you have liked this  project and it has inspired you to get your papers out and have a play


Tuesday, 5 September 2023

Japanese Beauty ATC matchbox


Hi all, Art Angel here with a  decorated Atc Matchbox

These Matchboxes are so easy to put together and are just brilliant to decorate, you have so many options as the grey board is very robust and will take all sorts of mediums. 

As an added bonus you get both Artist Trading Coins to decorate as well as the cards, and  because of the depth of the  matchbox you can add as much texture and dimension as you want as it will all conveniently store inside.

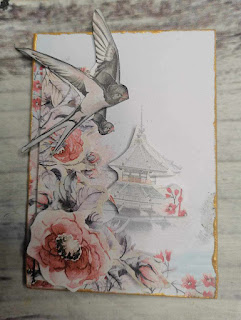
For this set I have used papers from the 8" x 8" ScrapBoys Japanese Beauty pad


this is the set in its entirety, whilst photo heavy I will include individual close ups of  each card and coin so that you can recreate the look if you wish


I have  strategically cut my papers to  cover the base of  each card, for some I have used a  floral backing paper from the pad with a fussy cut focal point layered over,  for others like this one I have cut the paper so that the focal image is intact and placed off centre with fussy cut smaller elements over the  top
The Scrapboys papers are  perfect for  decoupaging elements as you get several copies of the same  design rather than each page being different


When  fussy cutting images to decoupage I use multiple layers where I can  to provide  extra depth and shape each piece where I can to give a fuller  more natural 3d effect, I also like to have the raised pieces extend beyond the circumference of the card to break up straight edges and lines and  to bring about a sense of movement


I use  3d glue gel and  foam pads to create dimension and added a raised sentiment on a couple of the  cards, you  could easily personalise these if you are intending to gift them


the base papers have  been adhered to each of the  cards with a  matte pva that dries clear, I like to  coat the  top  layers of  my cards in matte varnish  as well to add a  layer of protection


I have four each of the cards and coins decorated to go into the matchbox, the complete set contains  five of  each. I have used the final card slightly more heavily decorated and used  as a topper to decorate the  top of my box.
Each side and all outer surfaces of the drawer have been  covered in floral background paper while the inside of the drawer has been painted in a c ordinating matte paint, as has the inside of the matchbox sleeve that the drawer slides into


I have decorated all  four coins in the same theme,  two on a dark background, two on  a lighter base paper, just to provide a bit of  continuity


 fussy cut elements on the coin  have been  taken from the matching 6 x 6" pad  as the images  were more aesthetically pleasing on this size of circle


again building up layer  to provide depth

I wanted  all of the design to have a cohesive feel so to bring everything together all  edges of all coins, cards, drawer and sleee  have been edged in decoart metallic gold paint, this frames each mini piece of  art  perfectly


again ,I used just four of the five coins to go inside the drawer and used the final one  as a  drawer pull on the front of the drawer panel

the completed set would make a lovely gift for someone  special, or  keep it  for yourself and use the  backs of all  coins and cards a  journaling space.

hope you enjoyed this little project and will have a go at decorating your own x x


Tuesday, 29 August 2023

NICKY'S MATCHBOX AND ATC

 MATCHBOX AND ATC'S BY NICKY ROUSSOU

Hello lovely people and welcome to my blog today. I'm going to share with you a fabulous product by Tando-Creative. I absolutely love these!! These Matchboxes great to work with, so many possibilities for designs. 


So for my project for Tando-Creative I have decided on this quite rustic rusty theme. I do like the dark rustic feel in my makes. 


I began with assembling my matchbox outer shell and then the inside box. Once assembled I gave the entire piece a coat of black gesso to give it a good seal to work on. 

I then used Stamperior Clear Crackle Paste with one on Tim Holtz stencils to create a rough rustic texture on the outsides of the box. I did the same for the draw fronts as that is the bit you will see once done. 

I do find that if you leave the crackle to dry naturally you will get a nicer crackle but I do sometimes give it a helping hand with a blast from a heat gun to speed things up a little.


Once ready to be painted, I picked 3 main colours to work with to achieve my rusty, aged look.

A yellow iron oxide, a brown and a teal. This time I decided to go with a Metallic Teal colour for a bit of shimmer. 

I start out with either the Team or Yellow generally first as the brown can cover if I think I've added too much of the lighter colours.

I randomly add sporadic coverage to the piece, no set patterns, just here and there over the crackle and around the box until I feel happy with it. 

Once I'm done with these two colours, I then start to fill in any gaps with the Brown I have chosen.

Then give the entire thing a good coat of ModgePodge to seal it. 

Once all dry I then used a mixture of Brown Oil Paint and some white spirts mixed to cover the piece to give a real aged look to it. Apply and then use a baby wipe to rub off the excess. leaving such a fabulous effect.

I then repeat this process for the ATC Cards and Circles to give a matching effect. On the back of some of the cards and tags i used some of Tando's substrates to add tot he texture and design. 


I then delicately edged some of the project with some gold gilding wax to bring out some beautiful highlights.

I finished this off by adding 2 butterflies I had in my stash. The colour of these was absolutely perfect to compliment the Matchbox's colour and feel. they suit it perfectly! 

PRODUCTS USED:

TANDO-CREATIVE LARGE MATCHBOX

TANDO-CRATIVE SUBSTRATES

STAMPERIOR CLEAR CRACKLE PASTE

TIM HOLTS STENCIL FROM MY STASH

DECOART YELLOW IRON OXIDE

DECOART BURNT SIENNA

COSMIC SHIMMER TEAL

COSMIC SHIMMER


Tuesday, 15 August 2023

Tando ATC matchbox - Arachnophobia by Kim


 Today we are using the Tando ATC Matchbox and Cards and Coins set. 

First, put your ATC box together and paint all surfaces. I used DecoArt Lamp Black on the matchbox, and DecoArt Black Gesso on the cards.

I wanted to create a spooky feel to this project and there are always spiders lurking in the woods. On the main surface of the matchbox I created a misty woods scene. I started by dry-brushing the mysterious distant light with DecoArt Indian Turquoise. 

To dry-brush you need a fairly firm bristle flat brush. Dip the brush in the paint and make sure the bristles are loaded, then wipe the brush on a paper towel until nearly all the paint has been removed - you really do need it to be dry! Lightly draw the brush across the surface so that the barest minimum of paint is left on the surface. It is better to apply more light coats than a single heavy application. Practice on a spare piece of greyboard if necessary.

The distant glow was created by choosing a centre point for the glow and dry brushing outwards from it so that I got 'rays' radiating. These rays got fainter the farther out they travelled. 


Next, I added some creepy, distant trees and bushes by dry-brushing the shapes lightly with Lamp Black over the turquoise. Then a little more turquoise 'rays' to push the trees back into the woods. 

Paint foreground trees with Lamp Black, with a few additional 'rays' in Whispering Turquoise. Finish with a small white dot in the centre of the light source.

To frame the picture I used one of Fiona's small ornate frames, chopped to make two 'L' shapes (sorry Fiona!) and painted gold.

I repeated the spooky turquoise rays on either side, but without the woods.

I used the small hanging web spider from the Grab bag of Spiders set for the main surface. It was painted Lamp Black with small white highlights and Zinc grey detail. One one side I used the large round spider, but had to trim the legs at the edge of the box. On the last side I used the small creeping spider.


I used white and creepy lettering to add text to the sides. I snuck the small round spider in the bottom of the drawer just for fun.

The ATC cards were painted with black gesso and, when dry, a very watery mix of Zinc was layered over the top giving a creepy look. I found some fear-relevant quotes and hand lettered the cards.


(Image inspired by the work of Jane Font (Painting with Jane)

Products:

Tando ATC Matchbox set: ATCMTCHBOX
Fiona's Ornate Frames set, small: FRORNTFRMMEDSML
Tando Grab bag of Spiders: GRBBGSPDERS
DecoArt Americana colours:
    Lamp Black
    Indian Turquoise
    Whispering Turquoise
    Zinc
    Titanium White
    Venetian Gold
    Black Gesso